
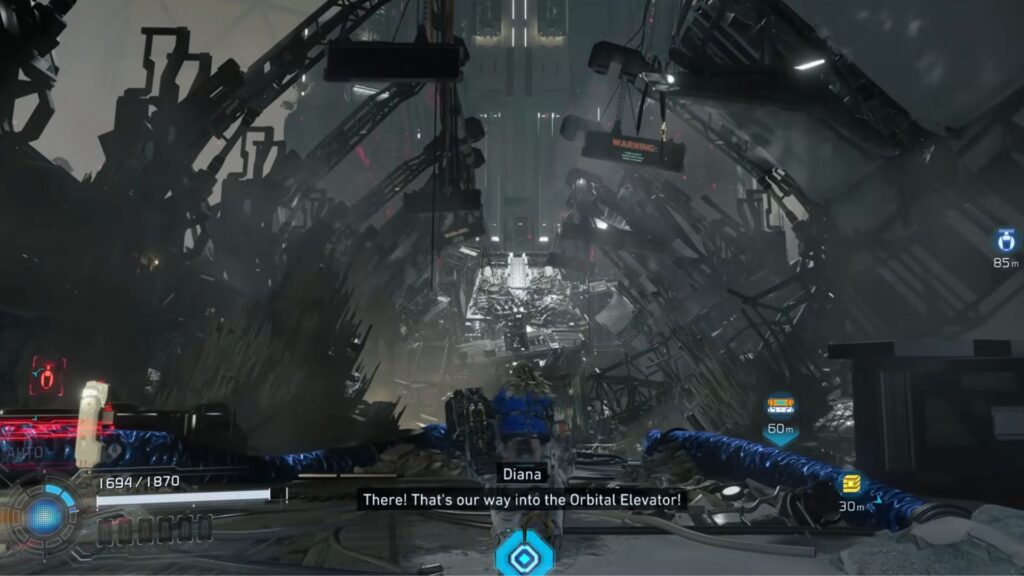
Central Port is the sixth Sector in Pragmata. Hugh and Diana push through a massive cargo and research facility on their way to the Orbital Elevator, where Eight is waiting. The area is split into four sections: Port Entrance, Research Sector, Regolith Lab, Lunafilament Lab, and the Orbital Elevator itself.
Pragmata Sector 06: Central Port Walkthrough
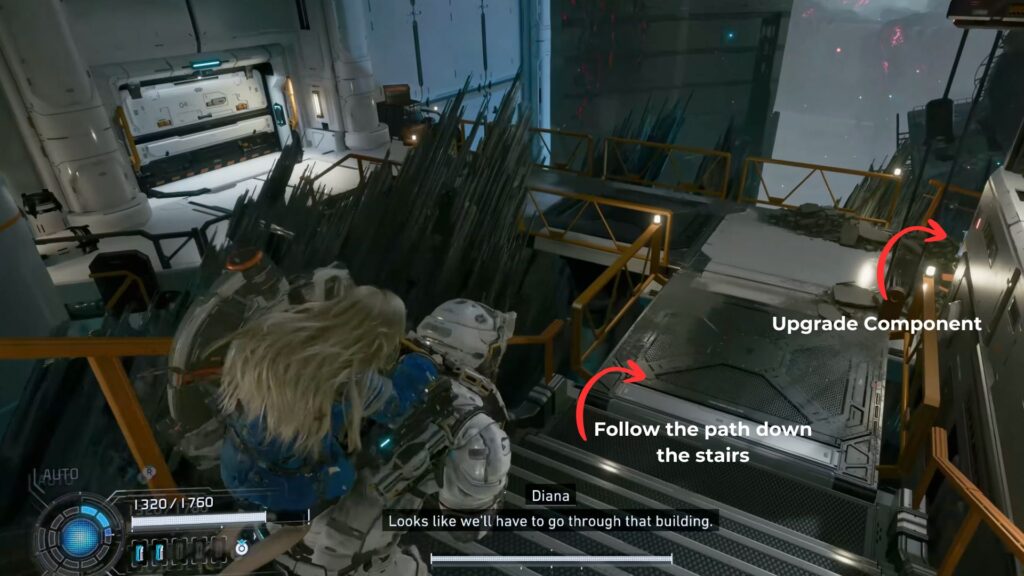
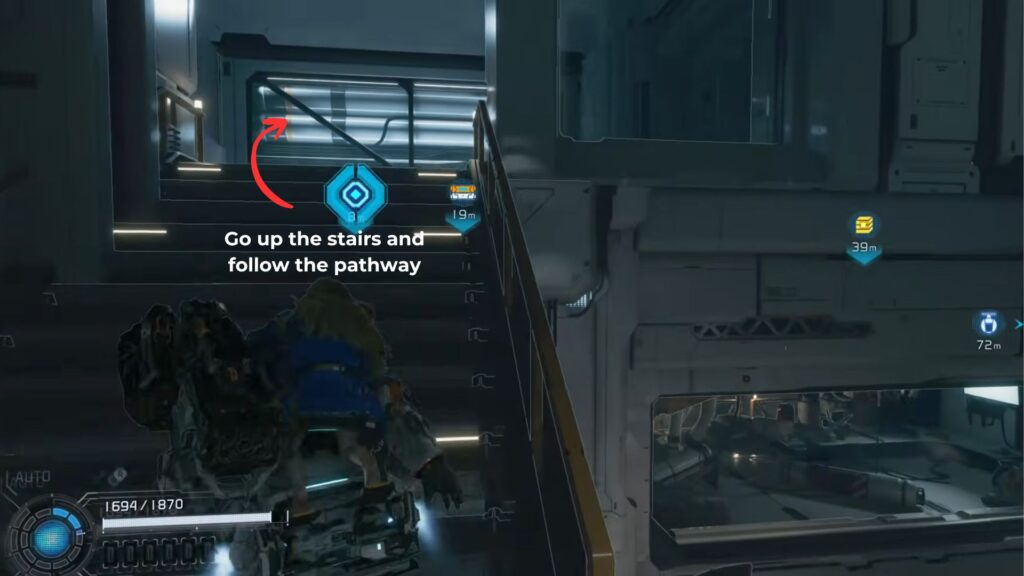
Port Entrance
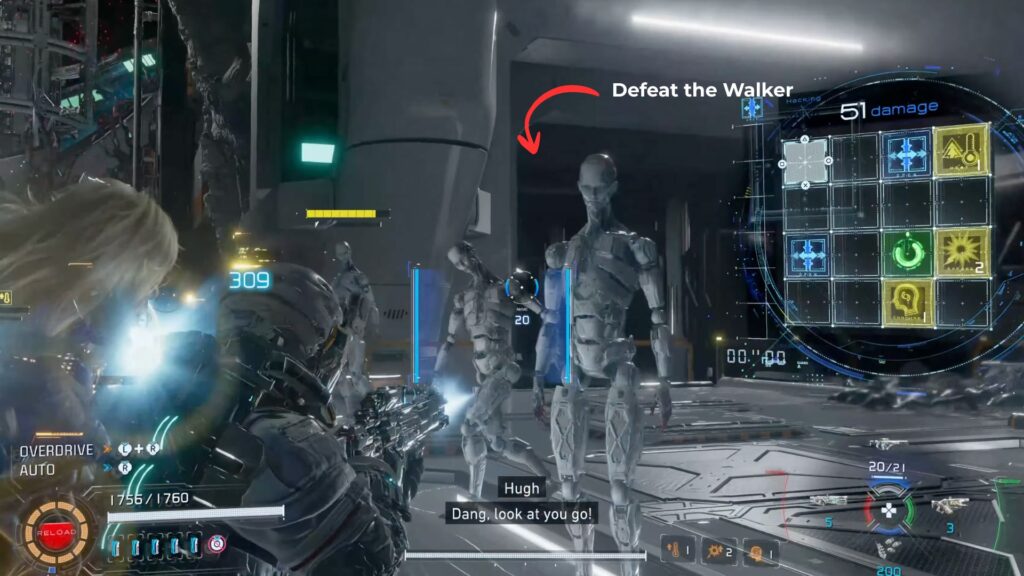
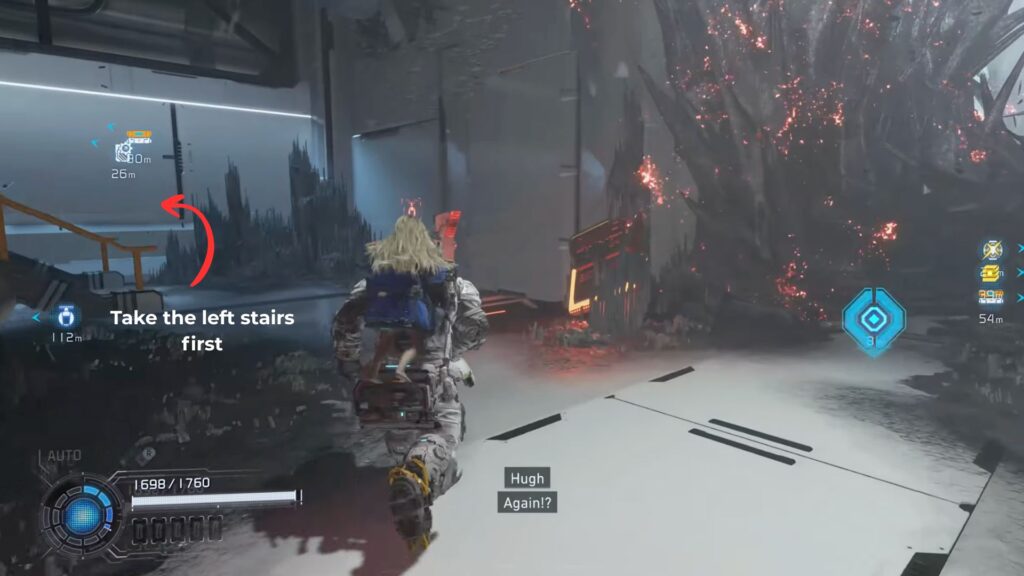
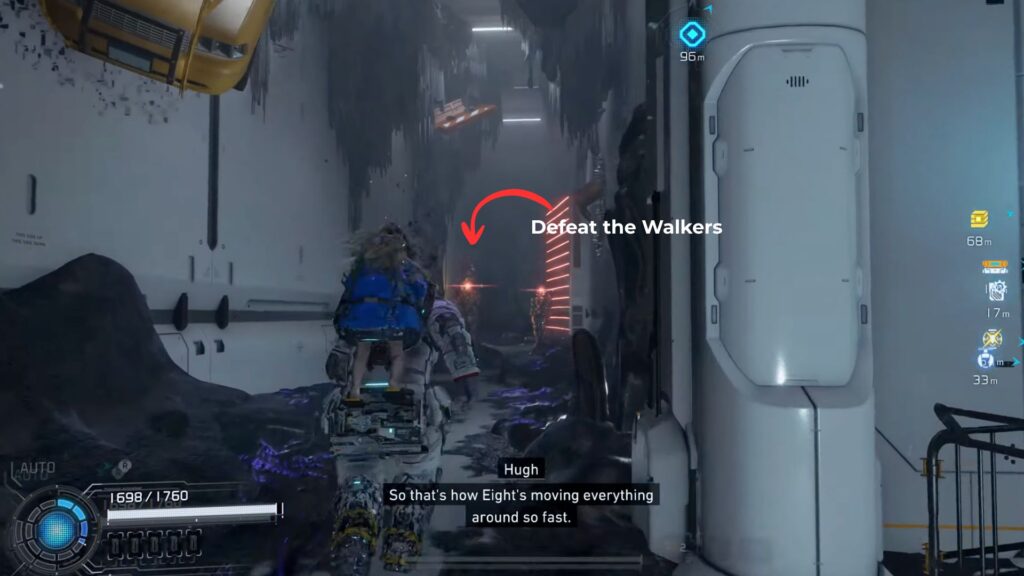
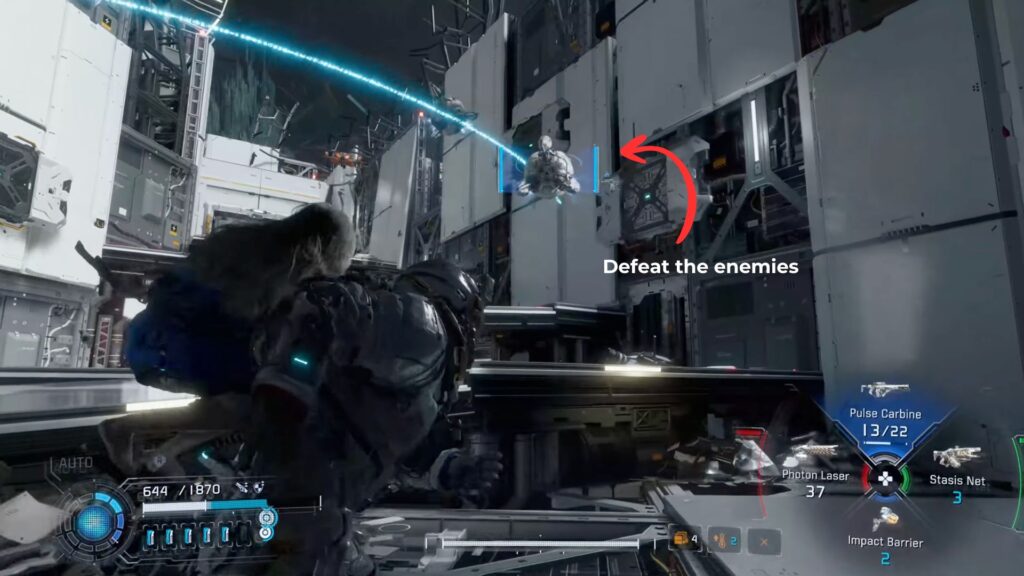
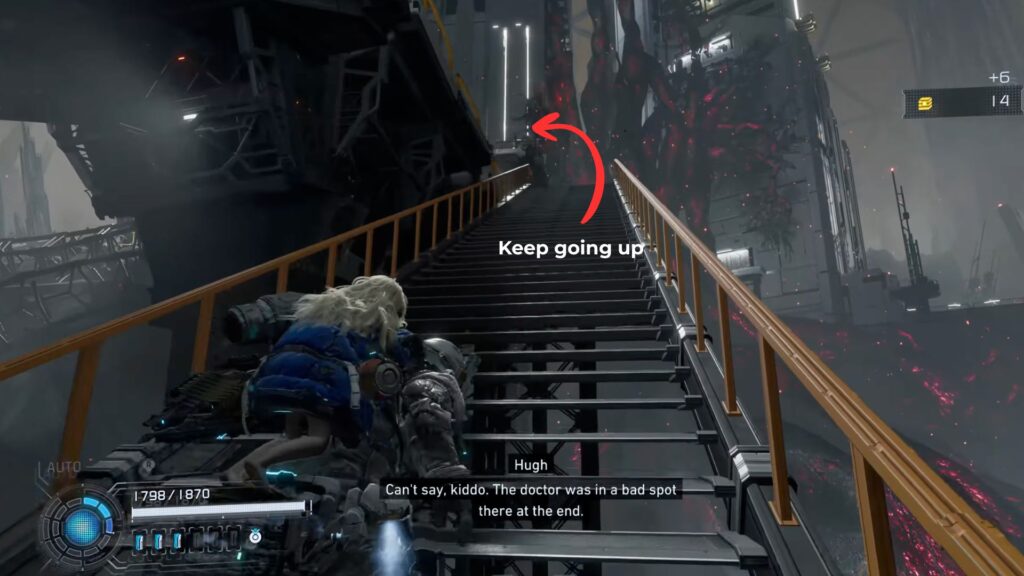
Step off the tram and follow the path forward. Clear the first batch of red crystals blocking the way, then keep going until you hit a second set. Before you can deal with these, four Walkers drop in. Take them out first.
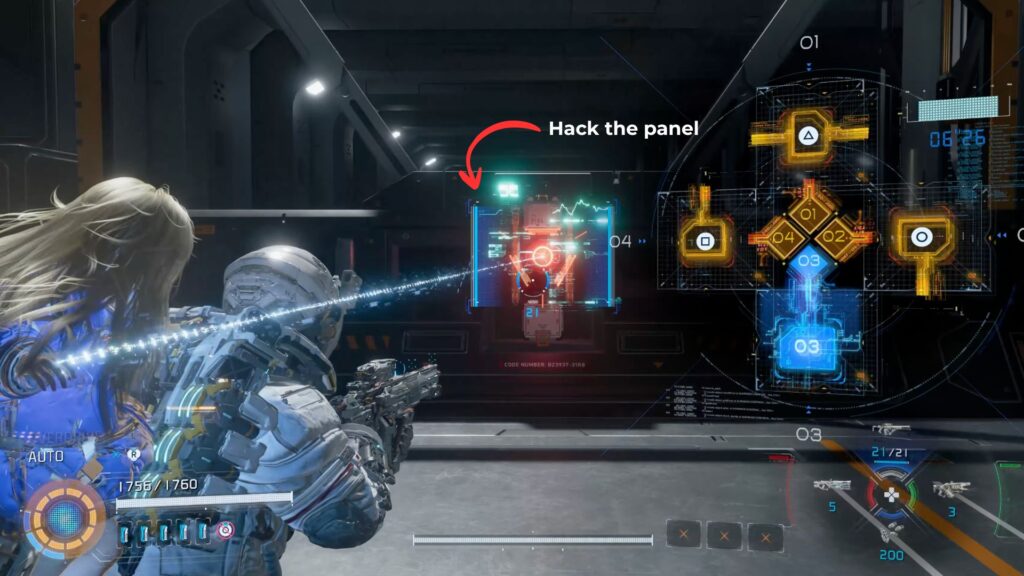
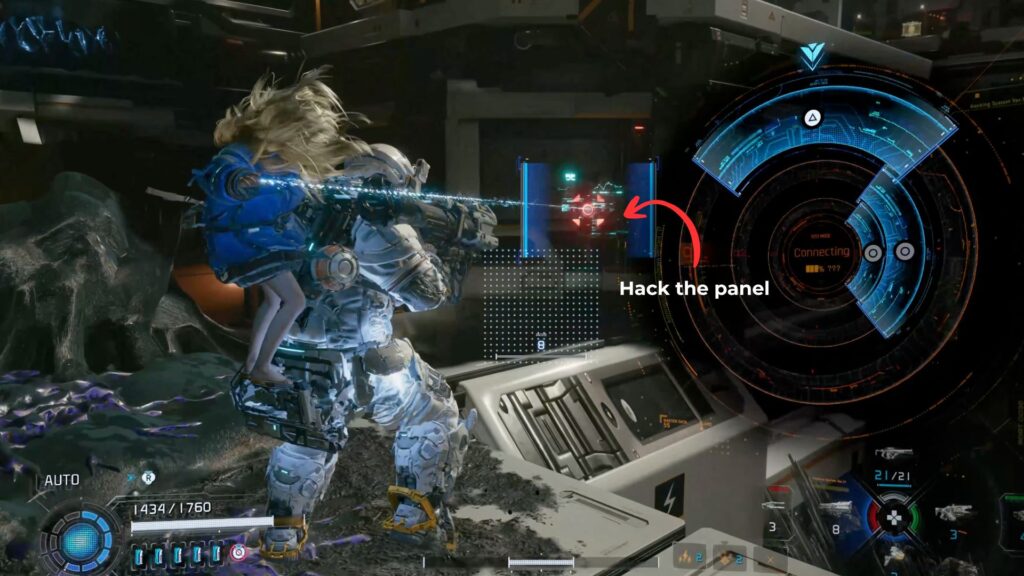
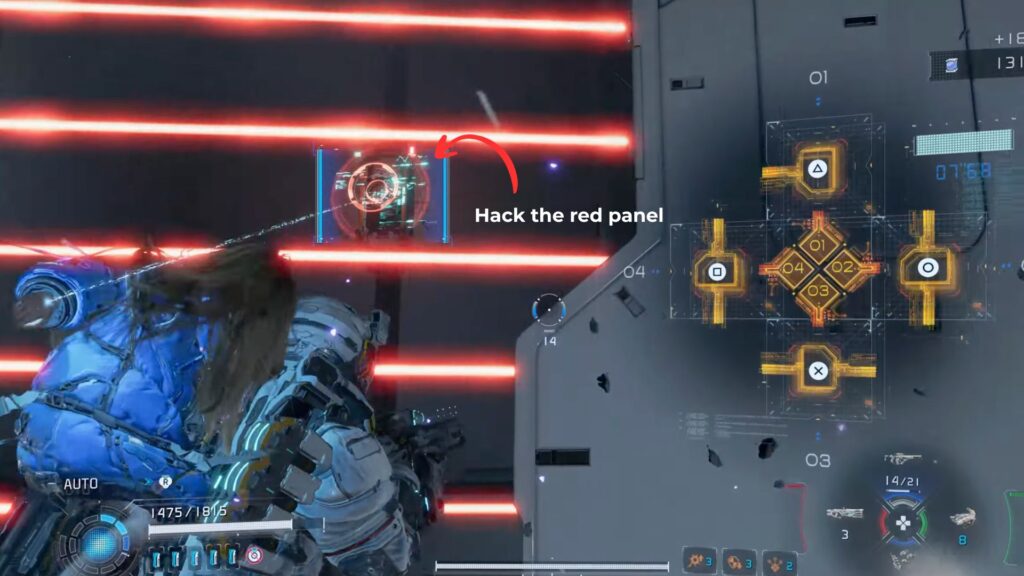
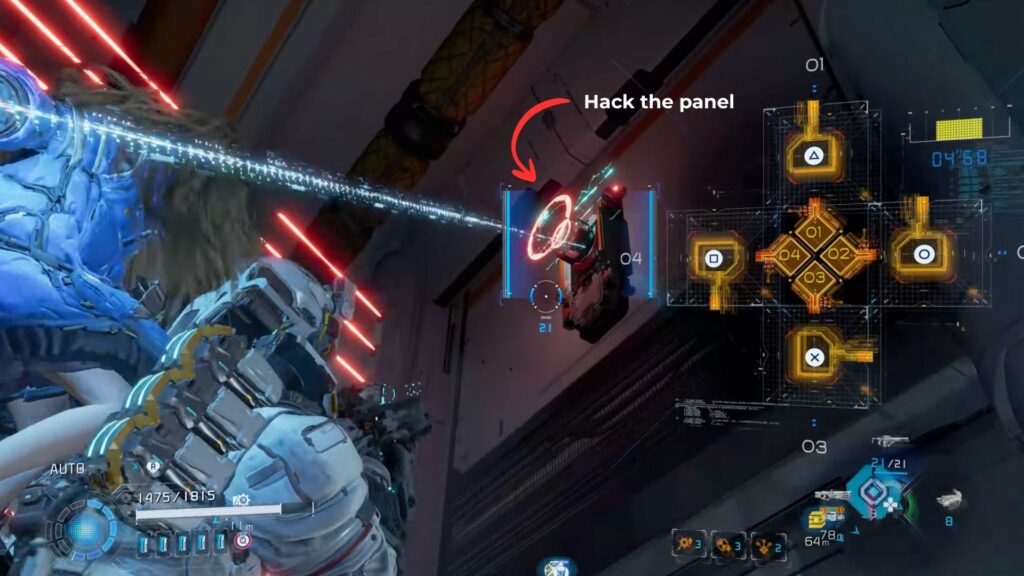
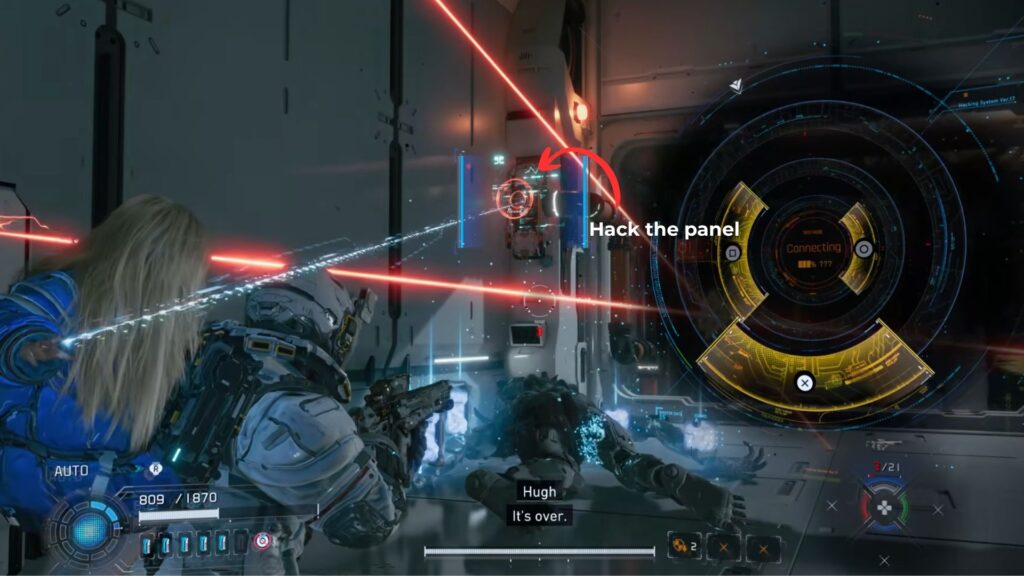
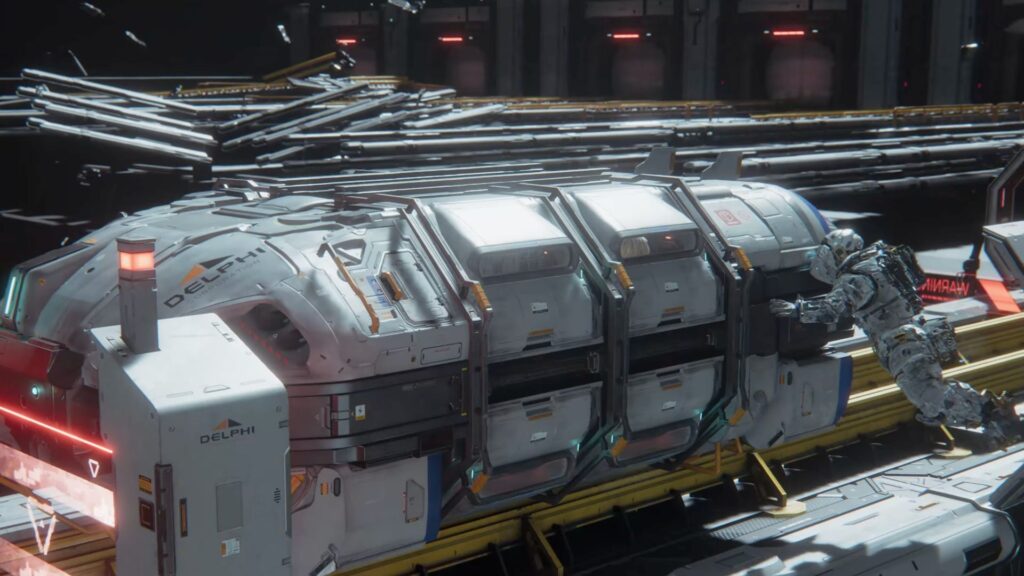
The second crystal cluster is blocking a freighter. Board it and hack red panel at the front to get it moving.

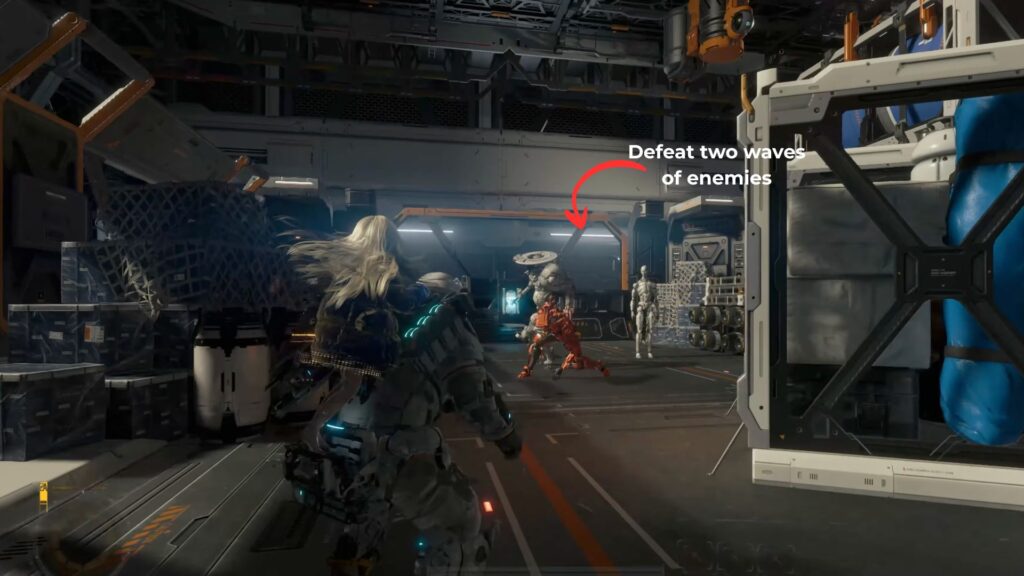
You will need to deal with two waves of enemies during the ride before you reach the next platform:
| Wave | Enemies |
|---|---|
| Wave 1 | Lancer x1, Walker MK-II x1, Walker x1 |
| Wave 2 | Bomber x1, Crusher x1, Spiderbot x1 |

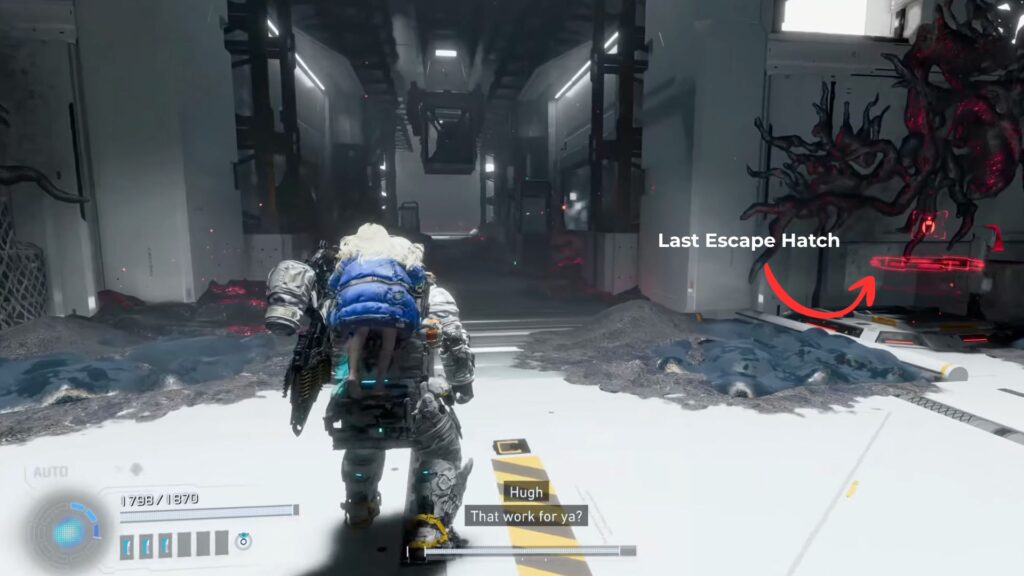
Once the freighter docks, hop off and check the blue screen nearby for Guidance: Notice for Earth Cargo and Returnees. There is also an Escape Hatch here.
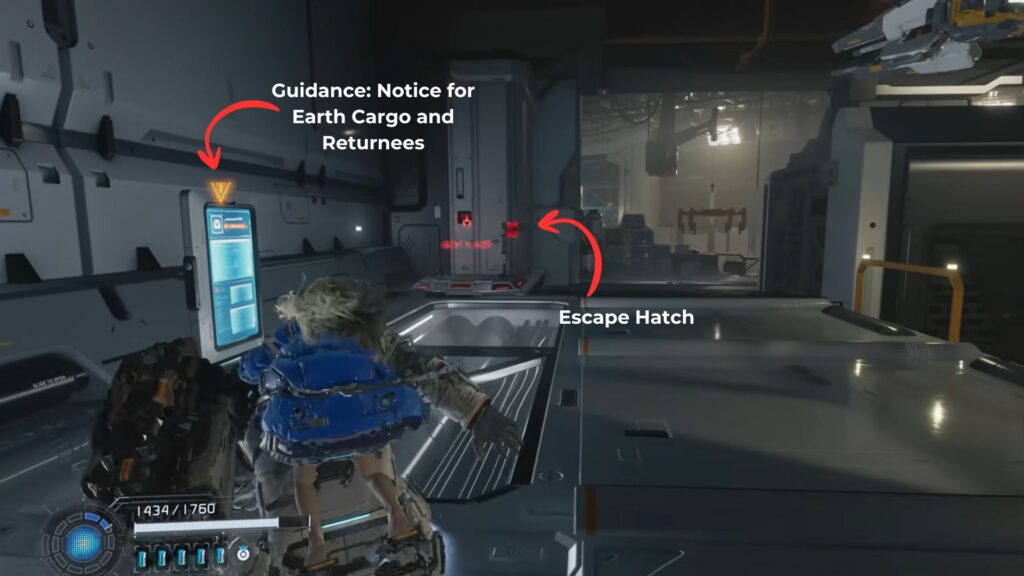
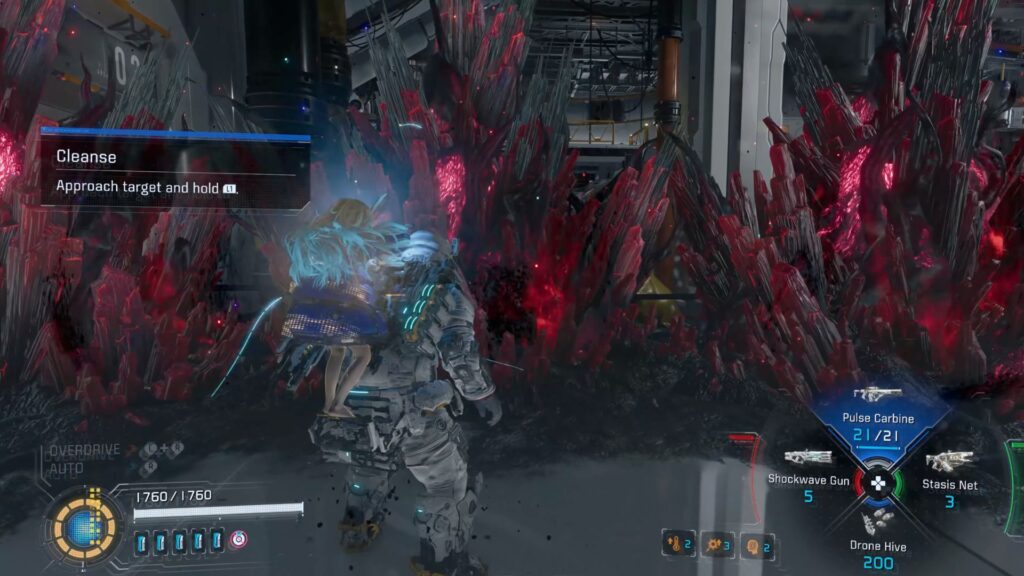
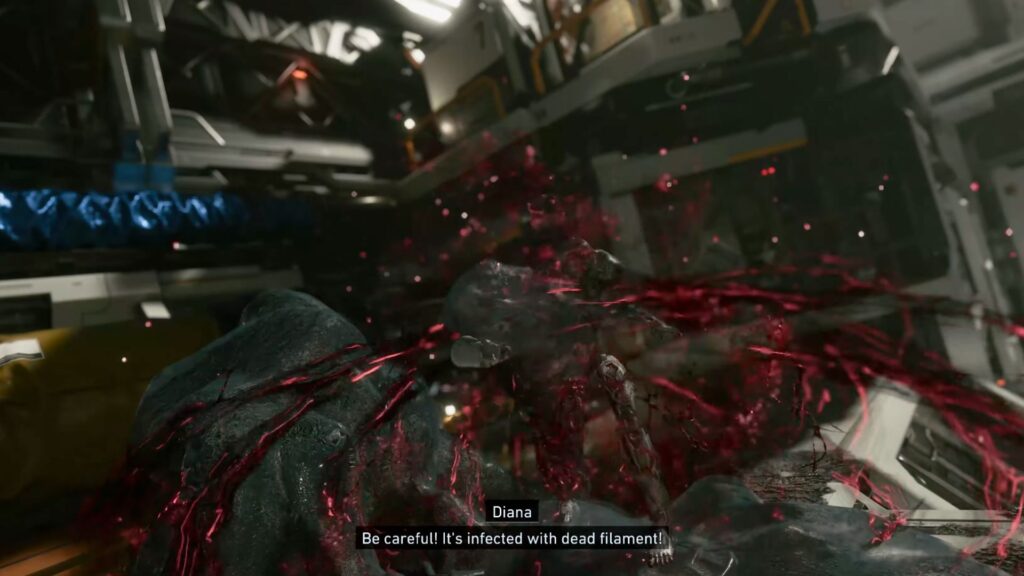
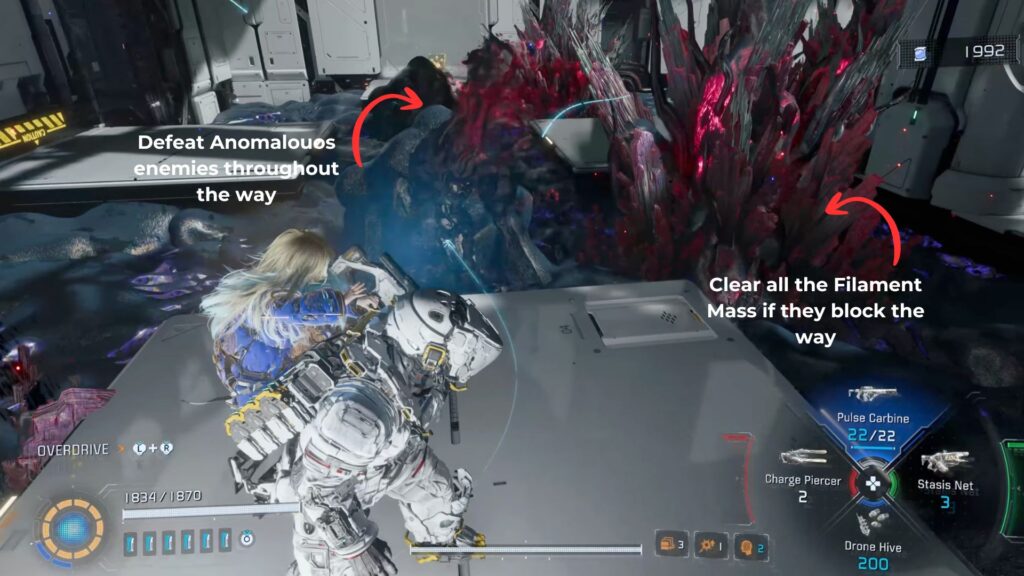
Head down the stairs by the Escape Hatch. At the bottom, a scene plays showing a Walker infected by Dead Filament and turning into an Anomalous Walker. You will be seeing a lot of this throughout Central Port. Anomalous enemies hit hard, but you can use Cleanse to strip the corruption off them and turn them back into their standard forms, which are much easier to handle.
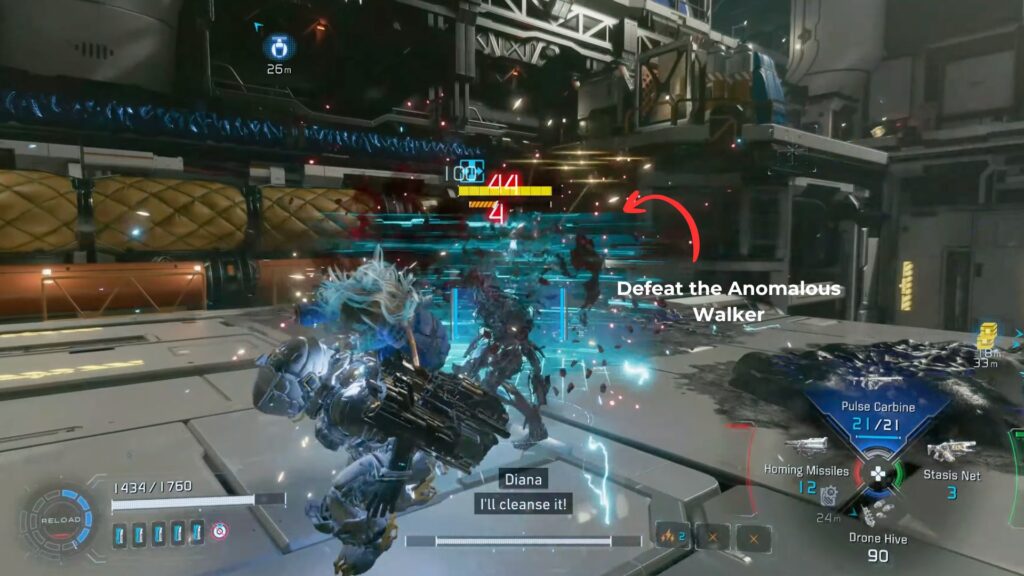
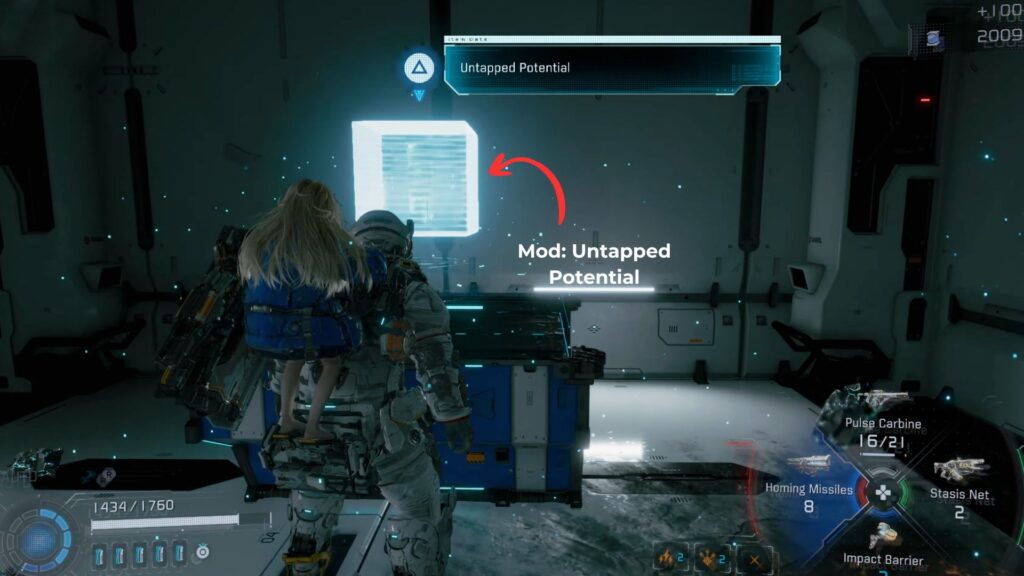
After putting down the first Anomalous Walker, two more show up. Clear them all out. Once the area is clear, look for a door at the base of the stairs. A Creeper is hiding inside, along with a chest holding Mod: Untapped Potential.
Cargo Area
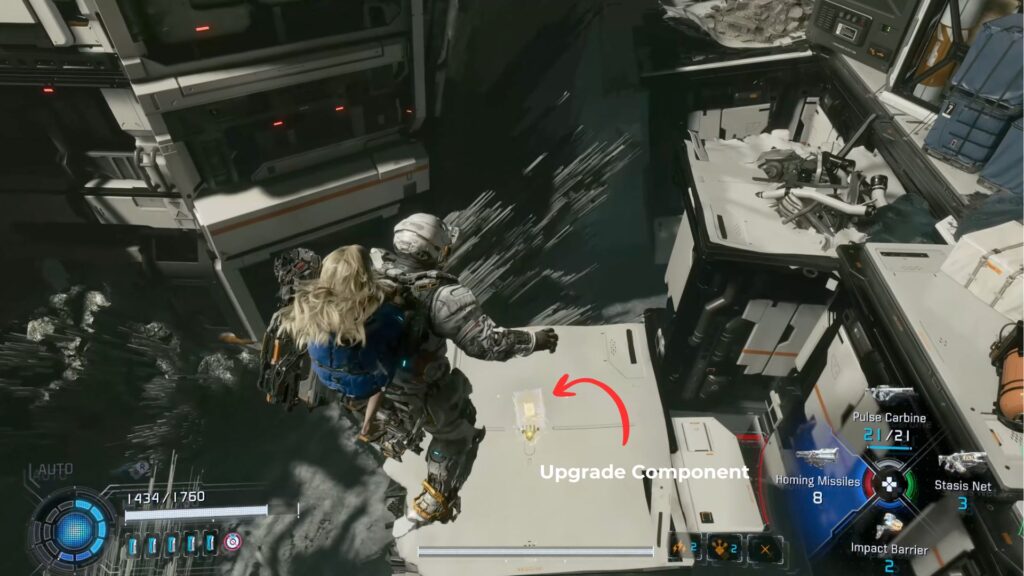
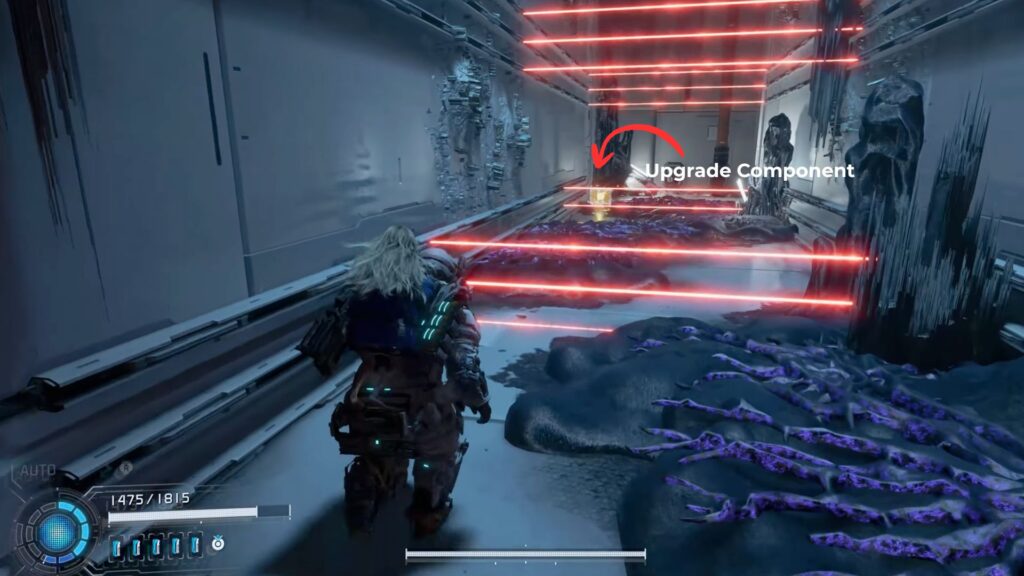
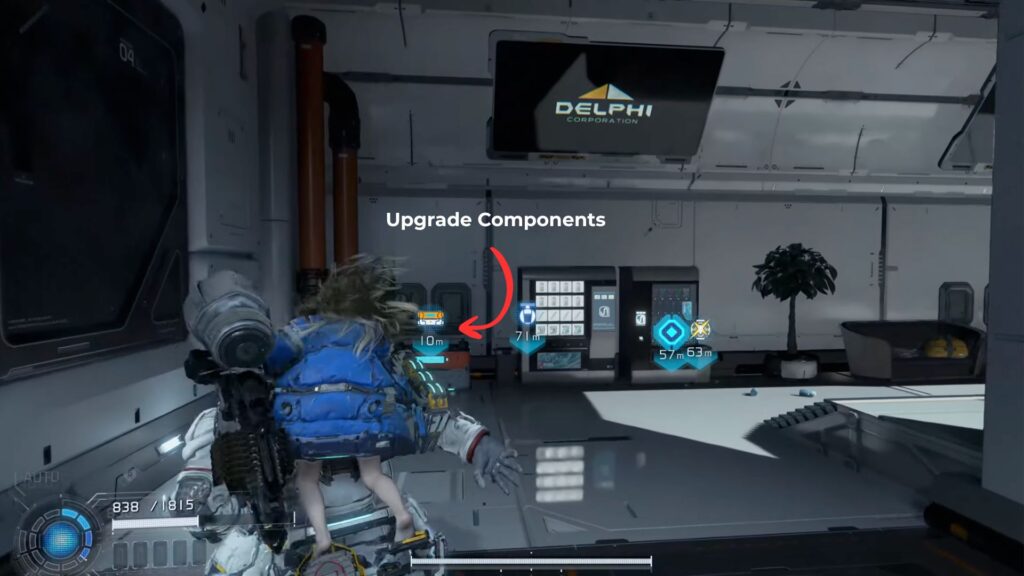
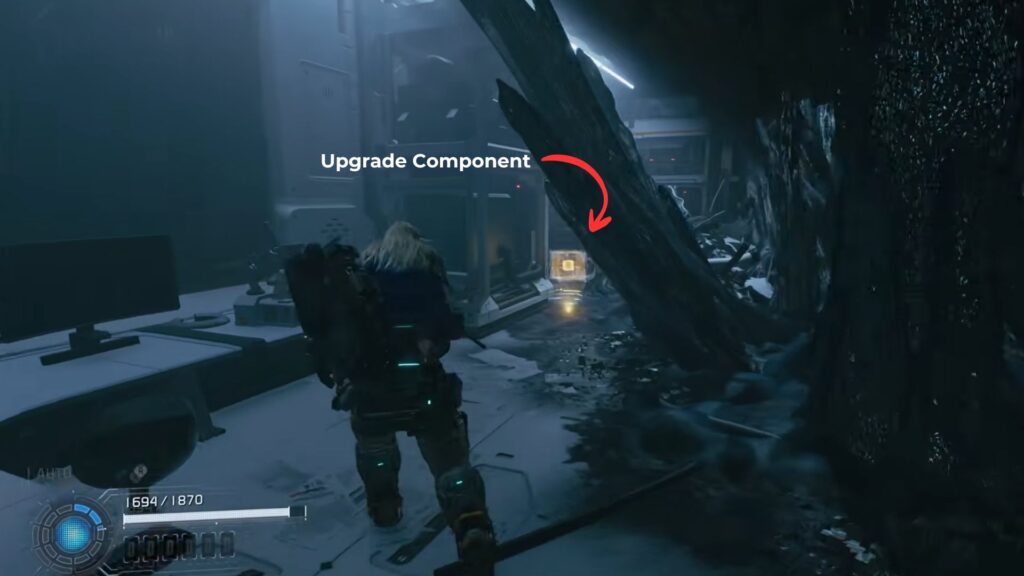
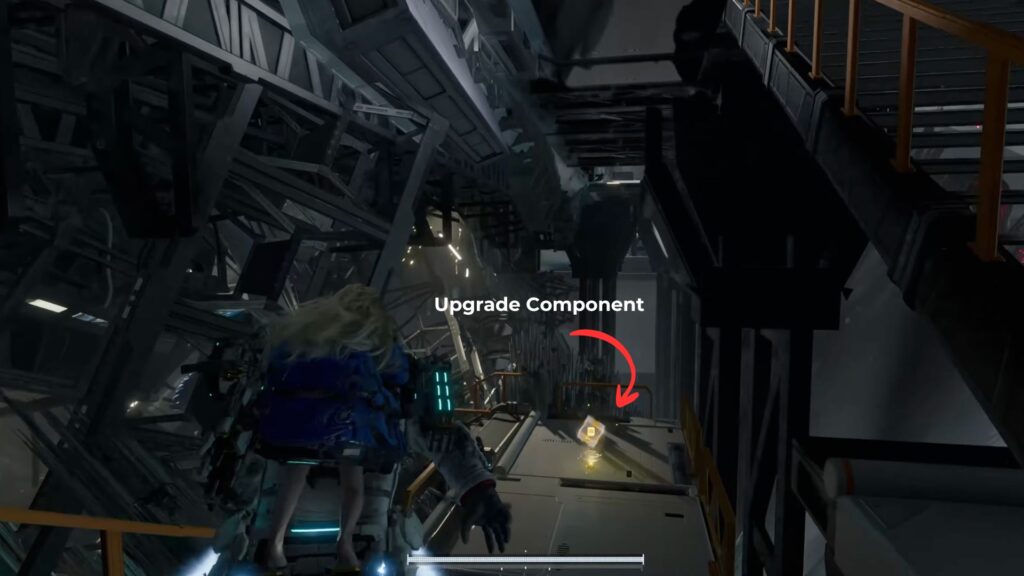
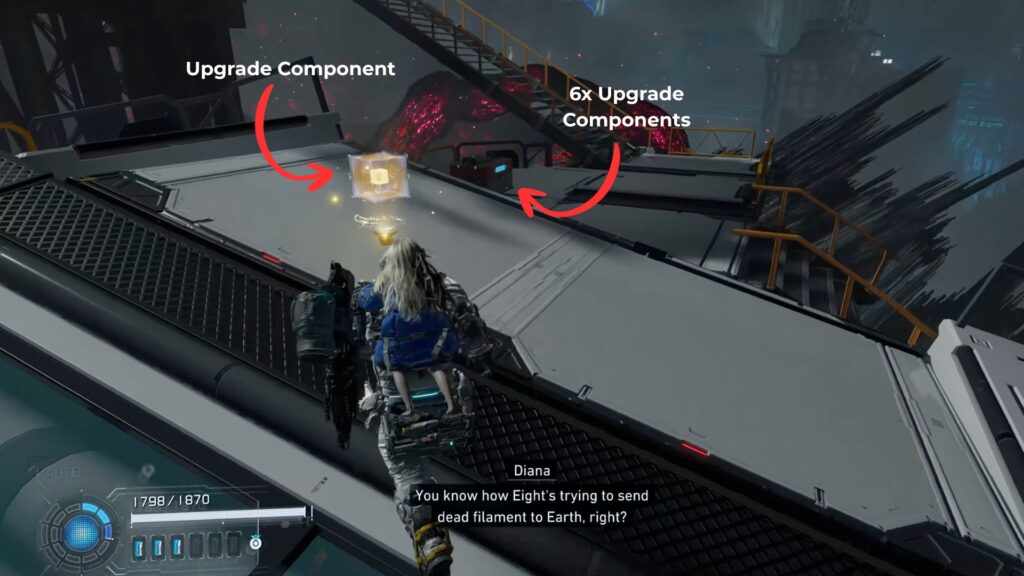
From where you fought the Anomalous Walkers, walk toward the edge of the platform away from the freighter station. There is a small platform below with an Upgrade Component on it. Follow the line of small platforms to the right to find a second Upgrade Component.
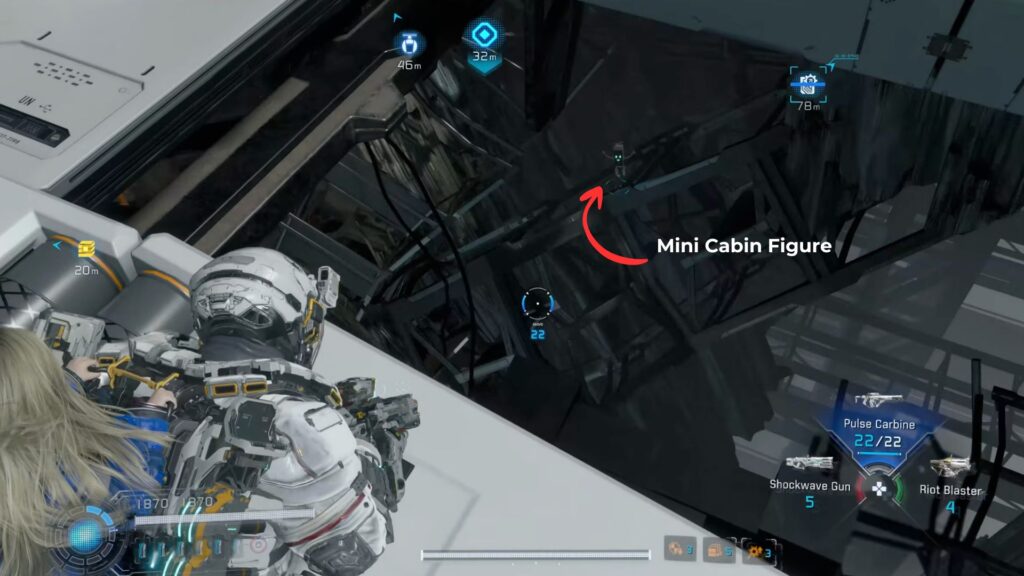
From that same spot, look up at the wall in the direction of the freighter station to spot a Mini Cabin Figure. Shoot it down to add it to your collection.
Head back to the Anomalous Walker fight area and look across the gap for a red panel. Hack it to raise some ledges behind you.
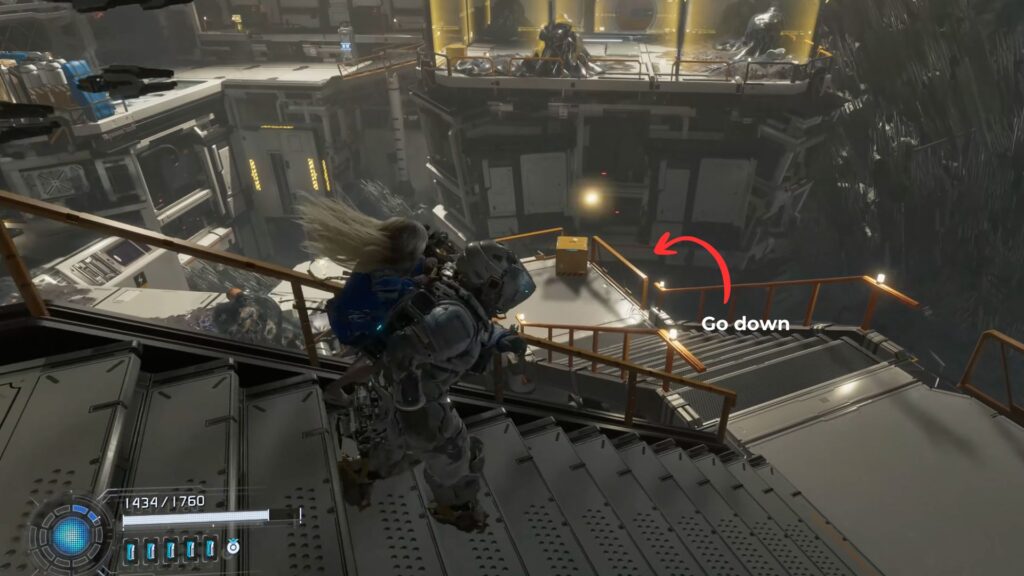
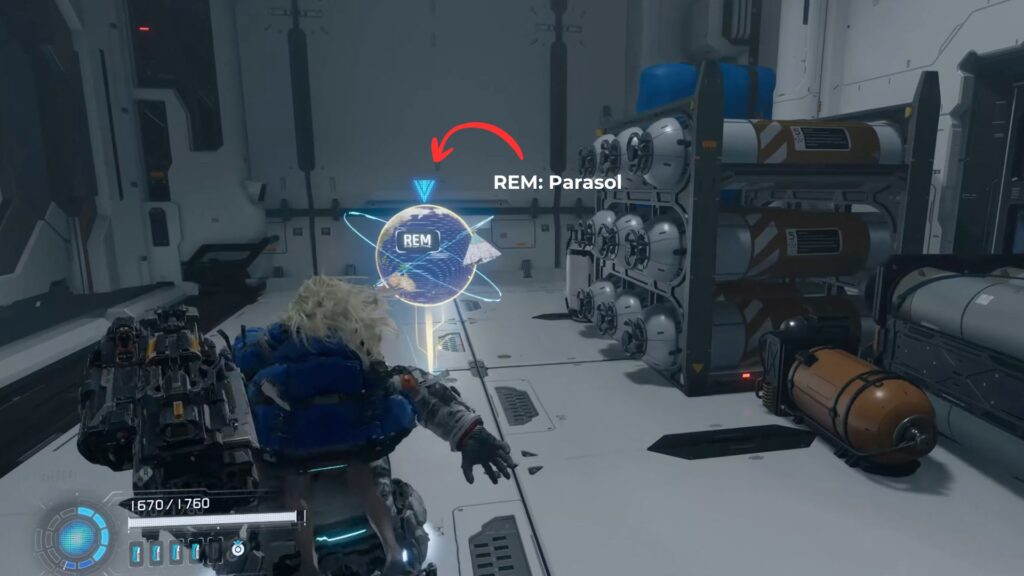
Go back up the stairs to the freighter station and jump across to the nearest raised block, then hop to a ramp nearby. Through the door at the top is REM: Parasol. The moment you grab it, a Crusher MK-II spawns behind you, so be ready to fight.

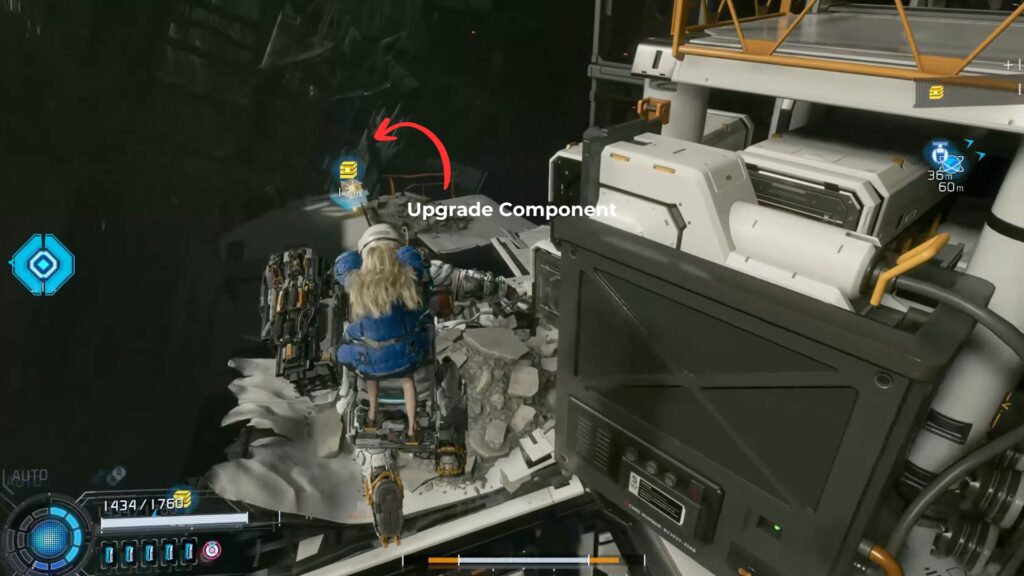
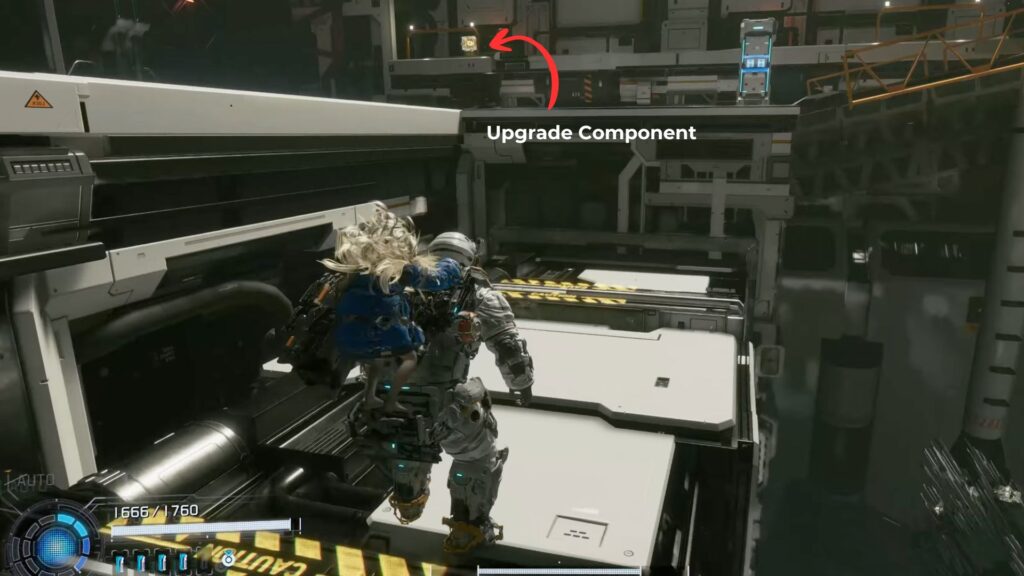
Return to the red panel and look for a new block extended from the wall beside it. If it is not there yet, hack the panel again. Jump from the block to the ledge above and follow the path, picking up an Upgrade Component along the way.
Security Zone
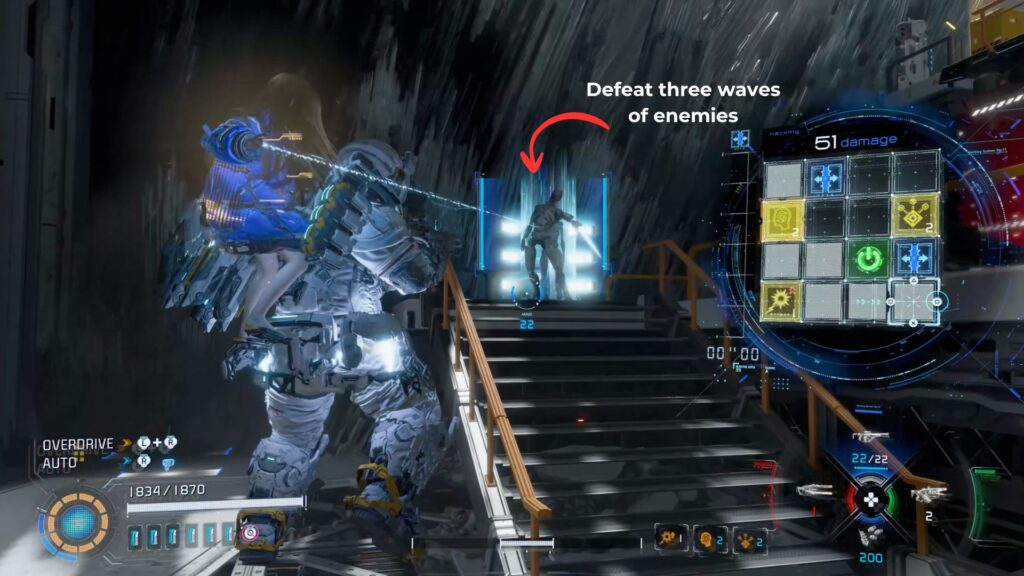
At the end of the path is a security zone. You need to fight off waves of enemies until they stop coming. Dead Filament covers a lot of the floor here, so watch where you step and use Cleanse on infected enemies when you can.
If you manage to Cleanse three enemies at the same time, you will unlock the Clean Up on Aisle Three Trophy. This security zone is a solid opportunity to pull it off, but more chances come up later in Central Port if you miss it here.
| Wave | Enemies |
|---|---|
| Wave 1 | Anomalous Walker x2 |
| Wave 2 | Anomalous Walker x3 |
| Wave 3 | Anomalous Executor x1 |
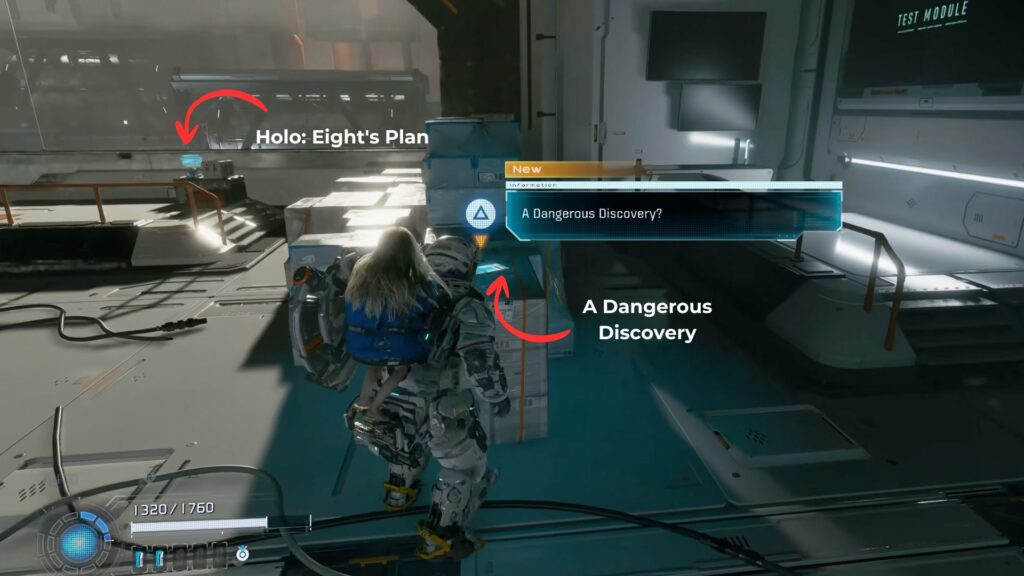
After clearing the zone, go through the next door. You will find Holo: Eight’s Plan near the windows and a tablet on a nearby crate with Email: A Dangerous Discovery?. Head through the door that follows.
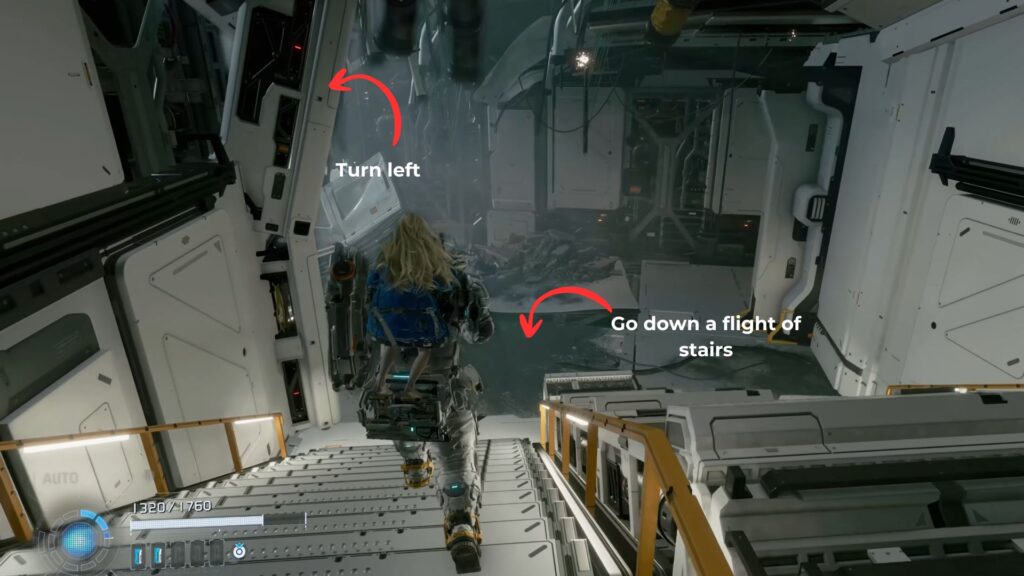
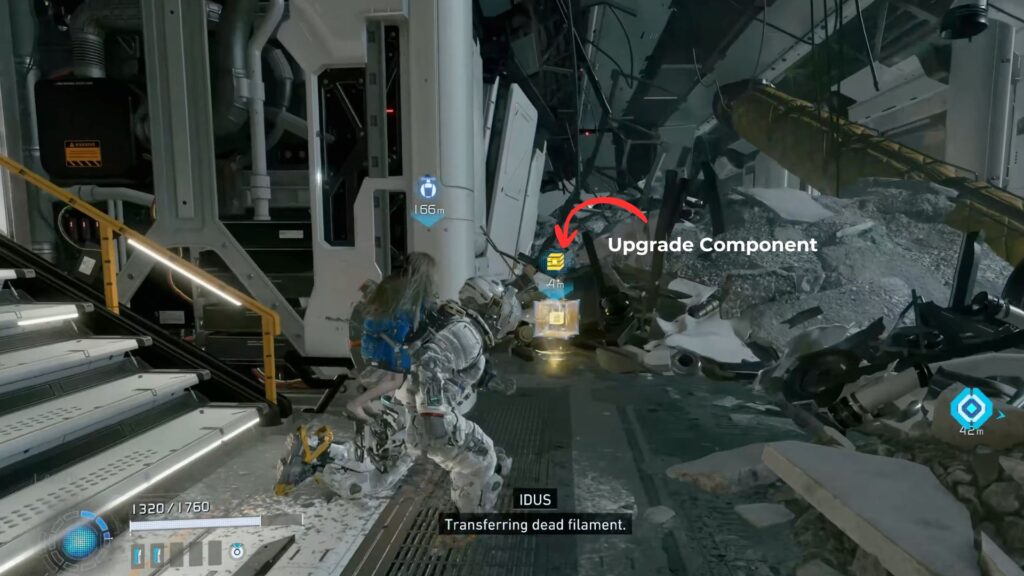
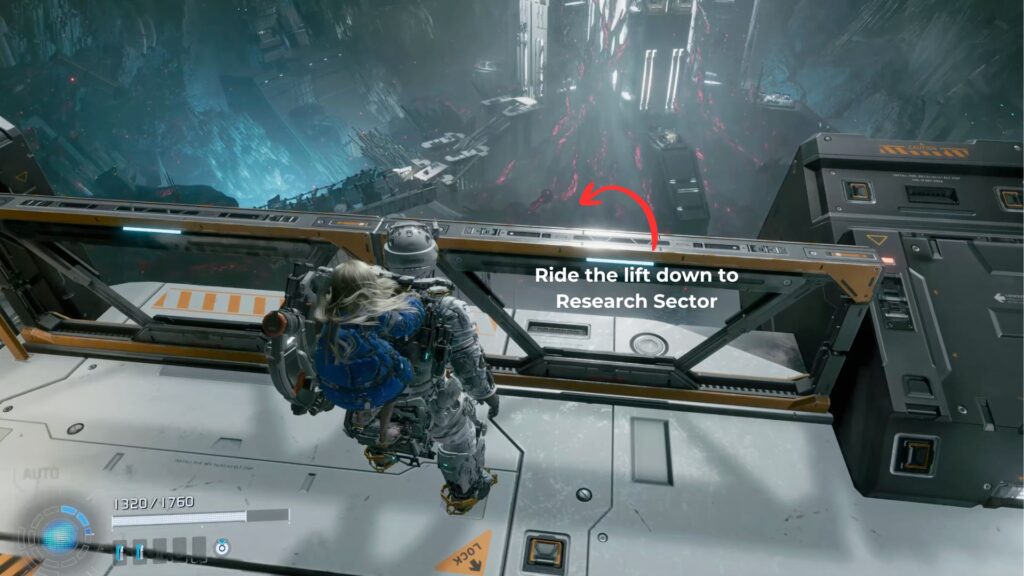
Continue along the path and after going down a set of stairs, check the left side for an Upgrade Component. A little further ahead is a lift. Ride it down to reach the Research Sector.
Research Sector
Once the lift stops, follow the path down. After the stairs, pick up the Upgrade Component on the right, then go through the door straight ahead.
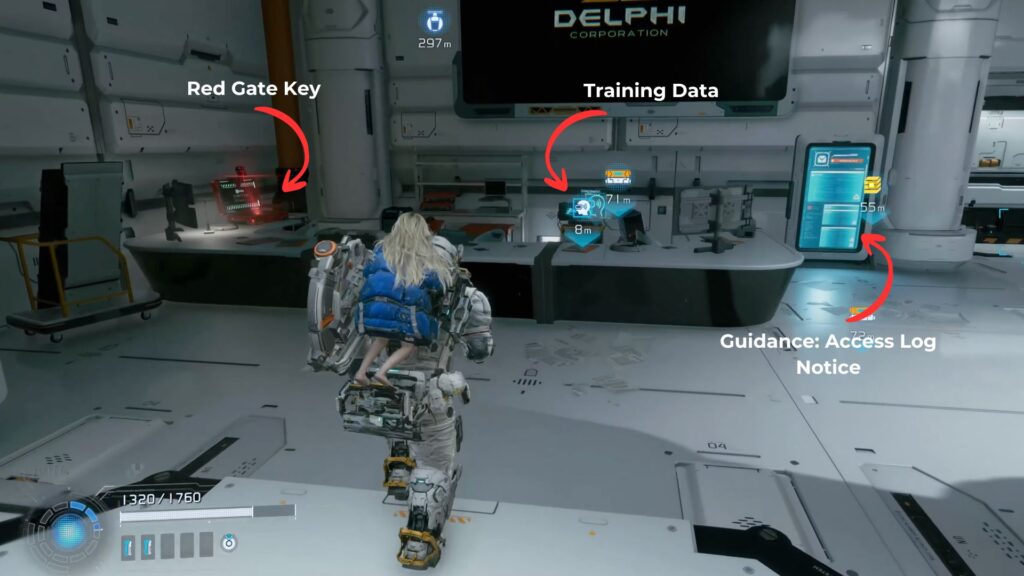
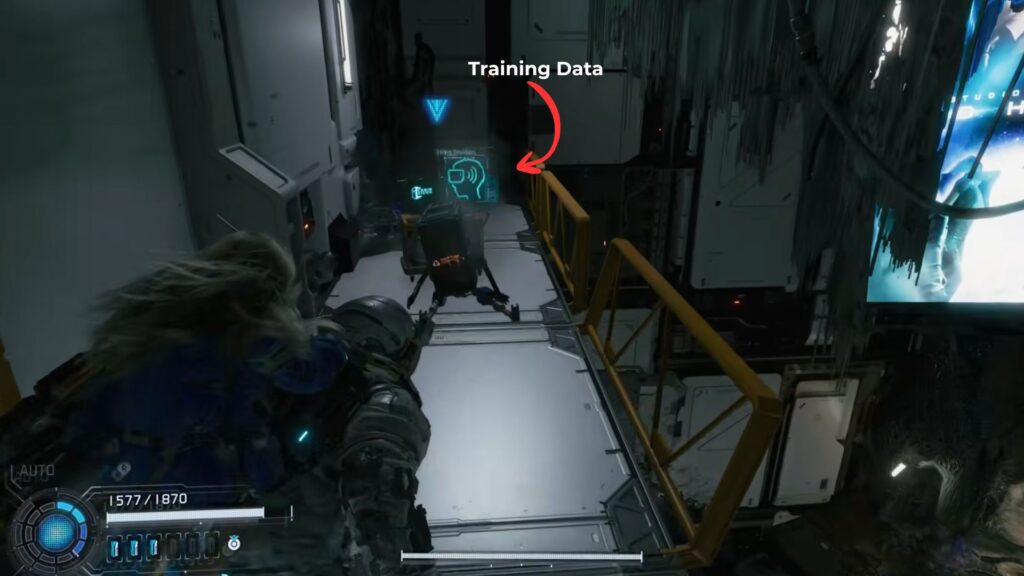
Inside, check the desk to find a Red Gate Key and some Training Data. The blue screen close by has Guidance: Access Log Notice, too. There is also an Escape Hatch in this room.
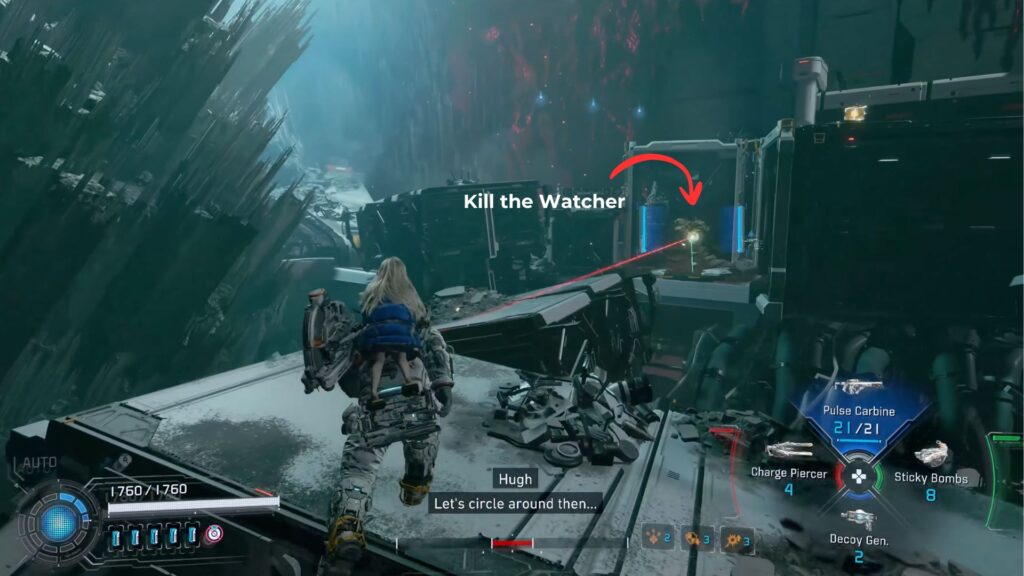
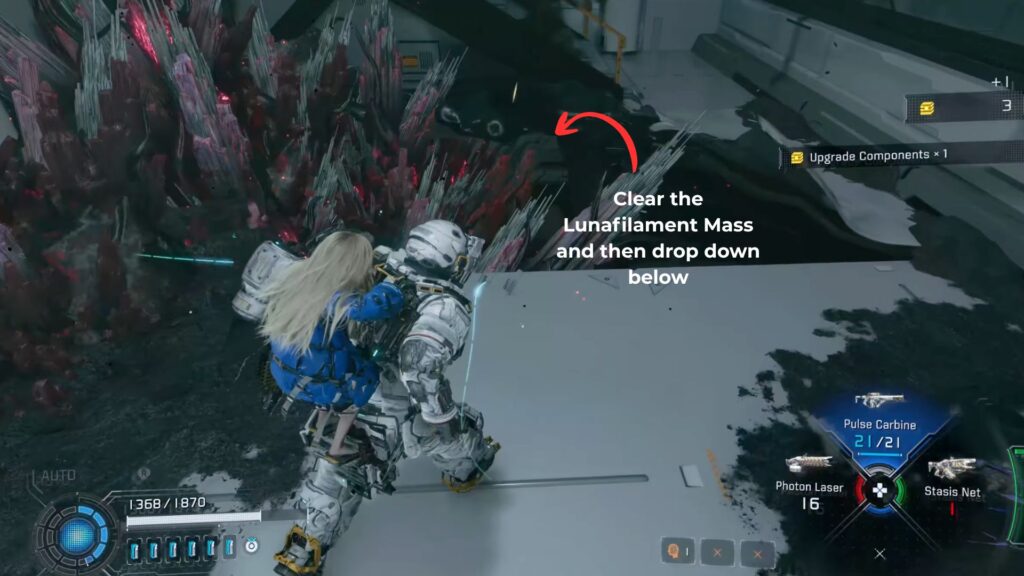
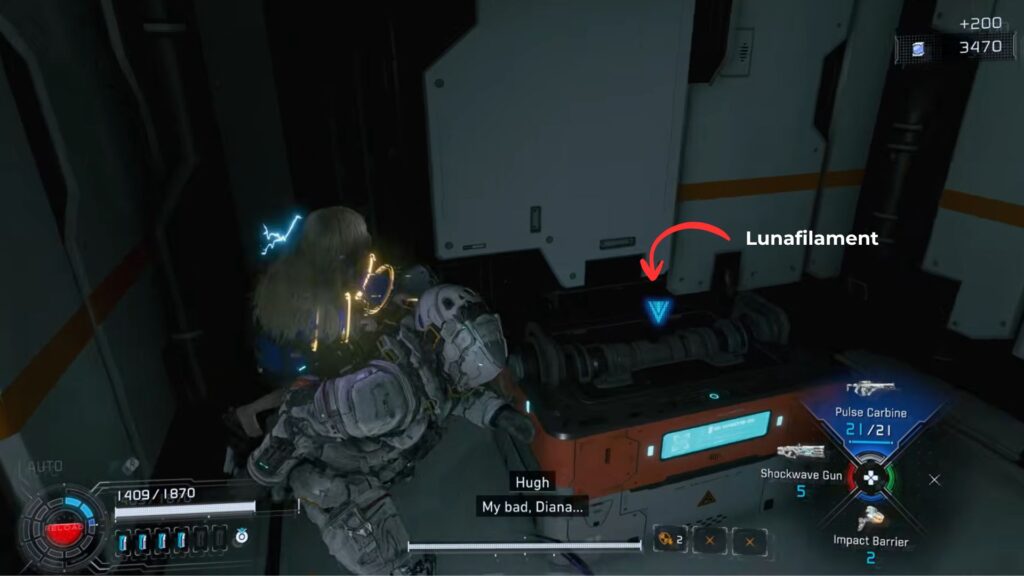
Next, go through the door and follow the main path until a large Lunafilament Mass cuts off the way forward. Use the small platforms on the left to drop down and get past it.

The moment you land, a Watcher spots you. Kill it and keep going until you reach the bigger platform at the end.
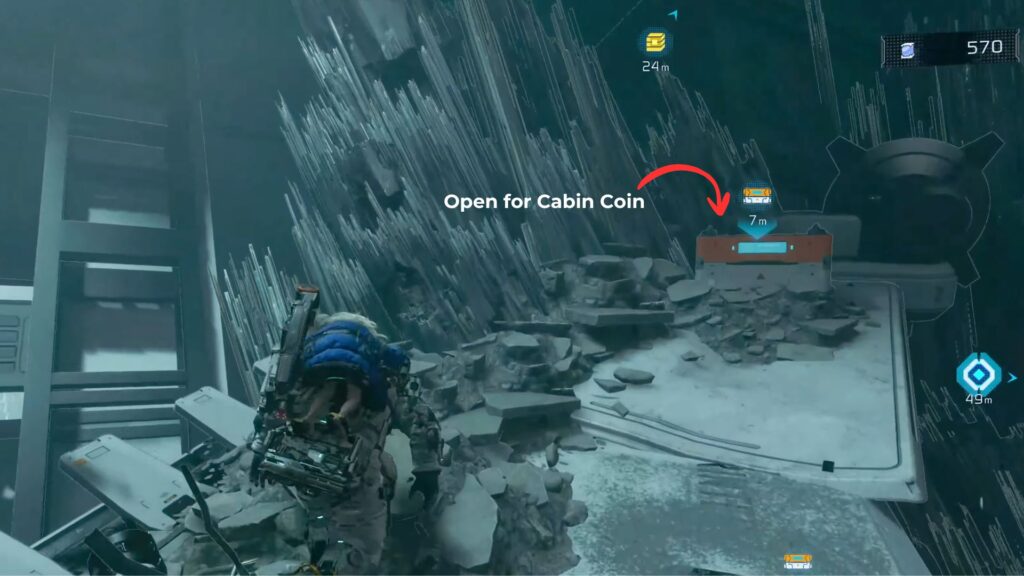
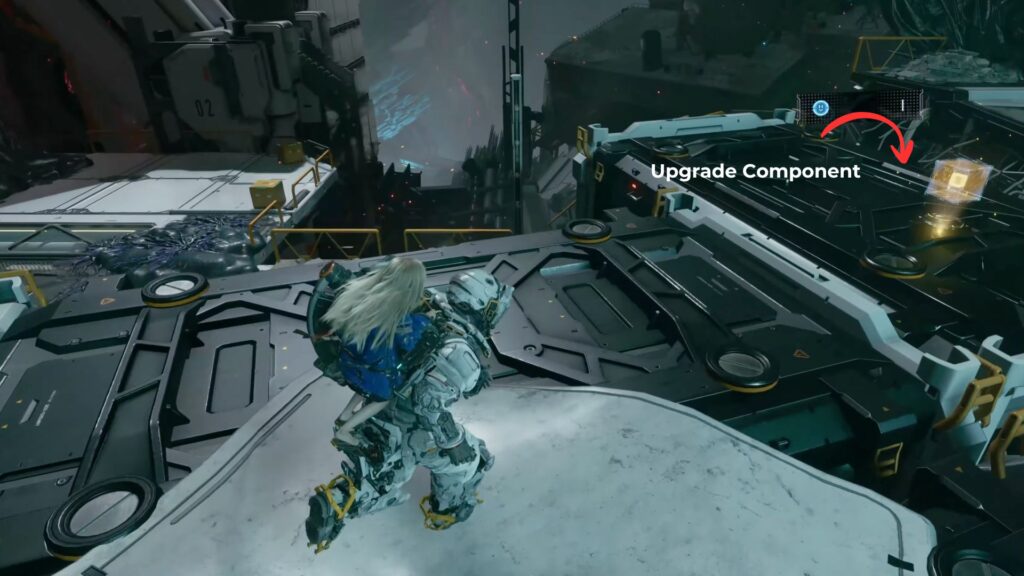
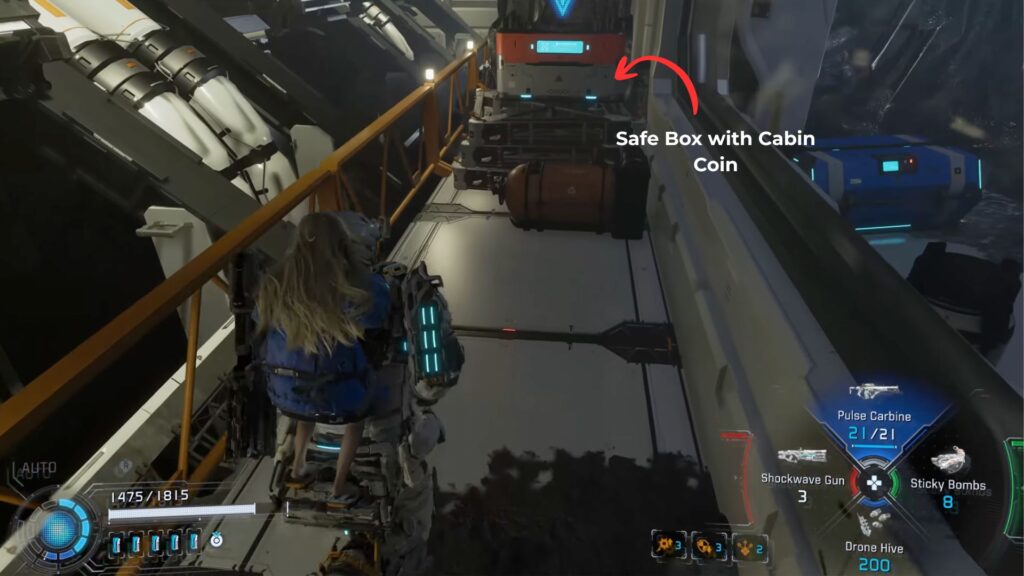
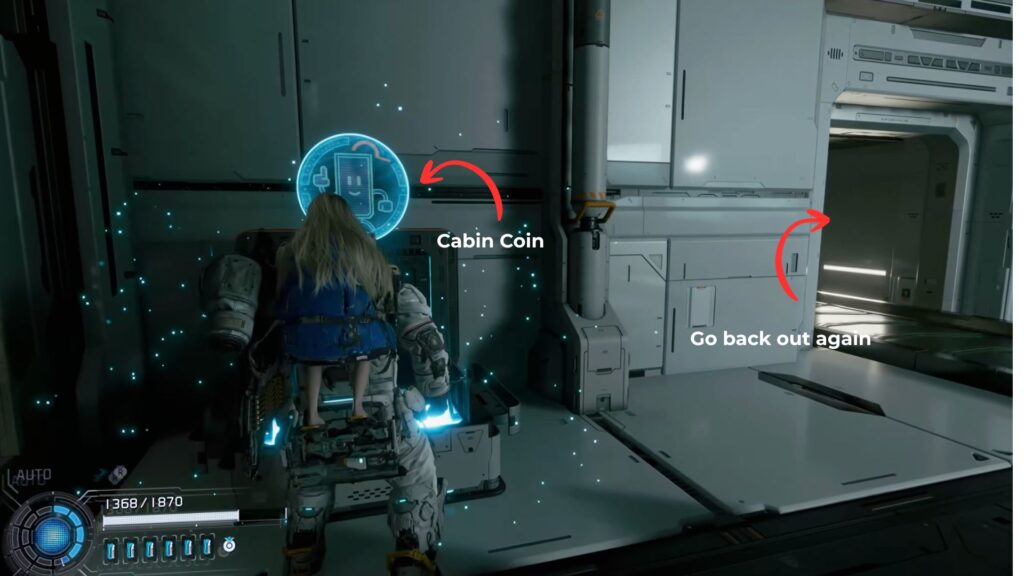
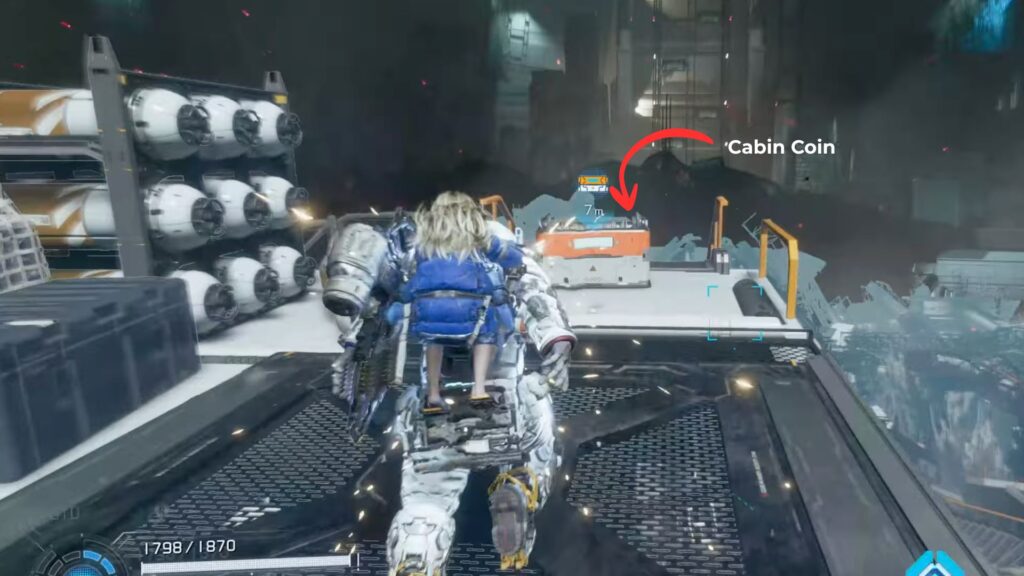
Go all the way to the left to find a Safe Box with a Cabin Coin inside. Then climb up the crates and make your way back along the other side of the blocked walkway to grab an Upgrade Component.
Drop down near the next door and a wave of enemies shows up. The first group is two Anomalous Walkers and an Anomalous Executor. If you still need the Trophy for Cleansing three enemies at once, this is a great spot to do it.

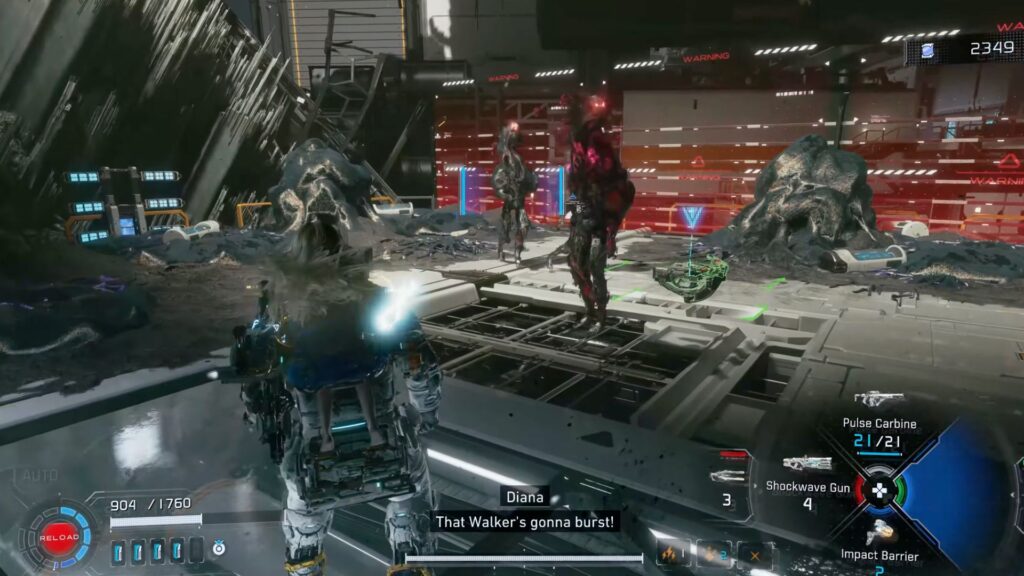
Once that group is dead, a new enemy type spawns: the Anomaly. These are big robots with long tentacle arms that can slam and sweep over a wide range. They also charge in fast and throw out quick headbutt attacks. Use Cleanse on one to expose glowing yellow crystals on its body.
Shoot those crystals off to cut off its arms for a short time. These enemies are quick and can take a lot of hits, so stay on the move and keep dodging.

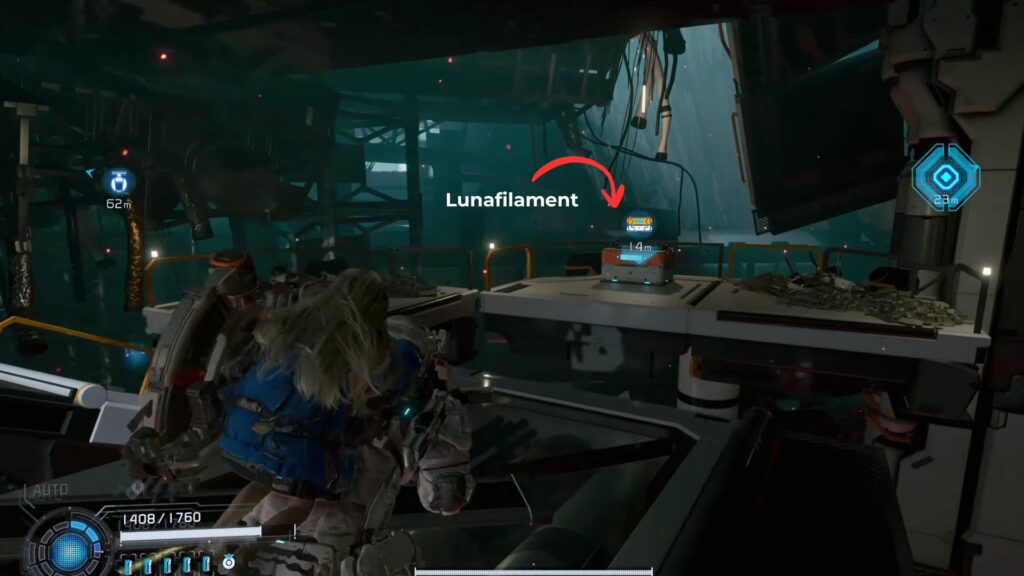
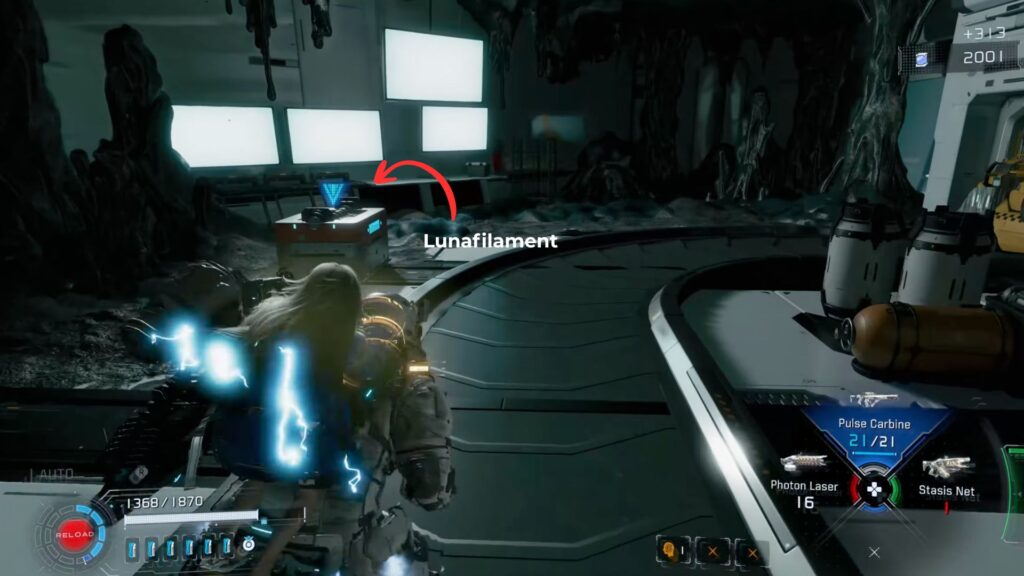
When all the enemies are dead, go the opposite way from the door to find a staircase going down. At the bottom, jump across to a small ledge where a Safe Box holds 500x Lunafilament.
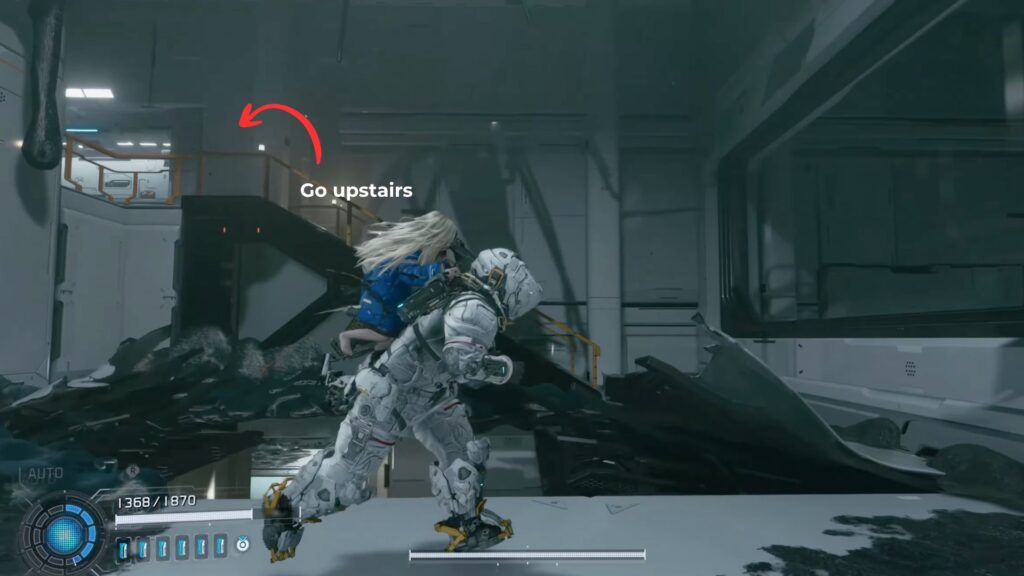
Head back to where you fought the Anomaly and go through the door to reach the Regolith Lab.
Regolith Lab
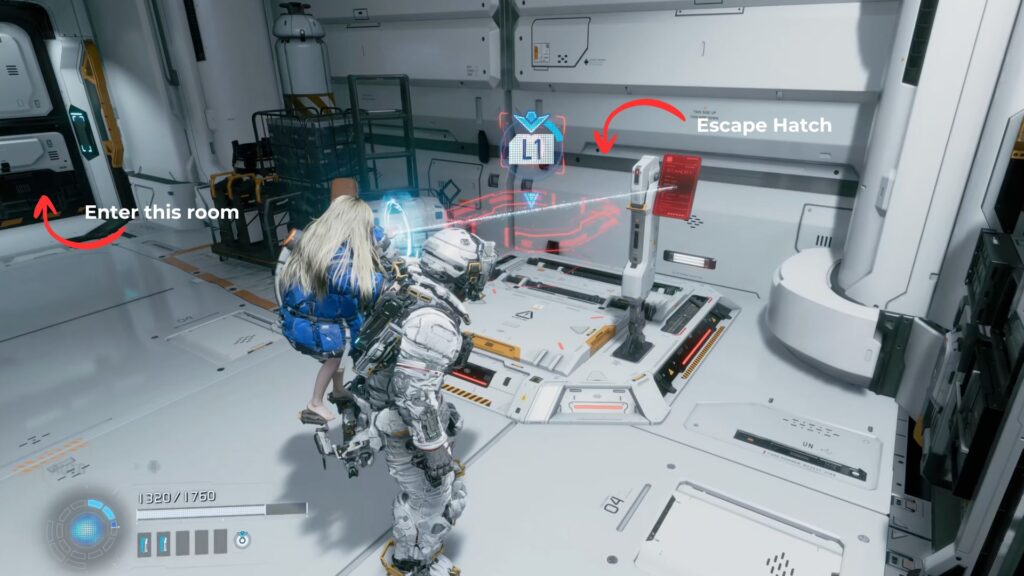
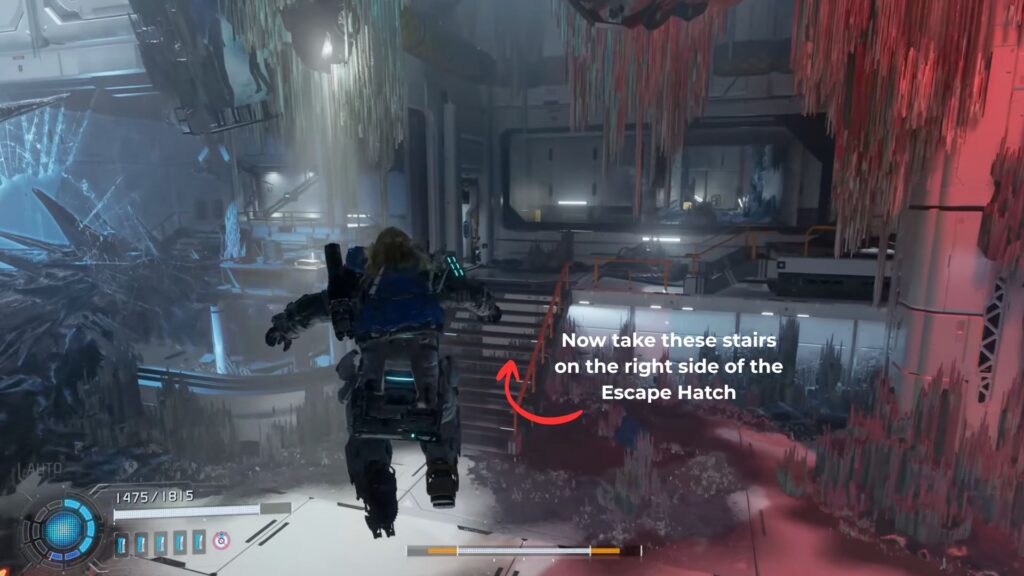
Walk through the entrance and keep going forward until massive Filament pop up and block the path. An Escape Hatch is here. From the Escape Hatch, there are two staircases on both sides of the room. Take the one on the left of the Escape Hatch first.

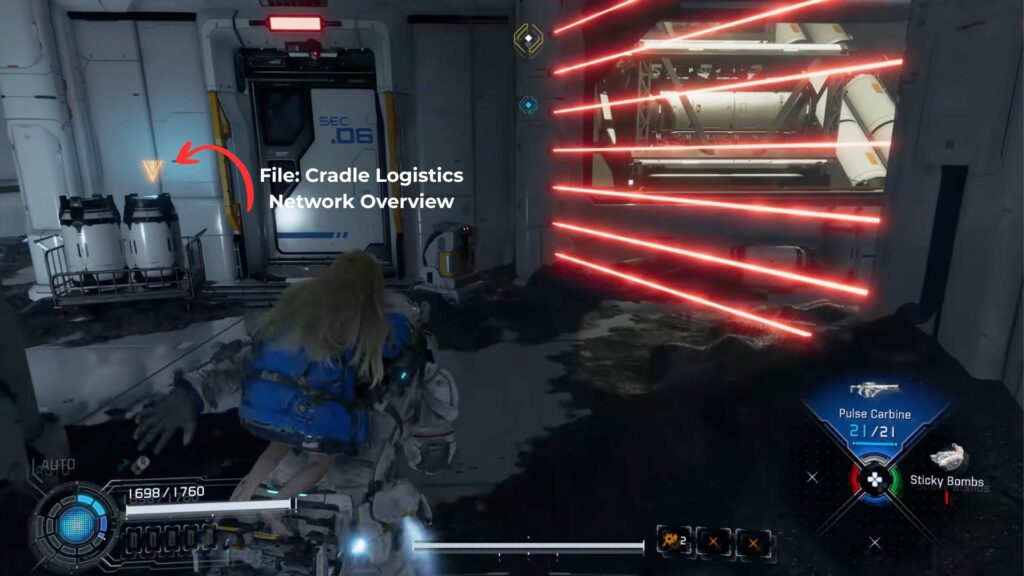
At the top, go into the hallway and pick up the tablet with File: Cradle Logistics Network Overview. Go around the corner and kill the Anomalous Walker and Walker MK-II up ahead.
Hack the panel through the laser grid at the end to bring it down. Through the door is a Safe Box with a Cabin Coin inside. Look up at the corner above the door you just came through to find a Mini Cabin Figure and shoot it down.
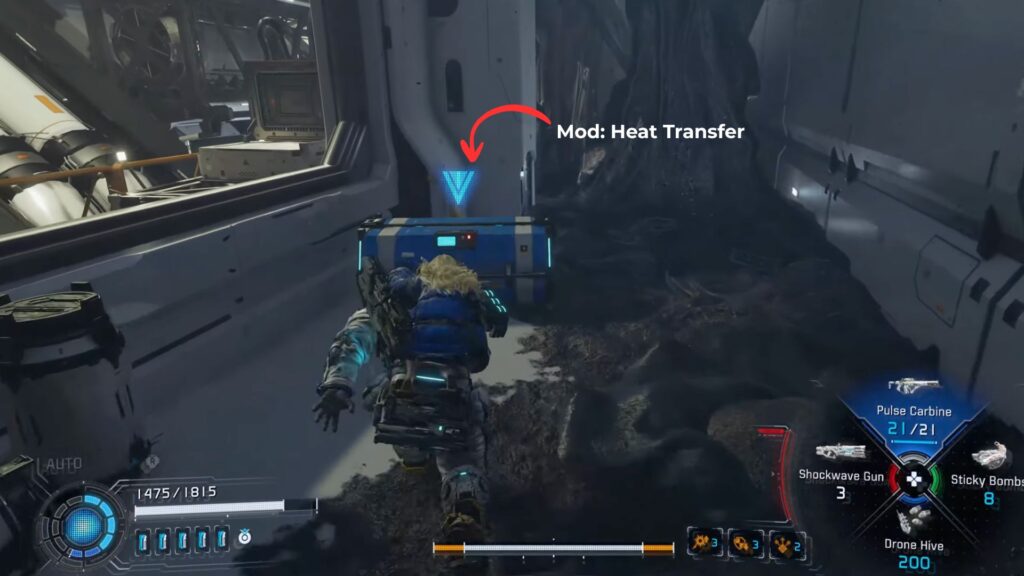
Hack open the next door to get back to the entrance side of the lobby. Look above this door for a red panel and hack it to drop the lasers on the left. With the lasers gone, open the chest behind them to get Mod: Heat Transfer.
Head back to the Escape Hatch and this time take the stairs on the other side of the lobby.
Follow the path until you hit a hallway packed with moving laser grids. Jump and dash your way through while staying clear of the lasers, and try to avoid the Dead Filament on the floor since it slows you down. At the far end is an Upgrade Component, and at the top of the next stairs is a Red Zone.
Red Zone 8
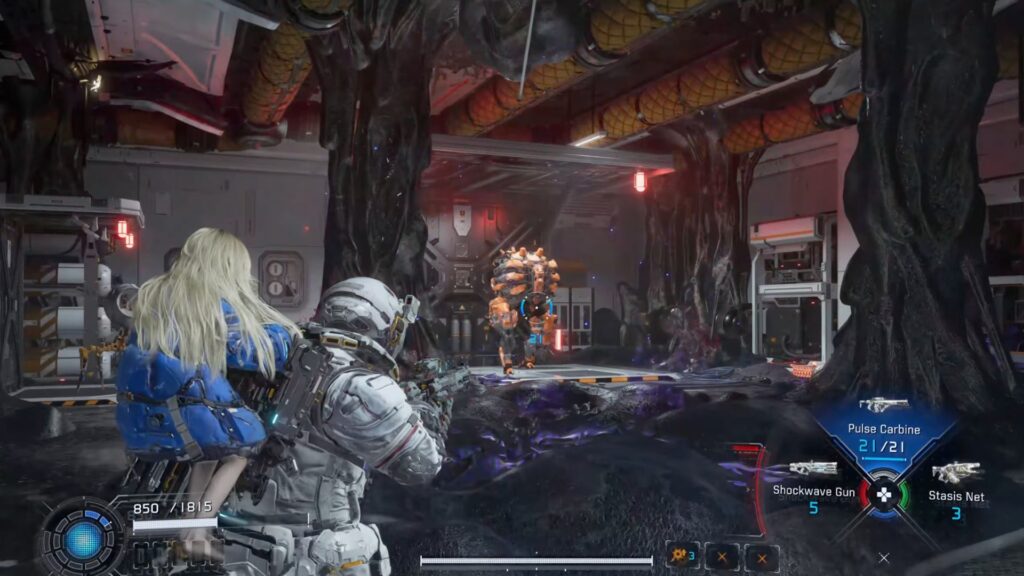
Go inside the Red Zone at the end of the hallway. Once you’re inside, take the lift down to the platform below. Wipe out all the enemies to clear the area.
The main threat is an Air Raider, but ranged enemies also spawn in the corners of the platform as the fight goes on. These are two Watcher MK-II enemies and two Missile Watcher MK-II bots. Deal with the smaller enemies as fast as you can before turning your attention back to the Air Raider.
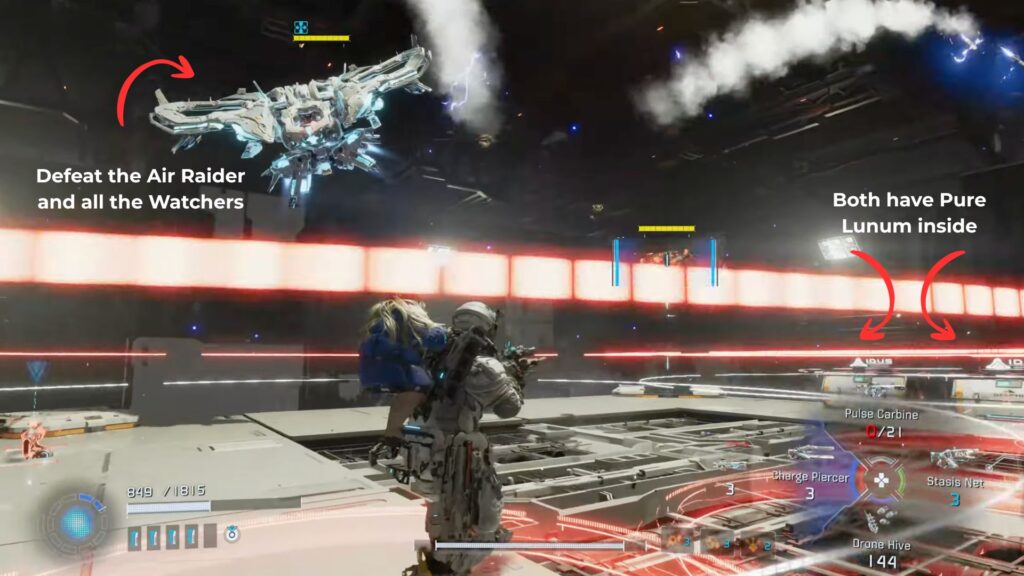
After the fight, open the two chests close by. Both have Pure Lunum inside.
Large Room and Basement
From the Red Zone door, keep going down the hallway into the large room at the end. Drop to the lower area and you will pull in a Lancer, Anomalous Walker, and Walker MK-II. Take them all down.
Once the enemies are dead, check the area under the platform you came in from. There are Filament Mass down here that Diana can cleanse. Behind them is a red panel you can hack to cut the lasers blocking the exit.

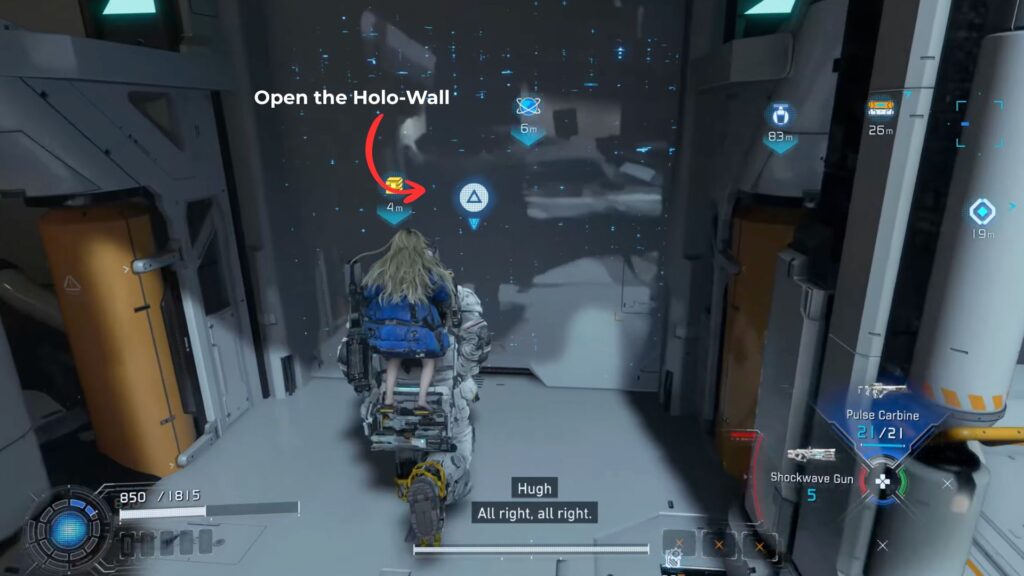
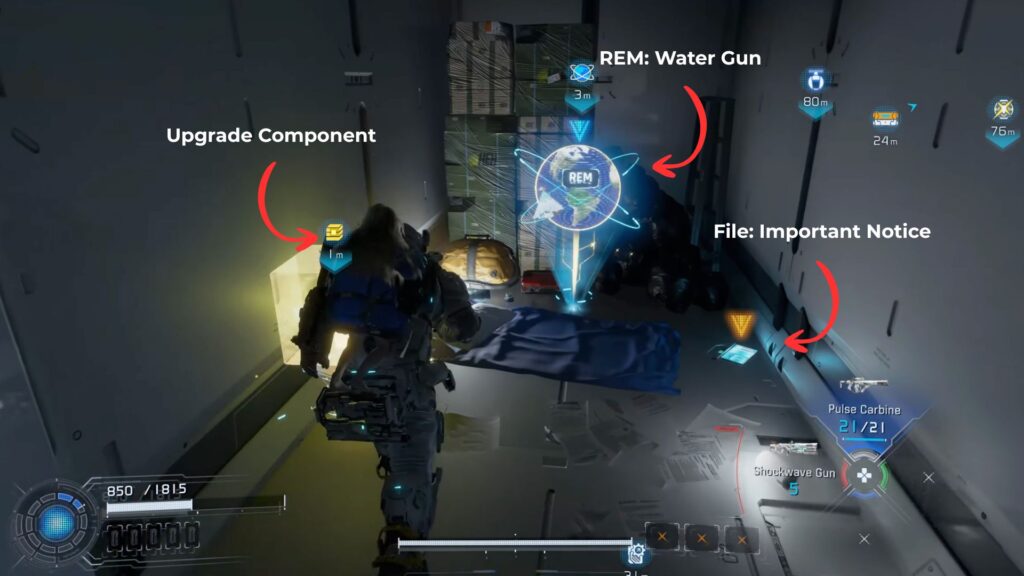
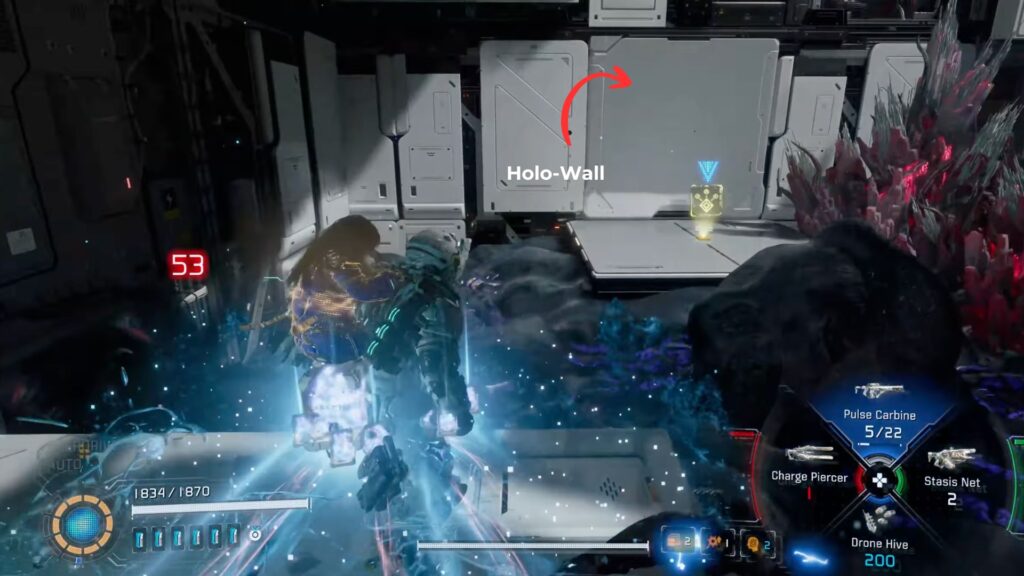
Before you leave, look for a Holo-Wall just to the left of the path leading to those Filament Mass. Inside the hidden room behind it is an Upgrade Component, REM: Water Gun, and File: Important Notice.
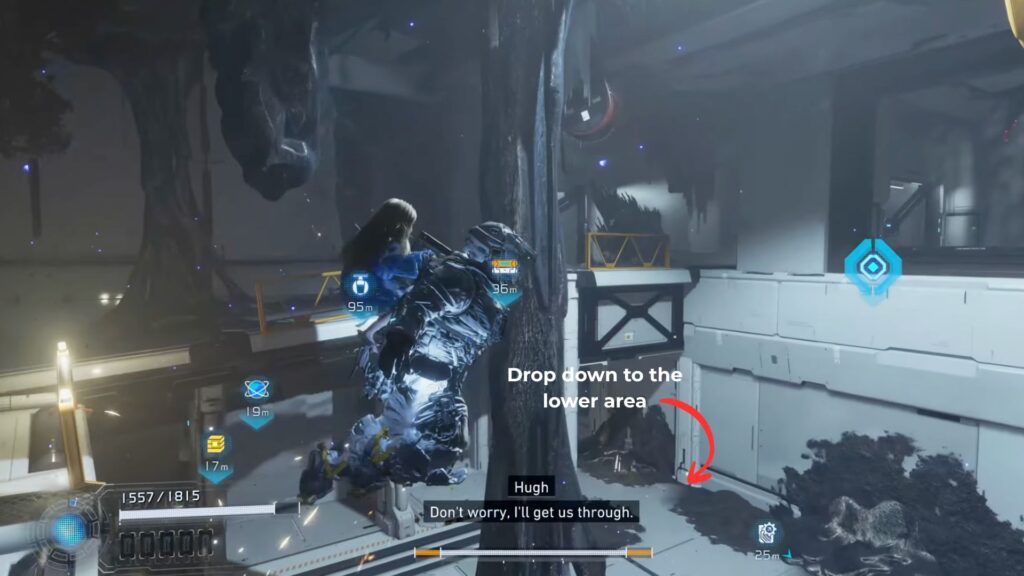
Back on the main path, look for another Filament Mass under the upper level. Have Diana remove it to open a way down to a basement area.
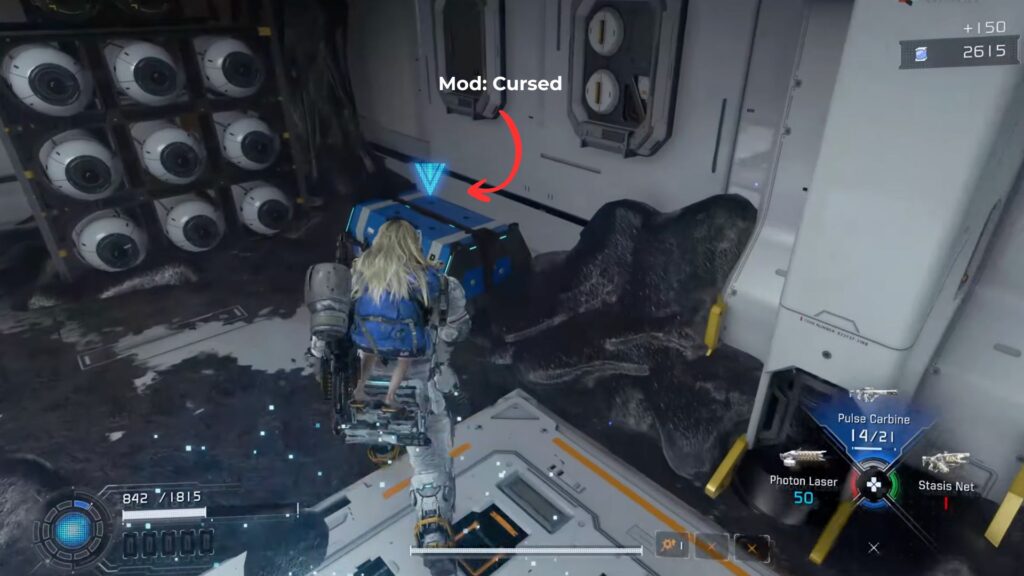
The lower level is full of Dead Filament and a big group of enemies: two Spiderbots, two Anomalous Walkers, and a Crusher MK-II. Clear them all and loot the chest for Mod: Cursed. On your way back up the stairs, a new Anomalous Walker will be there waiting for you.

Climb up to the top floor of the main room and go through the door that was locked behind lasers. There is a Safe Box ahead with six Upgrade Components. Near the window seating area, pick up Holo: An Executive Order.
Security Room
Go through the next door to enter a Security Room with several waves of enemies. Enemies in later waves start showing up after a short delay, so if you take too long on one wave you may end up dealing with two at once.
| Wave | Enemies |
|---|---|
| Wave 1 | Walker x1, Walker MK-II x1 |
| Wave 2 | Lancer x1, Impeder x1 |
| Wave 3 | Anomalous Walker x2 |
| Wave 4 | Anomalous Executor x1, Creeper x1 |
Once the room is clear, go through the door on the opposite side from the entrance, head down the stairs, and open the chest for Pure Lunum. Break the Filament Mass next to it to clear the lobby and update your objective.
Head through the smaller door at the top of the stairs to return to the lobby. The path beside the Escape Hatch is now open. Follow it through to reach the Lunafilament Lab.
Follow the passage from the Regolith Lab to reach a large lobby with an Escape Hatch. The big door at the far end is the way forward, but it has two locks on it.
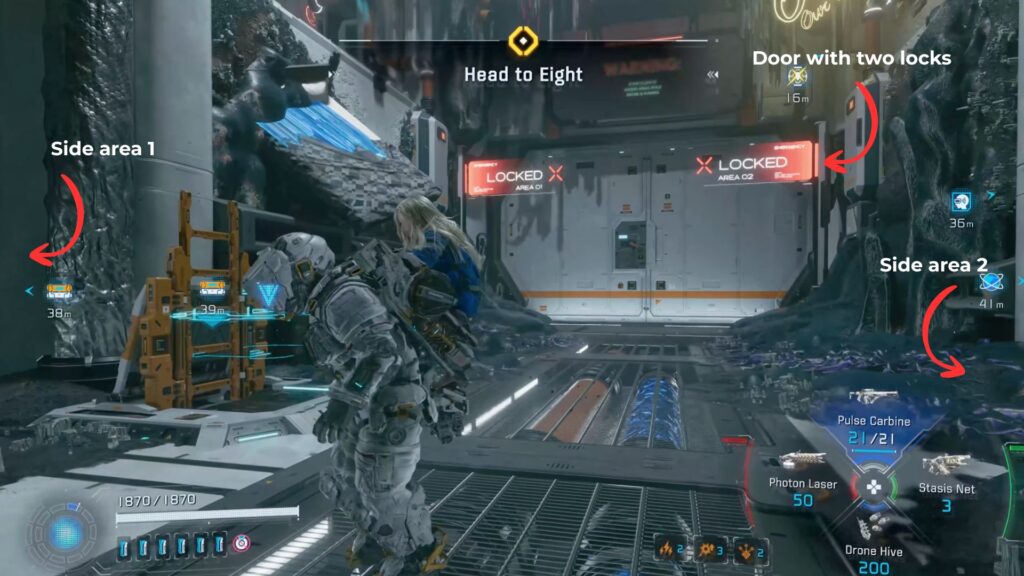
On the other end of the room is a Red Zone. Two side doors, one by the Escape Hatch and one across from it, lead to the panels you need to break the seals. You will need to hit both side areas and the Red Zone to get everything done.
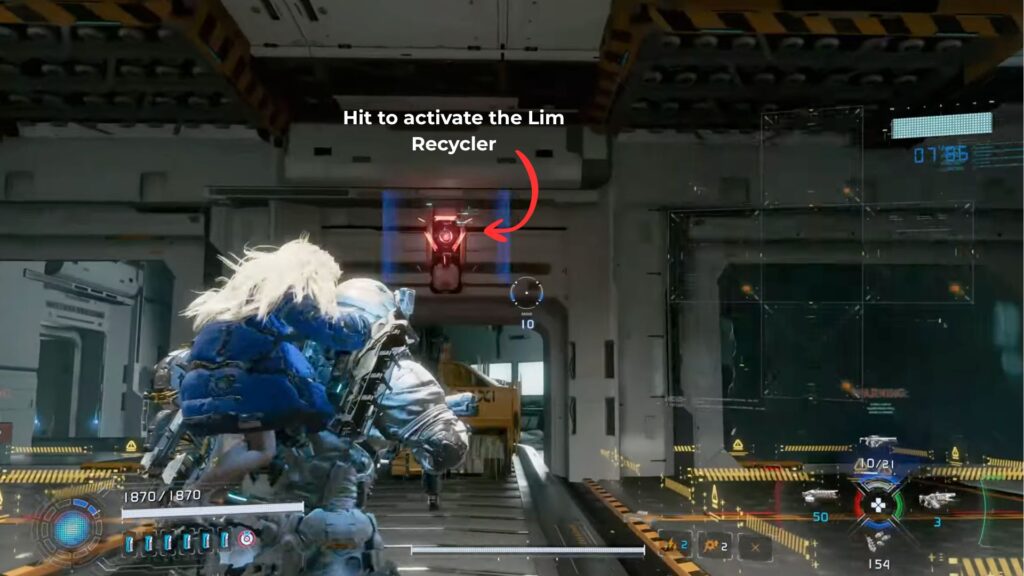
Side Area 1 (Door by the Escape Hatch)
Enter the first room to find a Lim Recycler. Hit the red panel to turn it on. You only get one use, so make it count.
Clear two waves of enemies to open the next door:
| Wave | Enemies |
|---|---|
| Wave 1 | Bomber x1, Crusher MK-II x1 |
| Wave 2 | Spiderbot MK-II x4 |
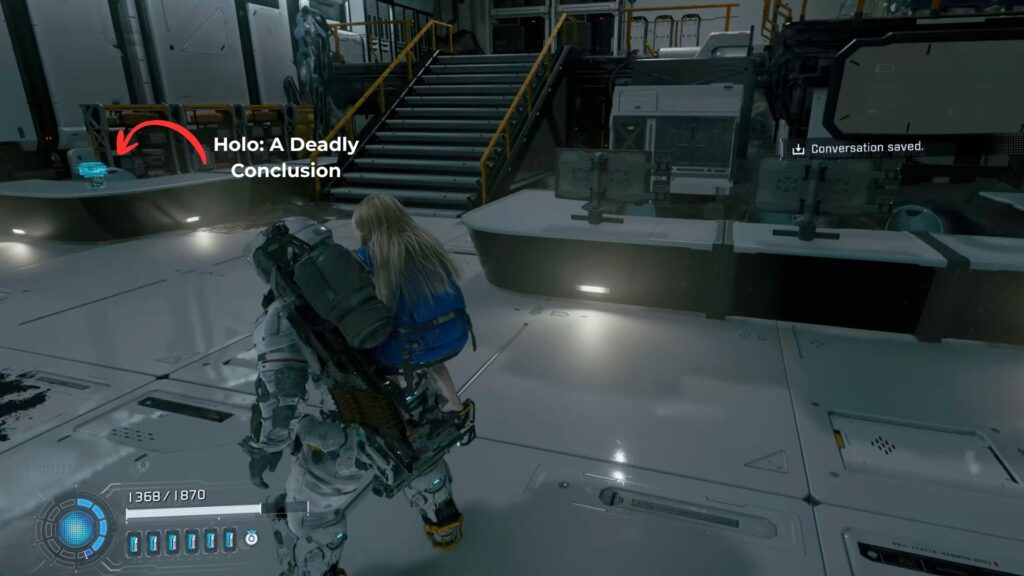
Keep going until Holo: A Deadly Conclusion plays. Climb the stairs and grab the Upgrade Component by the next door.

In the room ahead there is a Lunafilament Mass right in front of you. Diana can clear the mass, then drop into the hole below. Head into the next room to find two Safe Boxes: one with a Cabin Coin and one with Lunafilament.
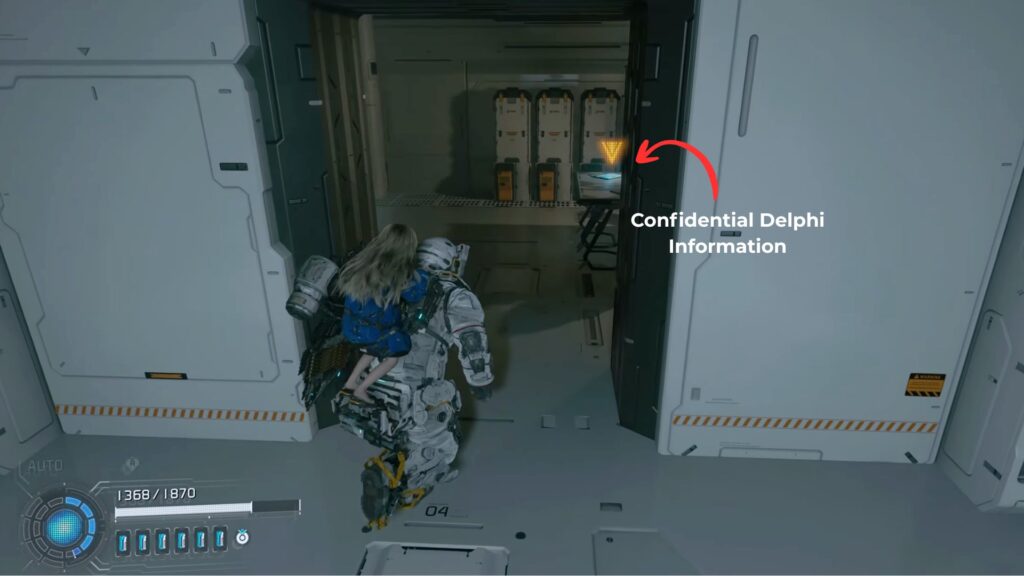
Climb back up and go up the stairs, then check the left room for a tablet with Email: Confidential Delphi Information.
Next, take the room on the right. It is a corridor with lasers. Move through carefully. About halfway in, three Anomalous Walkers spawn. Deal with them there before pushing around the corner. There will be an Anomalous Executor waiting for you there.

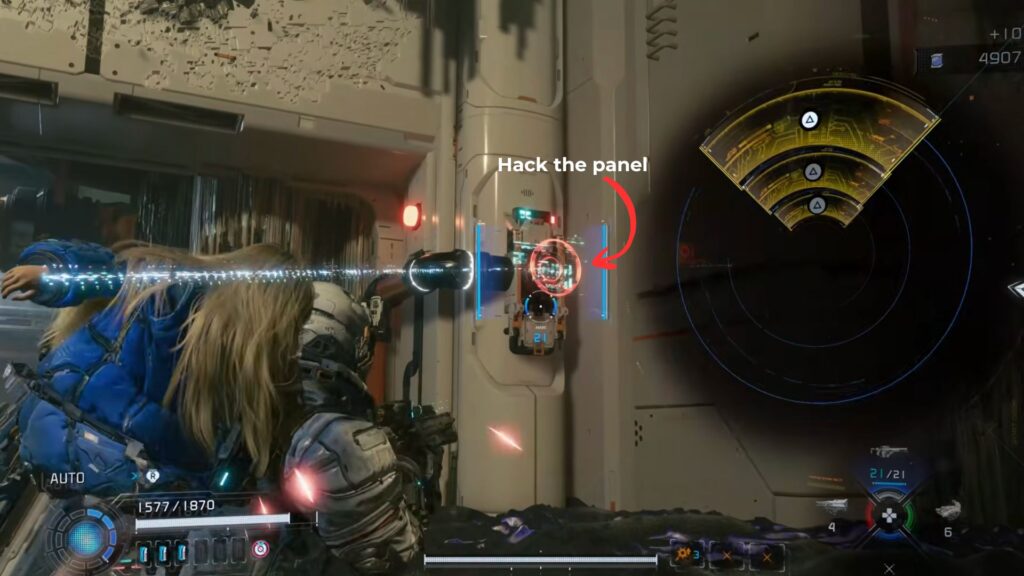
Once all enemies are down, hack the panel by the window to release one of the two locks on the big gate outside.
Side Area 2 (Door Opposite the Escape Hatch)
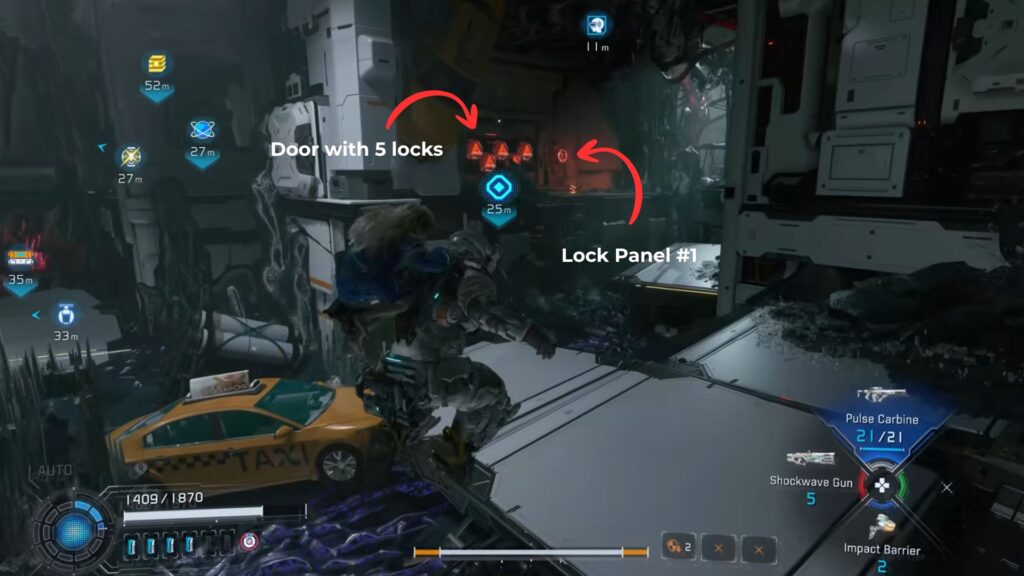
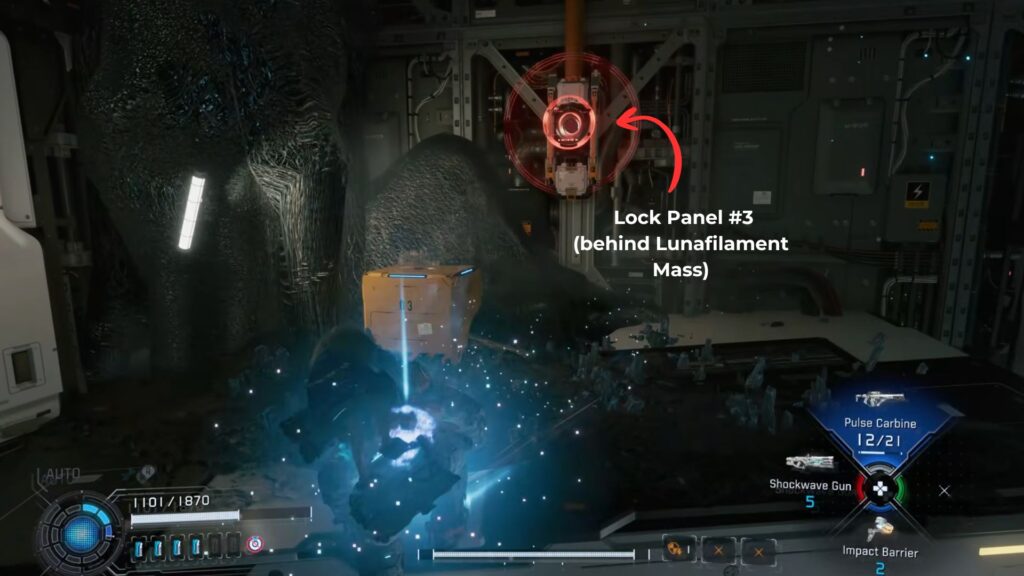
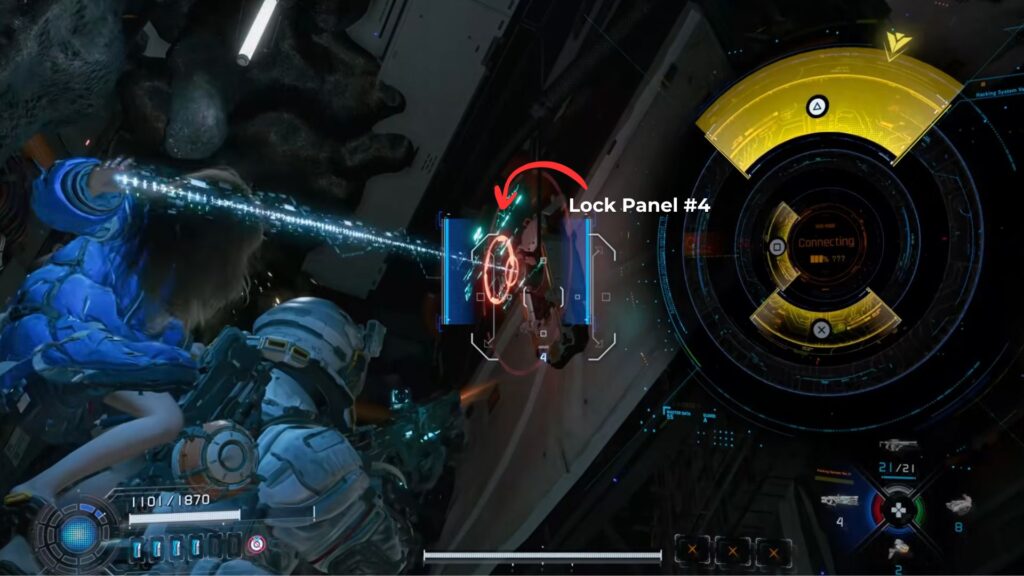
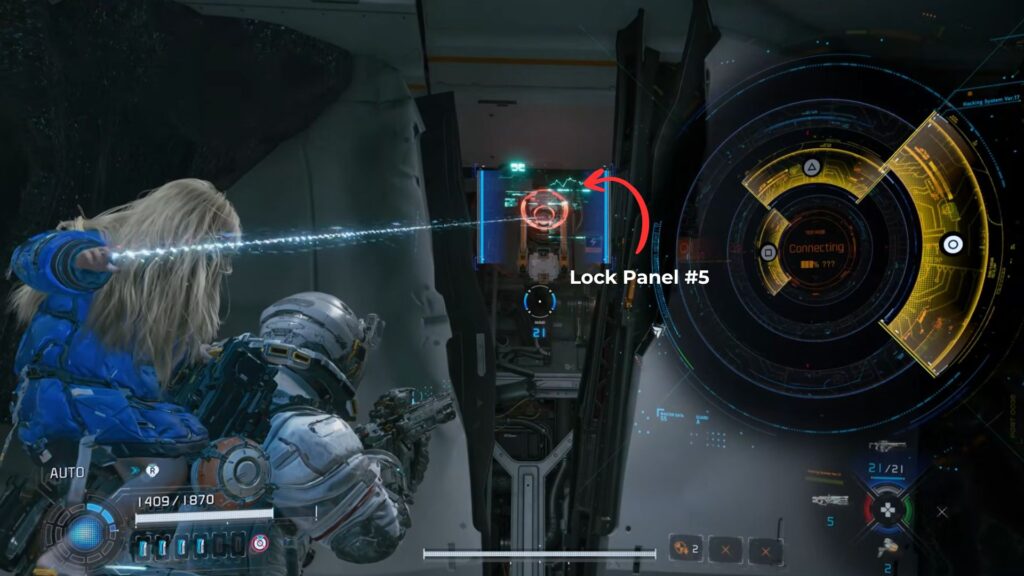
The room in this area has Dead Filament covering almost the whole floor, with small platforms popping up above it. In the back left corner is a door with five locks. You need to find and hack five panels around the room to open it.

Several Anomalous Walkers are hiding there and Watchers and Watcher MK-IIs will lunge at you, too, after each panel you hack, so stay sharp.
Here are the locations for the panels:
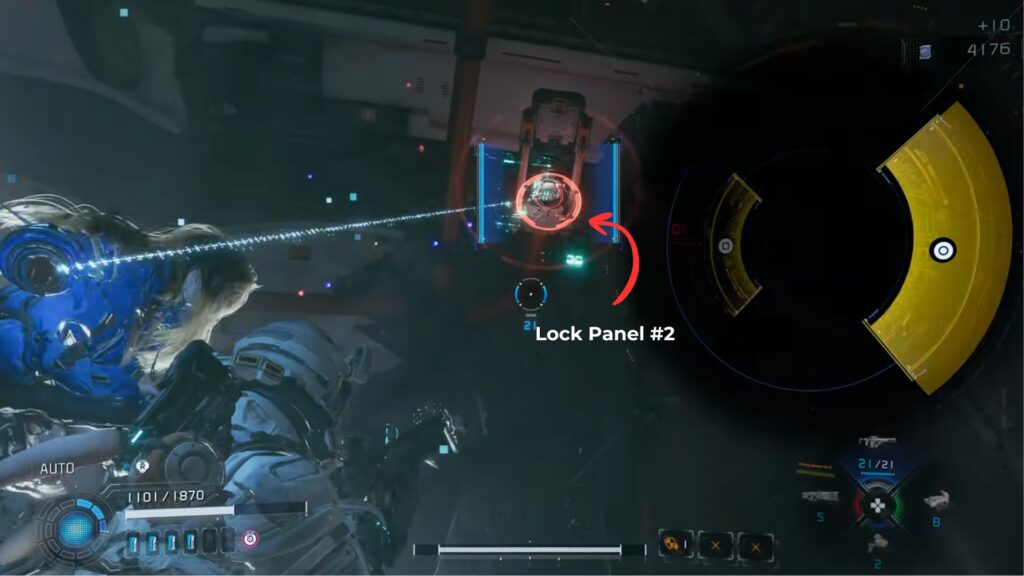
- #1 – The first panel is on the wall next to the locked door.
- #2 – Another is on the ceiling just across the door.
- #3 – The third panel is along the right wall behind some blue Filament Mass.
- #4 – Look back toward the entrance for a panel behind a white hanging metal.
- #5 – From the fourth location, follow the wall to the right to find the last panel high up on the wall. That all finally opens the door.
Before going through, drop to the ledge below your current spot. There is a Lunafilament Mass there. Behind, you can find Safe Box with 500x Lunafilament inside.
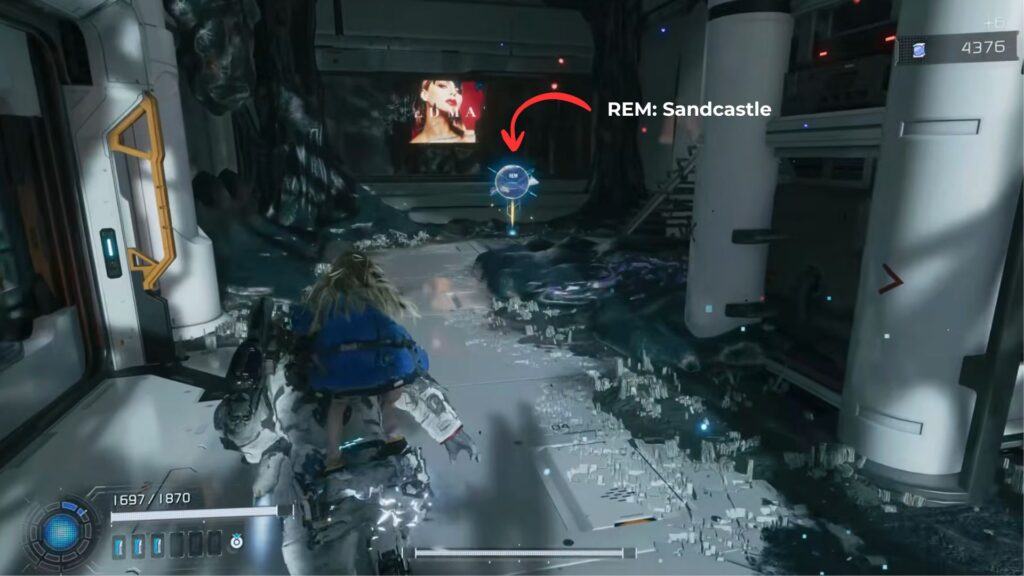
Go through the unlocked door. In the hallway is REM: Sandcastle. After collecting it, go upstairs and through the next door into a security area where you have to fight two waves of enemies.
| Wave | Enemies |
|---|---|
| Wave 1 | Anomalous Walker x2 |
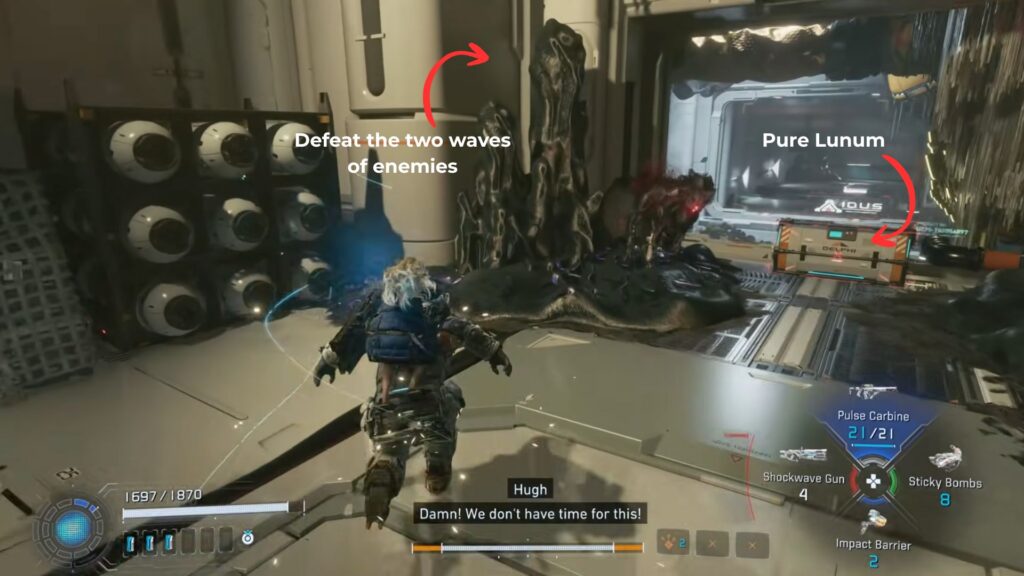
| Wave 2 | Defender x1, Anomalous Walker x1, Missile Watcher MK-II x1 |
Once all the enemies are dead, hack the panel on the wall to open the second lock on the big gate. Next to the panel, you can also notice a chest. Open the chest for Pure Lunum.
With your back to the window, there is a doorway along the right wall. Go through it to reach a small balcony with Training Data.
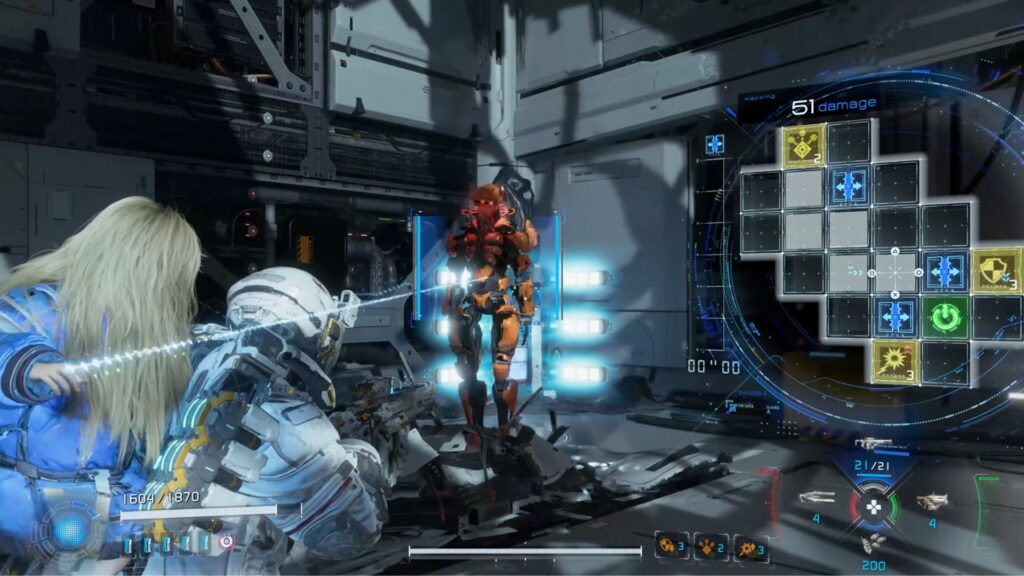
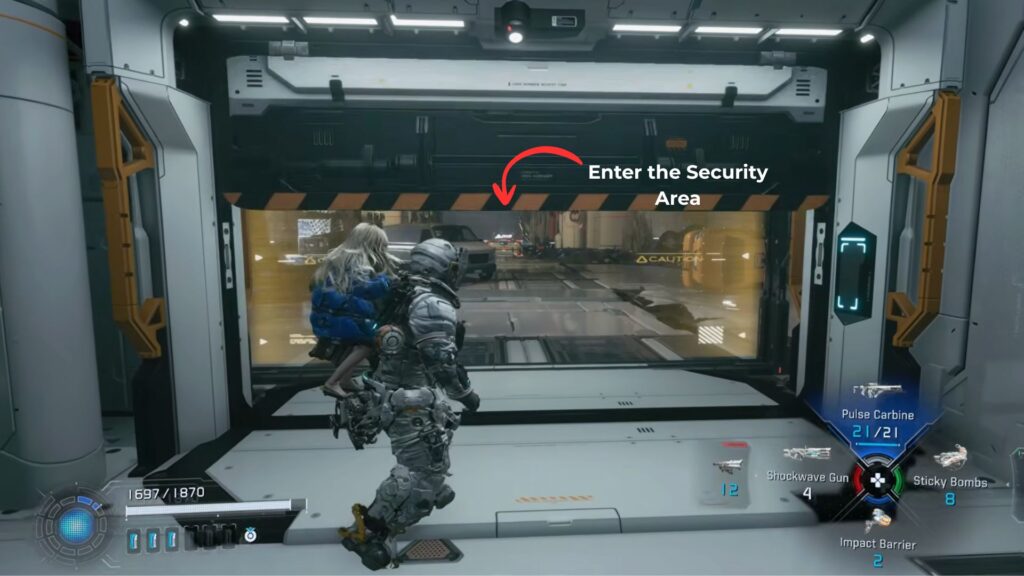
Head back to the locked gate and go through it. As you pass through the circular room, a scene plays and a boss fight kicks off.
How to Beat the Sentinel in Pragmata

The Sentinel is a fast, hard-hitting mech that uses two energy swords and aggressive combo attacks. Since Diana is with you, the fight is easier than before.
Stay close and have Diana Cleanse the Dead Filament whenever it covers the boss, especially right after its attack combos. This makes hacking easier and lets you deal more damage.
The Sentinel uses quick slash combos, lunges, aerial attacks, and ranged moves like missiles and energy slashes. It can also mark areas on the ground that explode shortly after, so keep moving and avoid those spots.
In the second half of the fight, it will pull you toward it while charging a big explosion. Run and dash away to avoid taking heavy damage. After this attack, it will be covered in Dead Filament again, so Cleanse it quickly.
Overall, keep moving, dodge often, Cleanse when needed, and attack during the short openings after its moves.
Lunafilament Lab
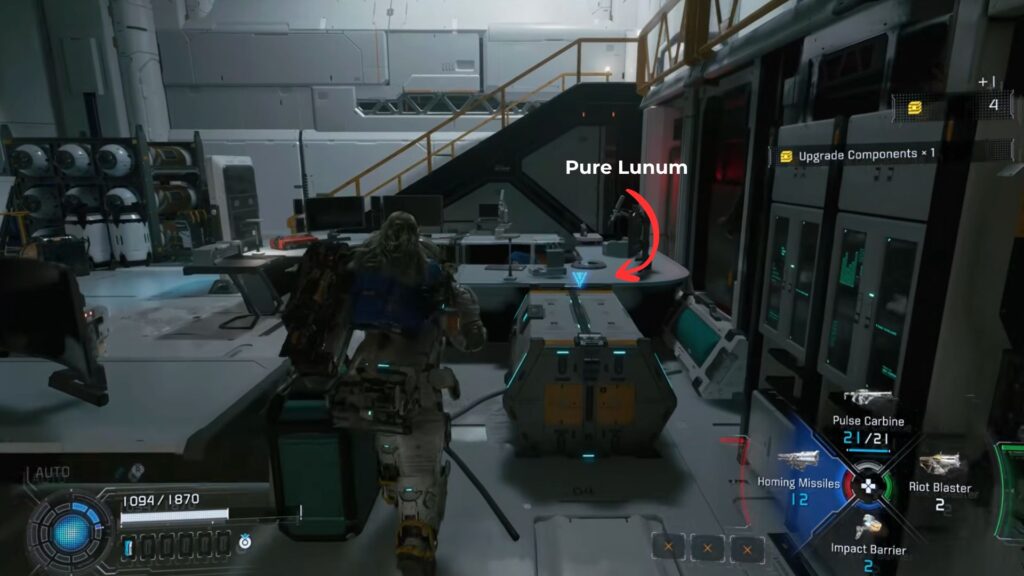
After you defeat the Sentinel, go through the door that the Sentinel was guarding and enter the next room. Inside, you will see a blue panel. Interact with it for File: Dr. Higgins – Availability. There’s also a chest nearby that contains Pure Lunum, so make sure to grab that.

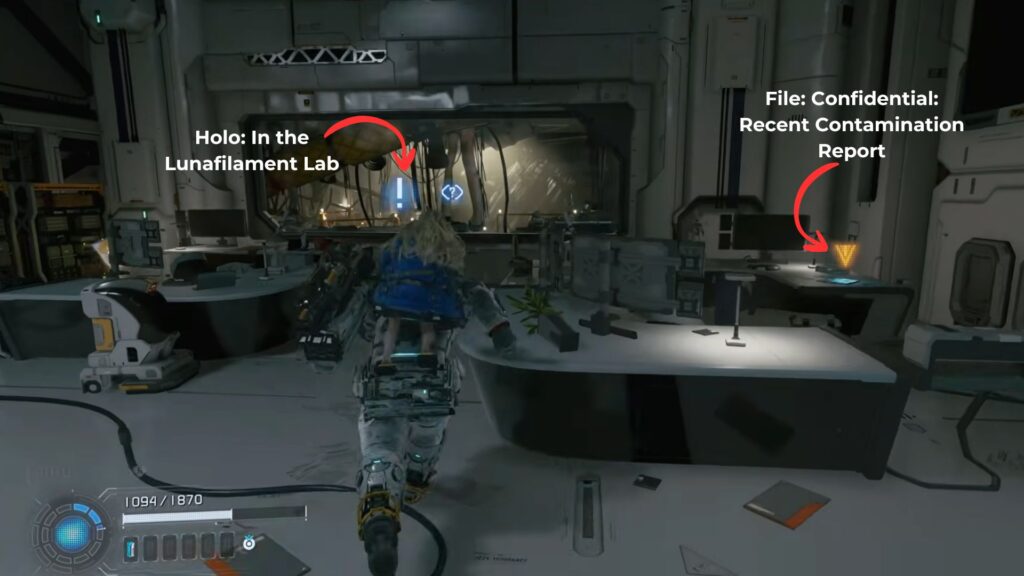
Look over at the table in the room and pick up Email: Re: Higgins Lab – Sec. Office along with File: Confidential: Recent Contamination Report. After that, head to the right side of the room near the window. You’ll find Holo: In the Lunafilament Lab there, along with an Upgrade Component.
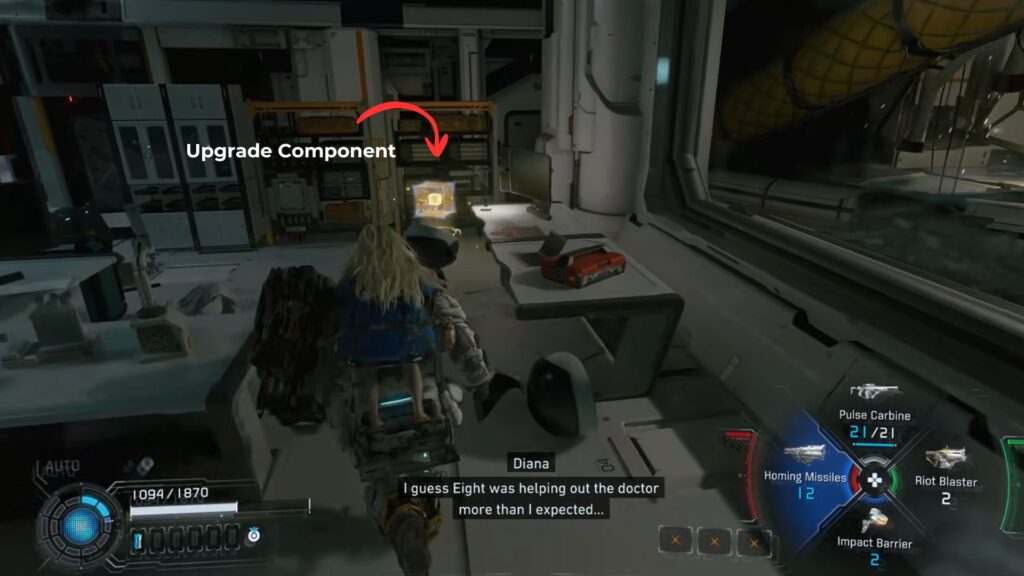
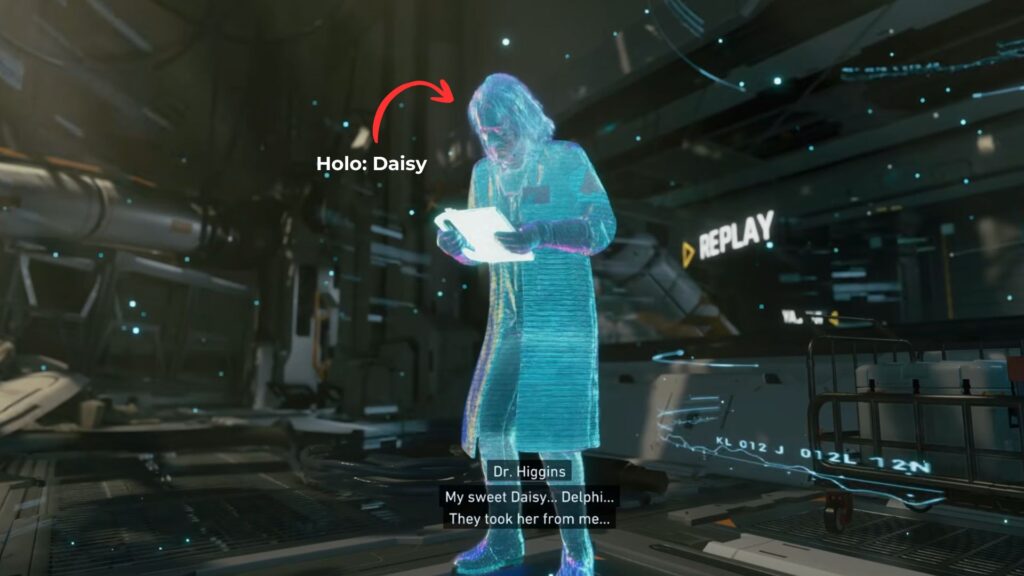
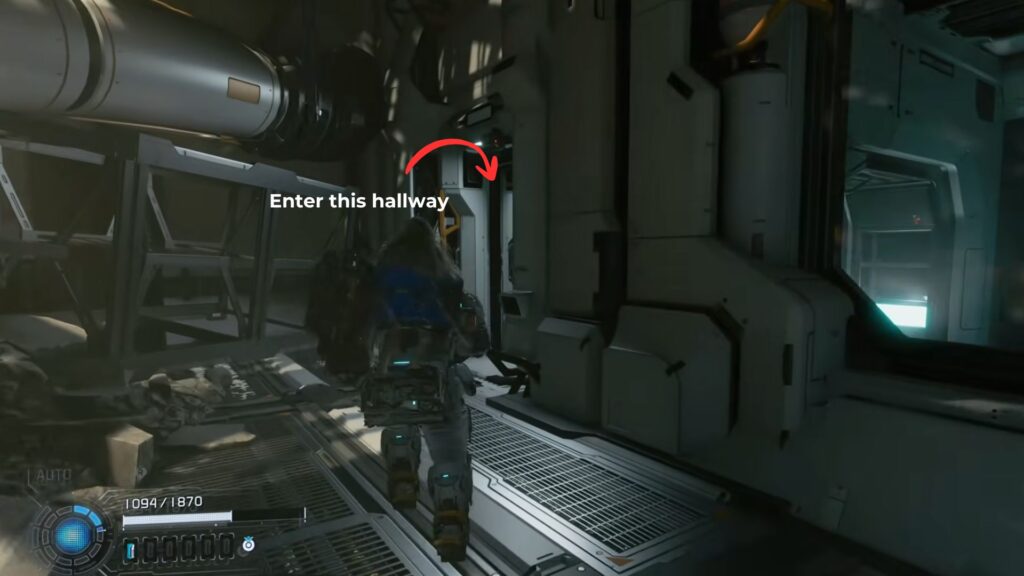
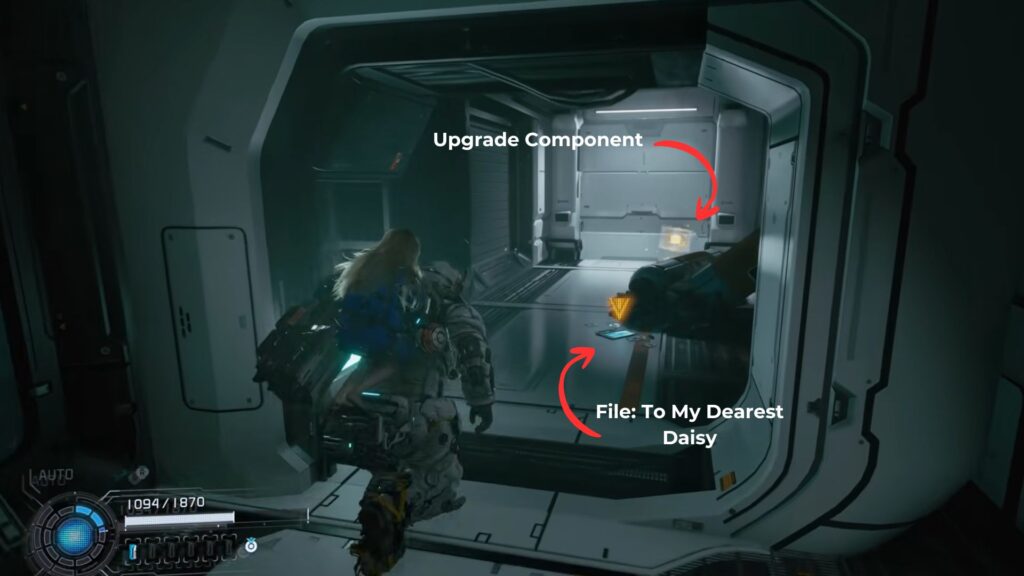
Next, go up the stairs. As. you reach the top and pass an open door on your left, Holo: Daisy will start playing. Go into the room adjacent to it and head through the door at the back. This leads to a hallway where you can collect File: To My Dearest Daisy and another Upgrade Component.
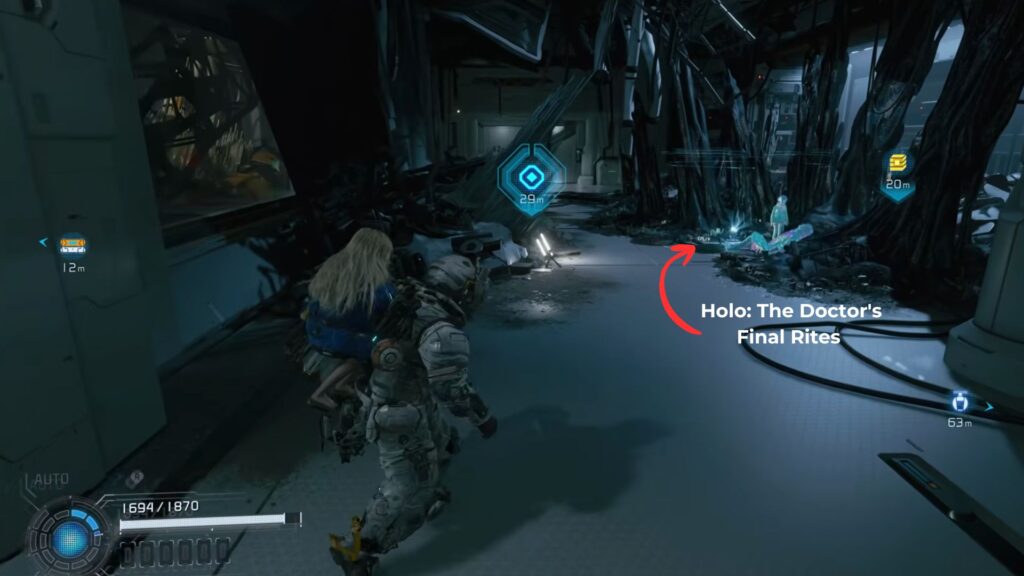
Return to the main area and go through a door that leads to a flight of stairs on the left. Follow the path forward, and you’ll trigger Holo: The Doctor’s Final Rites as you go.
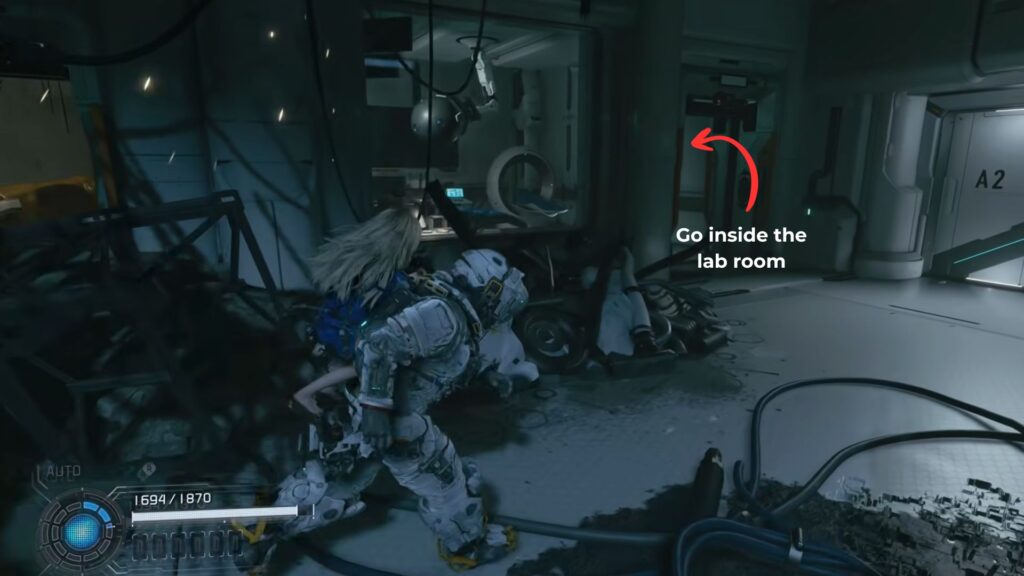
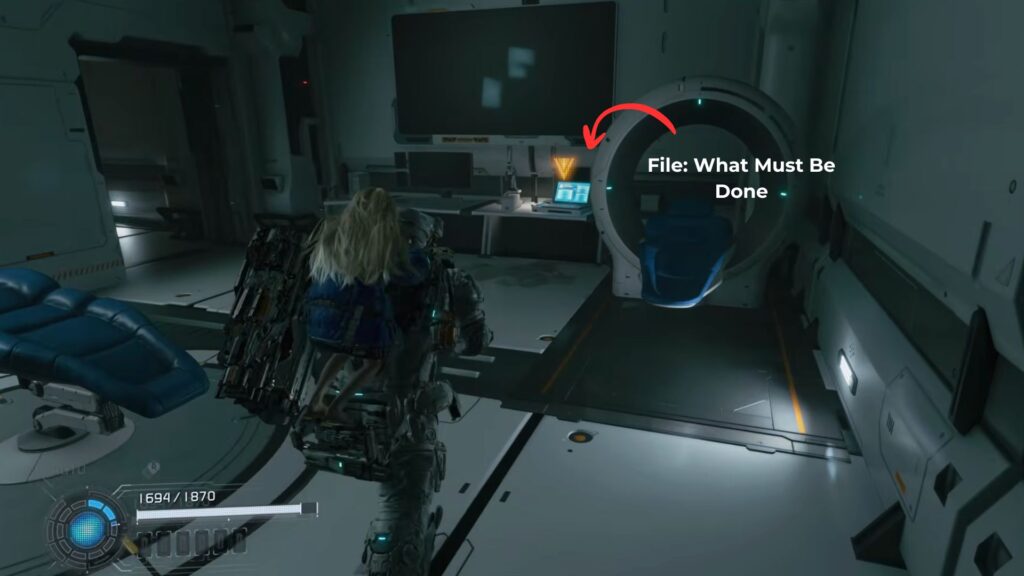
At the end of the hallway, don’t go through the main door just yet. First, check the lab room on the left. Inside, there’s a laptop with File: What Must Be Done, and a Safe Box that contains 6x Upgrade Components, so it’s worth grabbing everything here.

Once you’re done, head back out and look across the laboratorium door. You’ll find one more Upgrade Component there in the hallway.
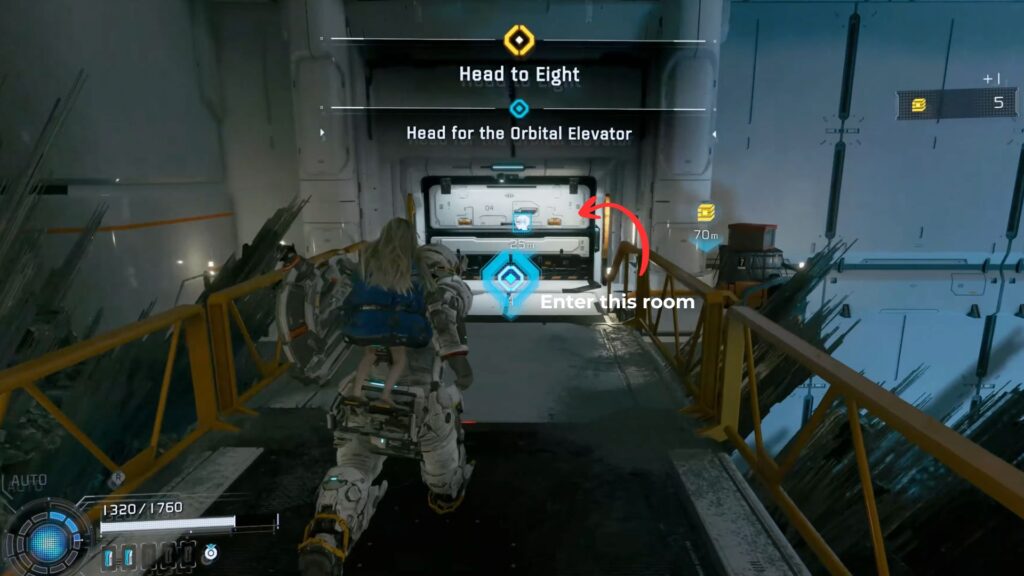
Finally, go through the door at the end to reach the Orbital Elevator.
Orbital Elevator
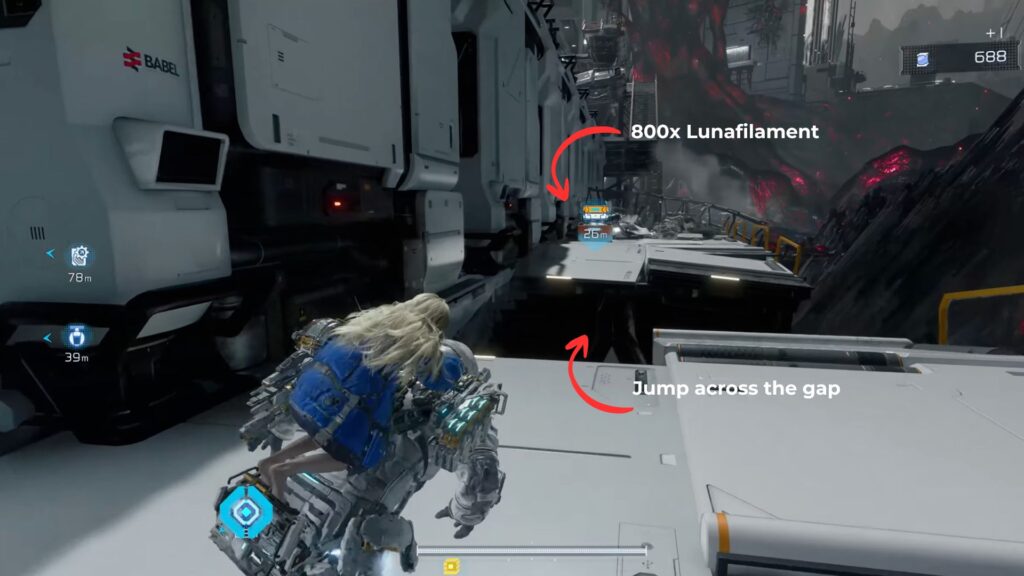
Step through the door to reach the Escape Hatch area. Before going straight ahead, turn right and follow the wall until you find an entrance that leads outside to a walkway.
Once you’re on the walkway, turn left and jump across the gap. There’s a Safe Box on the other side with 800x Lunafilament inside.
After jumping over, look down from the edge of that gap. You should spot a Mini Cabin Figure below. As usual, shoot it to collect it. If you’ve been finding all of them so far, this will be the last one and unlock the Mini-Hunter Supreme trophy.
After that, continue along the walkway to the other end and go down the stairs to pick up an Upgrade Component.
When you’re done, head back to the Escape Hatch. This time, follow the main path forward and drop down to the area below to keep going.
Head toward the door in front of you, but before you reach it, a laser grid will block your way back and lock you in. You’ll need to defeat two waves of enemies to open the door:

| Wave | Enemies |
|---|---|
| Wave 1 | Walker MK-II x2, Anomalous Walker x1 |
| Wave 2 | Impeder x1, Anomalous Walker x1 |
Once they’re down, the door will unlock.
In the next room, the floor is covered in Dead Filament and Filament Mass. There are also two Anomalous Walkers hiding around.
Keep on walking and in the middle of the area, look to the left side of the path. There’s a hidden Holo-Wall there.
Go inside, drop down, and enter the room below. A Creeper is waiting inside, so take it out first. After that, collect everything:
- An Upgrade Component
- Safe Box 1 – Lunafilament
- Safe Box 2 – 10x Upgrade Components
Leave the room through the other exit to find a tablet with File: Time to Say Goodbye. At the end of this path, hack the panel to open a door above you. Climb back up to return to the previous area.
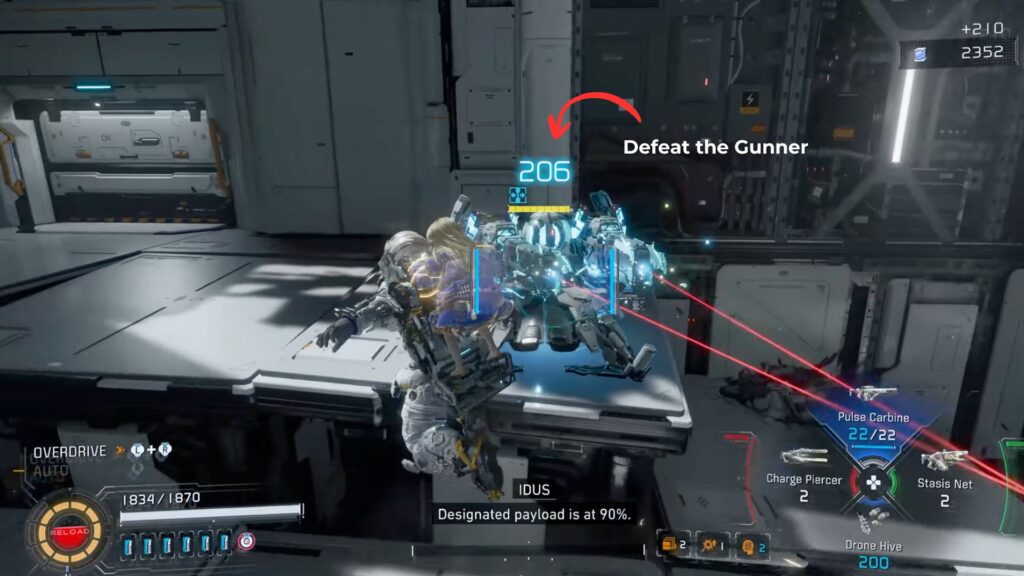
As you move forward, a Gunner in the distance will keep firing missiles at you. Move carefully by jumping between platforms, clear crystals when you can, and keep pushing forward until you reach the Gunner and defeat it.
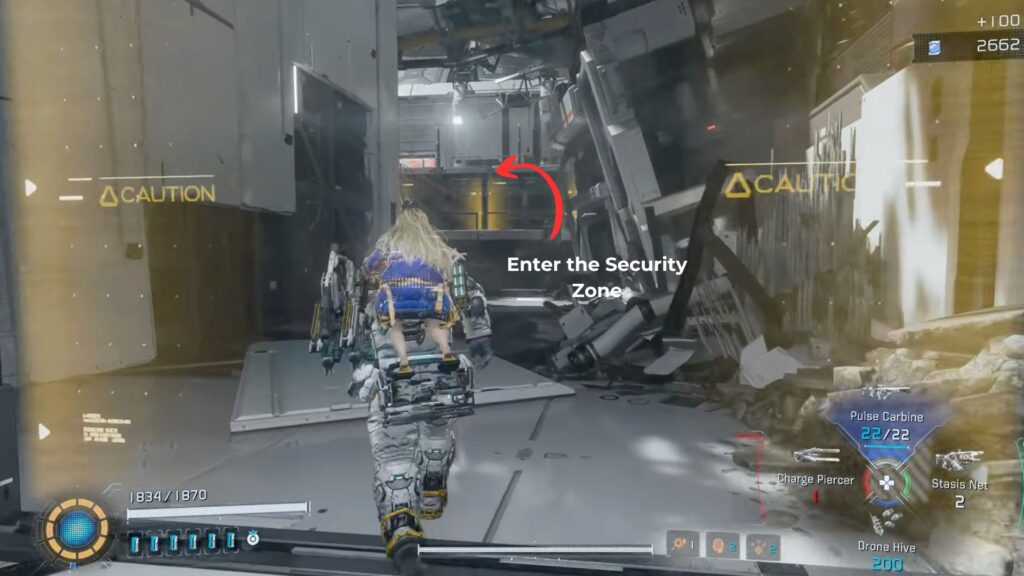
Now go through the door the Gunner was guarding. You’ll enter a Security Zone where enemies spawn in groups. It’s better to fight each group as they appear instead of rushing ahead.
- At the first stairs, enemies spawn at the top: a Crusher, a Walker MK-II, and two Walkers. Fight them from below first.
- At the next area, a Lancer, an Executor, and a Bomber will appear.
- At the top, the final group shows up: one Anomaly and three Anomalous Walkers. Defeat them all to unlock the door ahead.
Before moving on, go back down to the bottom of this area and take the door there. Inside, you’ll face two jammers, three Missile Watchers, and a Watcher MK-II.
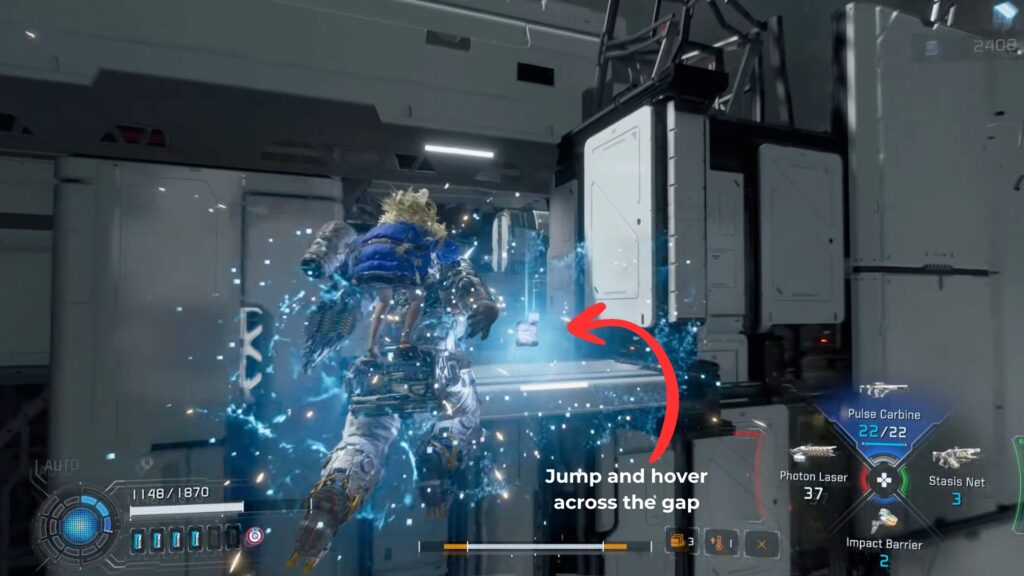
Clear them out and work your way up, then go through the door at the top. Jump and hover across the gap.
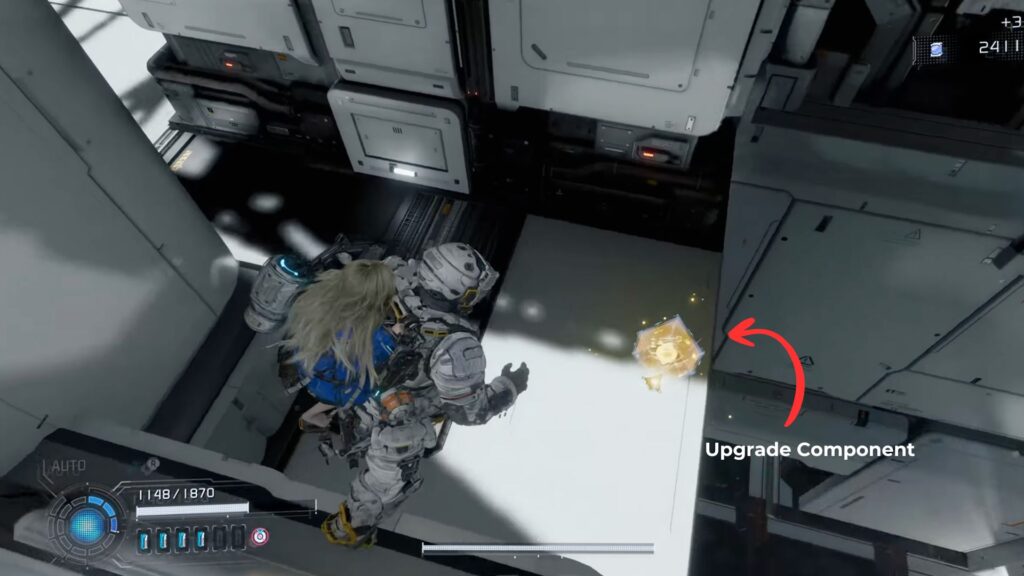
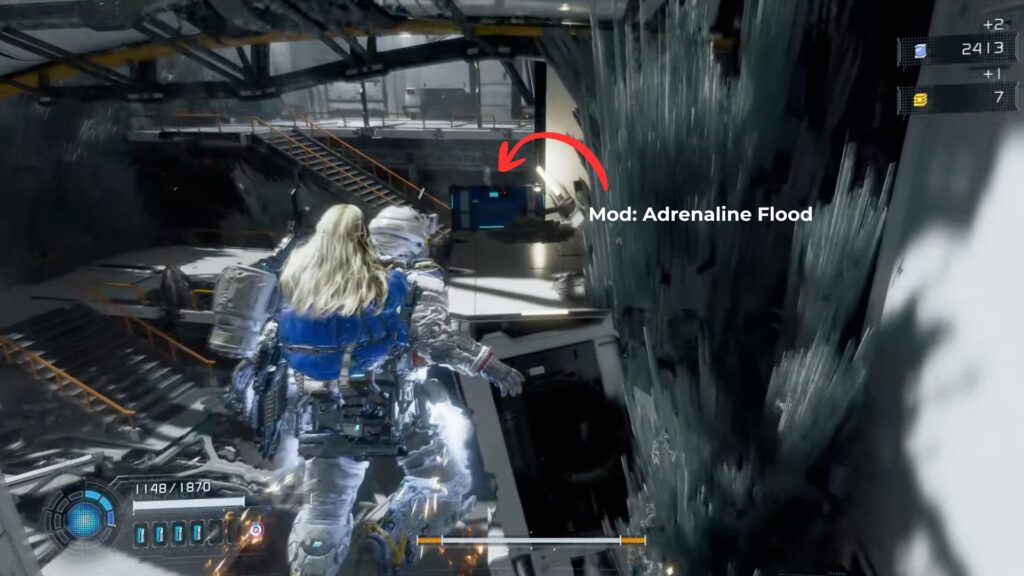
On the other side, drop down to grab an Upgrade Component. Then follow the path along the left ledges to find a chest with Mod: Adrenaline Flood.
After you are all done, head back up to the top of the Security Zone and go through the main door to continue.
Final Stretch
Go up the stairs and turn right to pick up an Upgrade Component and a Safe Box with 6x Upgrade Components.

Keep going up the next set of stairs and follow the sloped path to the top. On your right, you’ll find an Escape Hatch. This is the last one in the game, so if you’ve found all the others, you’ll unlock the Escape Artist trophy here.
Look across from the Escape Hatch on the upper walkway to find one last collectible: a Safe Box with a Cabin Coin.
Before moving forward, this is a good time to finish anything you missed. You can go back and collect leftover collectibles, complete Training Simulations, or upgrade your gear as much as possible. Even though you can return to this point later before the final boss, it’s easier to prepare now.
When you’re ready, follow the path from the Escape Hatch into the large room ahead. A cutscene will start, and then the first of the two final boss fights begins.
How to Defeat Idea in Pragmata
Idea is Eight’s true form. She’s a large boss with eight tentacles, and the fight works the same way as before. You have to use Diana to hack her, then attack her weak points (her chest and the crystal on her head).
She will often cover herself in Dead Filament. When that happens, you can’t hack her and your damage drops. It might take a few tries to hack it during this time, but once it’s gone, you can hack her again. The safest time to do this is right after she finishes an attack.
Phase 1

Most of her attacks use her tentacles and have long reach, so try to stay just outside their range.
- She can sweep her tentacles forward and back, hitting twice.
- She may slam them down and follow with a ground sweep.
- Sometimes she pulls them back on one side and quickly thrusts forward—this one is fast, so dodge when you see it coming.
At a distance, she uses Dead Filament attacks:
- A slow red orb that follows you.
- Spikes that come out of the ground in a line. You need to watch out for red markers and move away quickly.
- A large spike attack around her. Again, if you see a red circle, dash out fast.
Sometimes she puts her tentacles together like a shield. While this is up, you deal less damage and hacking is harder, so use that time to heal or grab supplies.
She can also trap you in place with Dead Filament and slowly walk toward you. When this happens, use Diana to hack and break free quickly. When her health reaches about half, Phase 2 begins.
Phase 2

In the second phase Idea becomes more aggressive and starts making hacking harder by adding hazards to Diana’s grid. Most of her old attacks stay the same, but some are faster or have extra hits.
Her main new move is a big area attack. She floats to the center and charges up, then Dead Filament drops from above across most of the arena. Red markers show where it will land, and crystals appear that block your movement. Keep moving, avoid the markers, and find safe paths between the crystals. After the attack, she destroys the crystals herself.


When her health reaches zero, a prompt appears where you need to activate Diana’s Deletion Protocol to finish the fight.
How to Beat Abiosis in Pragmata
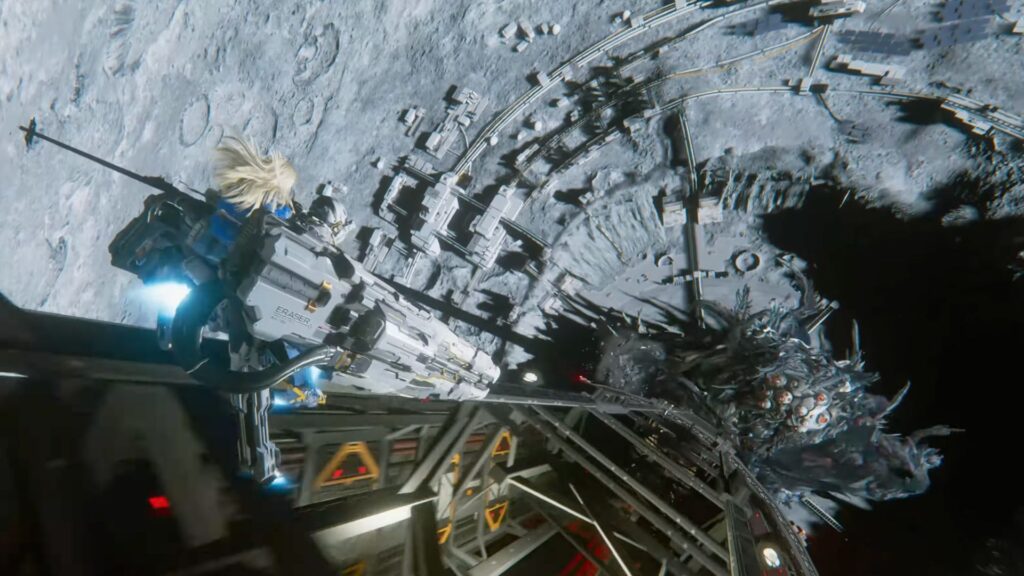
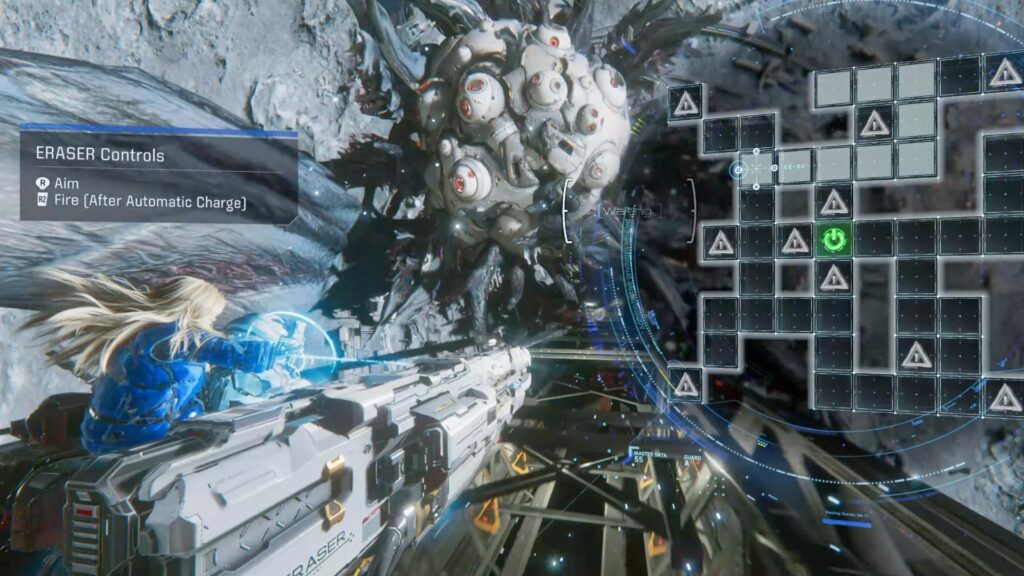
After the cutscene, the final boss fight begins. This one is different from the rest of the game. You’re riding up the Orbital Elevator in a mech, and the boss Abiosis is chasing you from below.
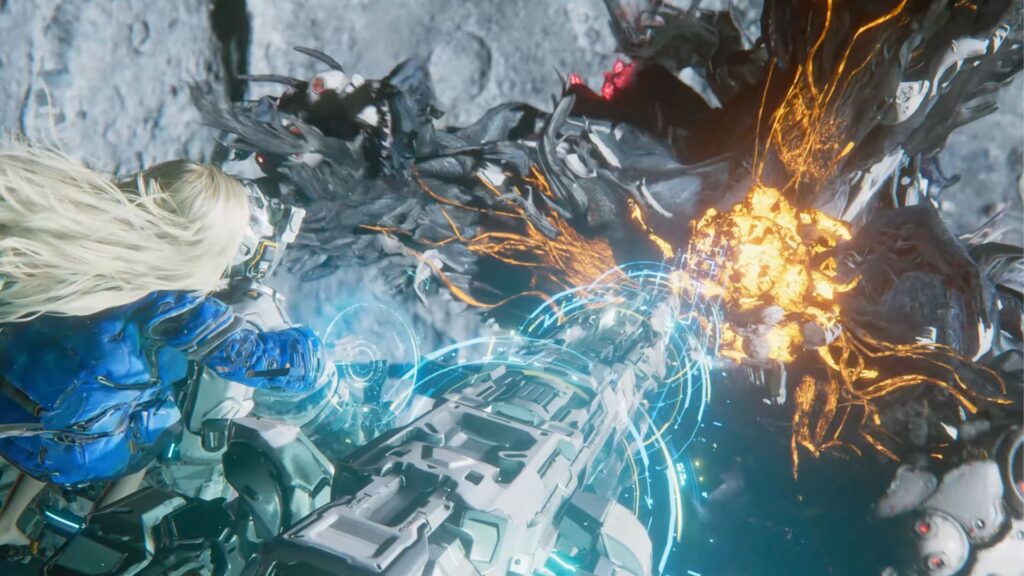
When the boss gets close, use Diana to hack it. This charges your mech’s cannon. Once it’s ready, aim at the red highlighted weak spot on the boss and press the button when the prompt appears. You need to hit it four times.
After the fourth hit, Diana will do one last hack automatically. Then you’ll get one final shot with the cannon. Hit the prompt to finish the fight.
After the boss is defeated, move forward through the area and head into the nearby hangar. There’s a cargo ship waiting. Walk up to it to trigger the final scene.
That’s the end of Pragmata. You’ll also unlock the Our Promise trophy for completing the game. Congratulations!

Post-Game Unlocks
After finishing the game, you unlock a few new things to keep playing:
- Unknown Signal becomes available in the main menu. It puts you right before the final boss again, but with extra challenges. Completing them rewards you with new Mods, Weapons, Outfits, and more.
- Lunatic Difficulty is unlocked if you want a much harder version of the game.
- New Game Plus lets you start a new run while keeping all your weapons and upgrades from your previous playthrough.
- You also get new outfits:
- Astro Classic Type-B for Hugh
- Pink Pop for Diana
- Finally, a new weapon called the Jackhammer can now be crafted at the terminal in the Shelter.
All Collectibles in Pragmata Sector 06: Central Port
| Category | Item | Location |
|---|---|---|
| Mods | Mod: Untapped Potential | Chest inside the door at the base of the stairs — Port Entrance |
| Mod: Heat Transfer | Chest behind the lasers on the left — Regolith Lab lobby upper floor | |
| Mod: Cursed | Chest in the basement area after clearing two Spiderbots, two Anomalous Walkers, and a Crusher MK-II — Regolith Lab | |
| Mod: Adrenaline Flood | Chest along the left ledges after crossing the gap — Orbital Elevator | |
| REMs | REM: Parasol | Through the door at the top of the ramp near the raised ledges — Port Entrance |
| REM: Water Gun | Hidden room behind the Holo-Wall in the large room — Regolith Lab | |
| REM: Sandcastle | Hallway through the unlocked five-lock door — Lunafilament Lab Side Area 2 | |
| Mini Cabin Figures | Mini Cabin Figure | On the wall above the freighter station — Port Entrance Cargo Area |
| Mini Cabin Figure | Corner above the door leading back to the lobby — Regolith Lab | |
| Mini Cabin Figure | Below the gap on the outer walkway — Orbital Elevator | |
| Safe Boxes | Safe Box — Cabin Coin | Left end of the larger platform past the crystal blockade — Research Sector |
| Safe Box — 500x Lunafilament | Small ledge at the bottom of the stairs past the Anomaly fight — Research Sector | |
| Safe Box — Cabin Coin | Through the door at the top of the first staircase — Regolith Lab | |
| Safe Box — Cabin Coin | Side Area 1, room below the Lunafilament Mass hole — Lunafilament Lab | |
| Safe Box — Lunafilament | Side Area 1, room below the Lunafilament Mass hole — Lunafilament Lab | |
| Safe Box — 500x Lunafilament | Ledge below the five-lock door area — Lunafilament Lab Side Area 2 | |
| Safe Box — Pure Lunum (x2) | After the Air Raider fight — Regolith Lab Red Zone 8 | |
| Safe Box — 6x Upgrade Components | Through the previously laser-blocked door — Regolith Lab | |
| Safe Box — 800x Lunafilament | Across the gap on the outer walkway — Orbital Elevator | |
| Safe Box — Lunafilament | Hidden room behind the Holo-Wall — Orbital Elevator | |
| Safe Box — 10x Upgrade Components | Hidden room behind the Holo-Wall — Orbital Elevator | |
| Safe Box — 6x Upgrade Components | Platform to the right after the Security Zone — Orbital Elevator Final Stretch | |
| Safe Box — Cabin Coin | Upper walkway opposite the final Escape Hatch — Orbital Elevator | |
| Upgrade Components | Upgrade Component | Right side after the lift from Port Entrance — Research Sector |
| Upgrade Component | Far side of the blocked walkway via crates — Research Sector | |
| Upgrade Component | Path up after the raised block near the red panel — Port Entrance | |
| Upgrade Component | At the far end of the laser hallway — Regolith Lab | |
| Upgrade Component | Opposite side of the room from the Area Guide tablet — Regolith Lab Red Zone side room | |
| Upgrade Component | By the stairs leading up in Side Area 1 — Lunafilament Lab | |
| Upgrade Component | Room after the Sentinel fight, by the window — Lunafilament Lab | |
| Upgrade Component | Hallway past Holo: Daisy side room — Lunafilament Lab | |
| Upgrade Component | Hallway across from the lab door — Lunafilament Lab | |
| Upgrade Component | Bottom of the stairs on the outer walkway — Orbital Elevator | |
| Upgrade Component | Drop at the end after crossing the gap — Orbital Elevator | |
| Upgrade Component | Platform to the right after the Security Zone — Orbital Elevator Final Stretch | |
| Files & Holos | Guidance: Notice for Earth Cargo and Returnees | Blue screen near the freighter dock — Port Entrance |
| Guidance: Access Log Notice | Blue screen by the desk — Research Sector | |
| File: Cradle Logistics Network Overview | Tablet in the hallway at the top of the first staircase — Regolith Lab | |
| Holo: Eight’s Plan | Near the windows after the Port Entrance security zone | |
| Email: A Dangerous Discovery? | Tablet on a crate after the security zone — Port Entrance | |
| Holo: An Executive Order | Window seating area through the laser-blocked door — Regolith Lab | |
| File: Important Notice | Hidden room behind the Holo-Wall — Regolith Lab | |
| Holo: A Deadly Conclusion | Along the path in Side Area 1 — Lunafilament Lab | |
| Email: Confidential Delphi Information | Left room at the top of the stairs — Lunafilament Lab Side Area 1 | |
| Email: Re: Higgins Lab – Sec. Office | Table in the room after the Sentinel — Lunafilament Lab | |
| File: Confidential: Recent Contamination Report | Table in the room after the Sentinel — Lunafilament Lab | |
| Holo: In the Lunafilament Lab | By the window in the room after the Sentinel — Lunafilament Lab | |
| Holo: Daisy | Open door at the top of the stairs — Lunafilament Lab | |
| File: To My Dearest Daisy | Hallway through the back door of the Daisy side room — Lunafilament Lab | |
| Holo: The Doctor’s Final Rites | Along the path after the main stairs — Lunafilament Lab | |
| File: What Must Be Done | Laptop in the lab on the left before the final door — Lunafilament Lab | |
| File: Time to Say Goodbye | Tablet through the alternate exit of the Holo-Wall room — Orbital Elevator | |
| Guidance: Dr. Higgins – Availability | Blue panel in the room after the Sentinel — Lunafilament Lab | |
| Other | Training Data | Desk in the first room — Research Sector |
| Training Data | Small balcony through the right wall door — Lunafilament Lab Side Area 2 | |
| Storage Expander | Pedestal beside the chest — Lunafilament Lab Red Zone 9 | |
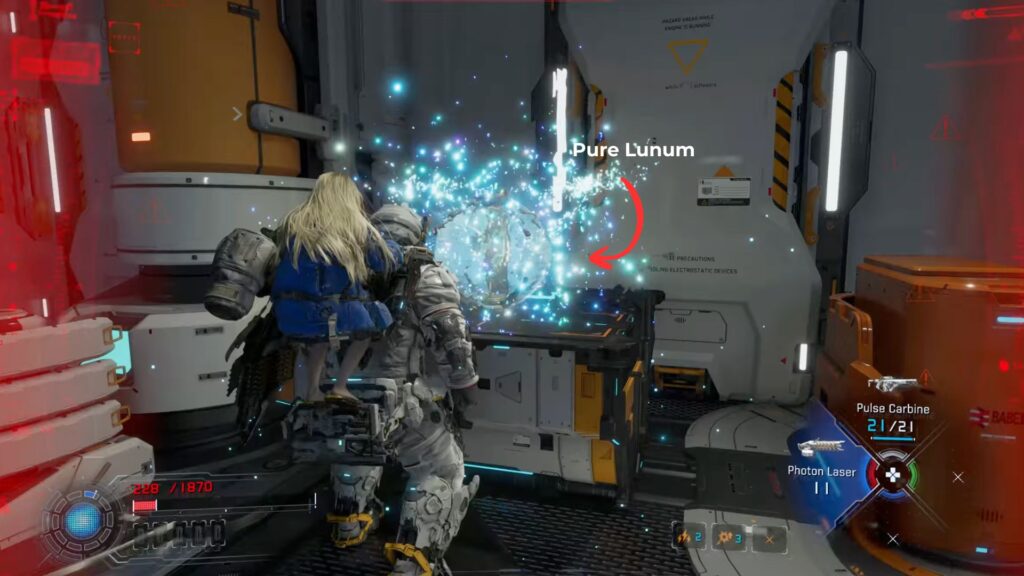
| Pure Lunum | Chest in the room after the Sentinel — Lunafilament Lab | |
| Pure Lunum | Chest after clearing the Regolith Lab Security Room | |
| Pure Lunum | Chest after Red Zone 8 — Regolith Lab | |
| Pure Lunum | Chest after Red Zone 9 — Lunafilament Lab | |
| Pure Lunum | Chest after Side Area 2 security waves — Lunafilament Lab | |
| Escape Hatches | Escape Hatch: Cargo Terminal | Near the blue screen after the freighter dock — Port Entrance |
| Escape Hatch: Research Sector Gate Station | First room of the Research Sector | |
| Escape Hatch: Research Sector Lobby Station | Inside the Regolith Lab entrance | |
| Escape Hatch: Connect Center Station | Large lobby — Lunafilament Lab | |
| Escape Hatch: Laboratory – Main Entrance Station | Start of the Orbital Elevator section | |
| Escape Hatch: Orbital Elevator Access Station | Top of the sloped path — Orbital Elevator Final Stretch | |
| Trophies | Clean Up on Aisle Three | Cleanse three or more enemies at the same time |
| Mini-Hunter Supreme | Shoot every Mini Cabin | |
| Escape Artist | Unlock every Escape Hatch | |
| Our Promise | Complete the game on any difficulty |