
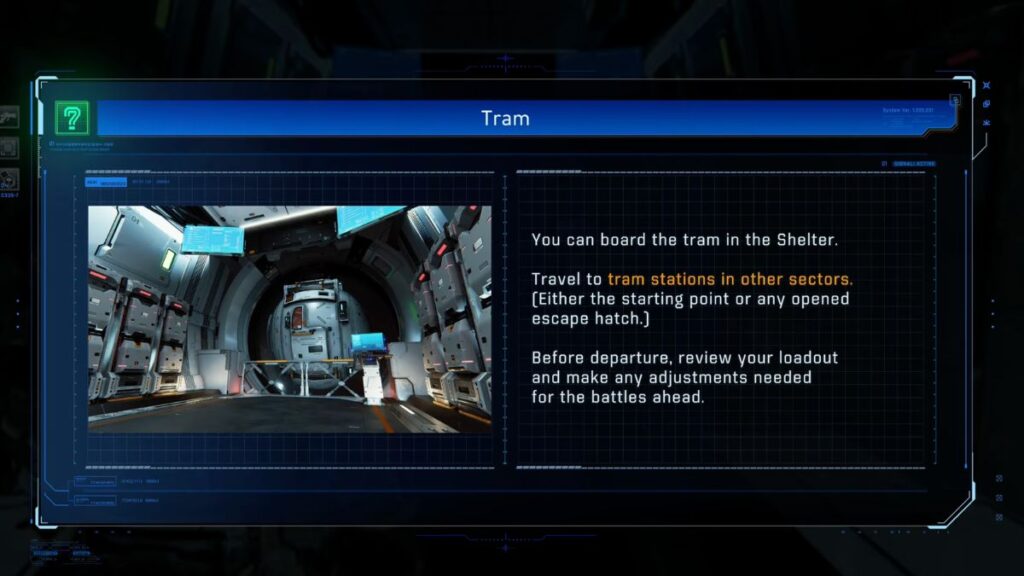
The Solar Power Plant is the first Sector you’ll visit in Pragmata. To get there, press Triangle to open the Tram Menu, choose the Ride Tram option, and select Solar Power Plant. The area is split into three blocks and this guide will take you through each one.
Block 1: Generator Entrance
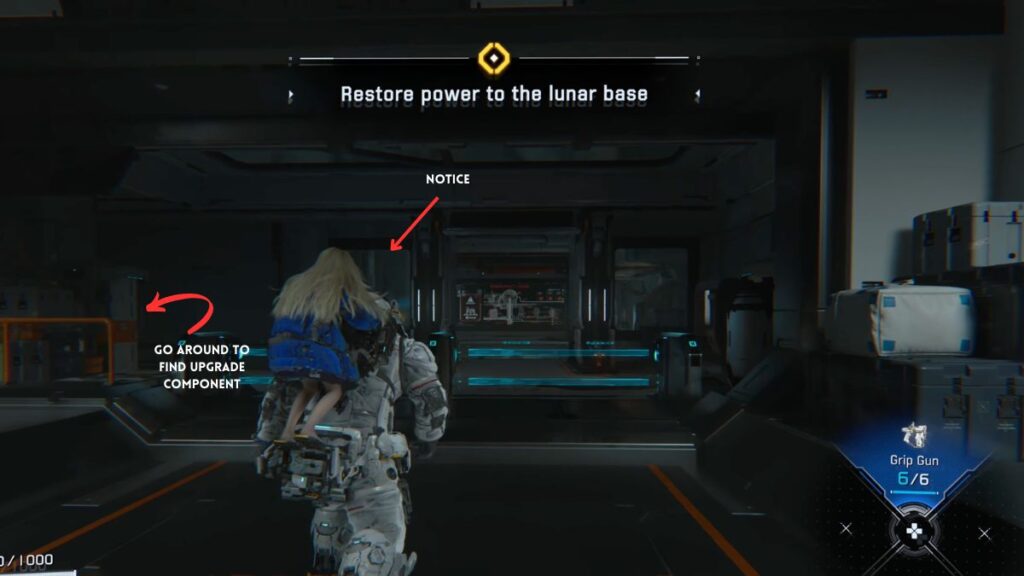
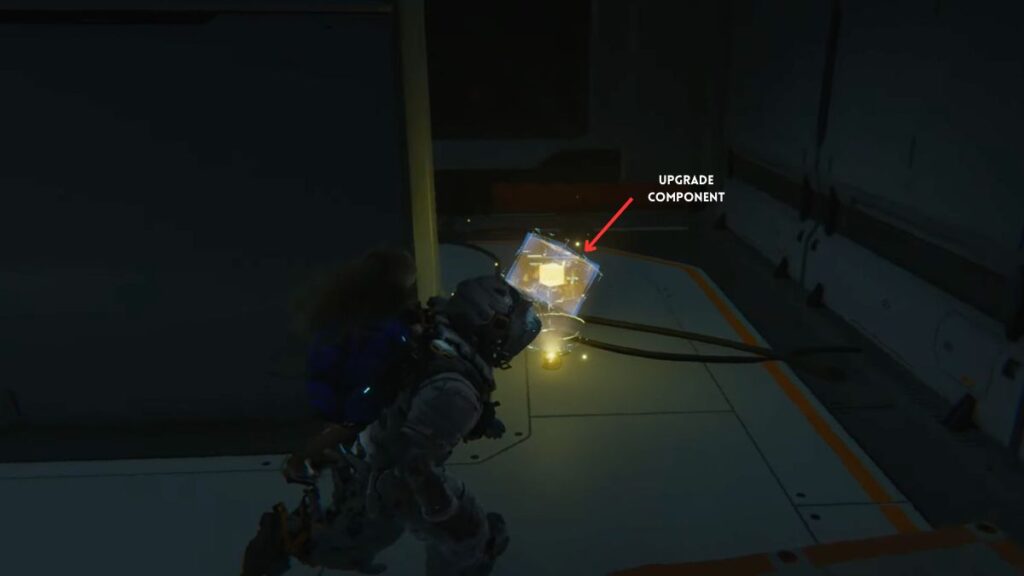
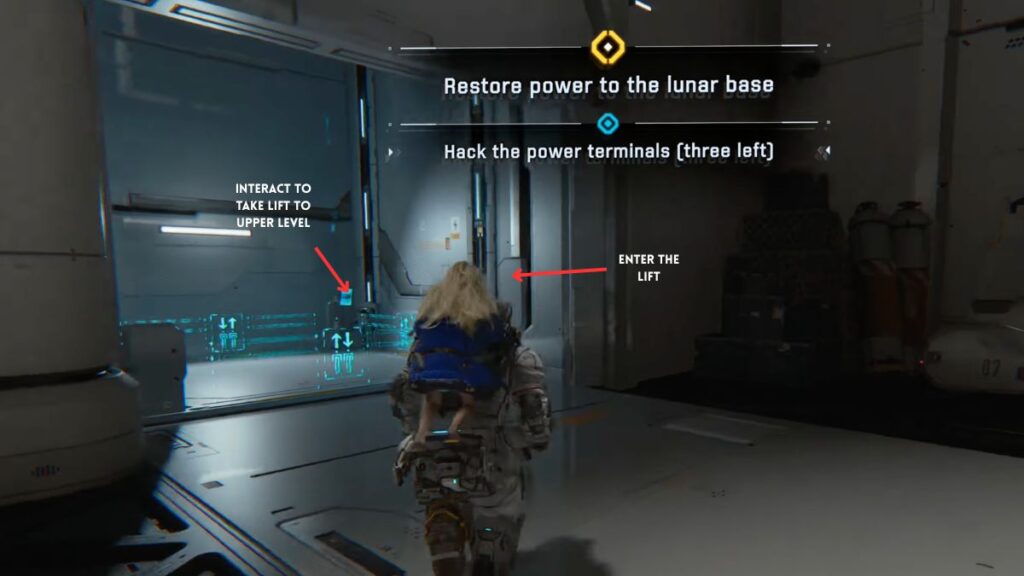
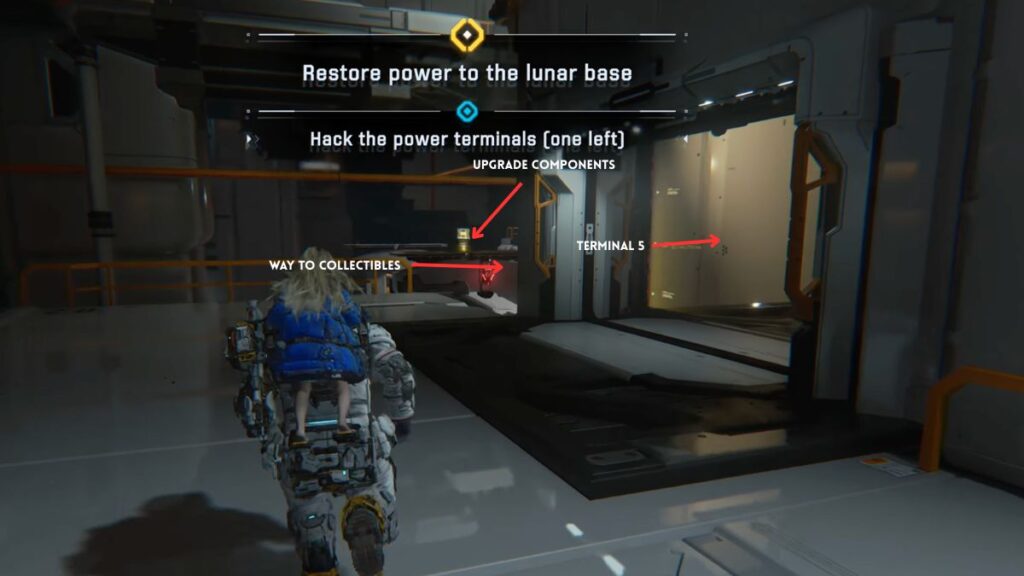
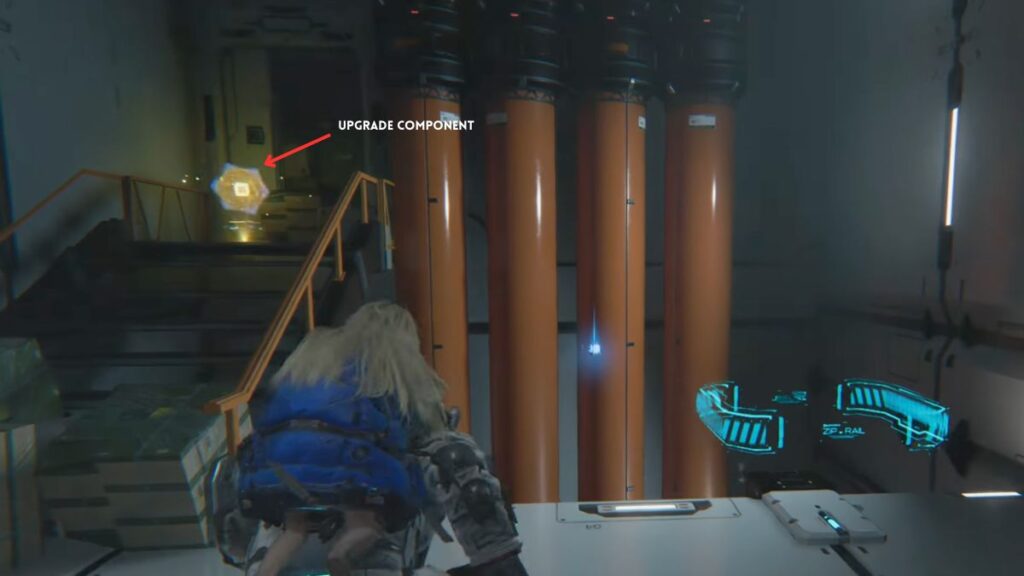
After entering the area, you’ll be prompted to restore power to the lunar base. Move forward past the blue barriers and look to the left to find a screen — interact with it to read a warning message that reads “WARNING: Severe Tremor Detected.” Take the left turn from here and move around the boxes to find your first Upgrade Components. These are used to upgrade Hugh’s abilities and Diana’s hacking at the Shelter, improving stats like damage and health.
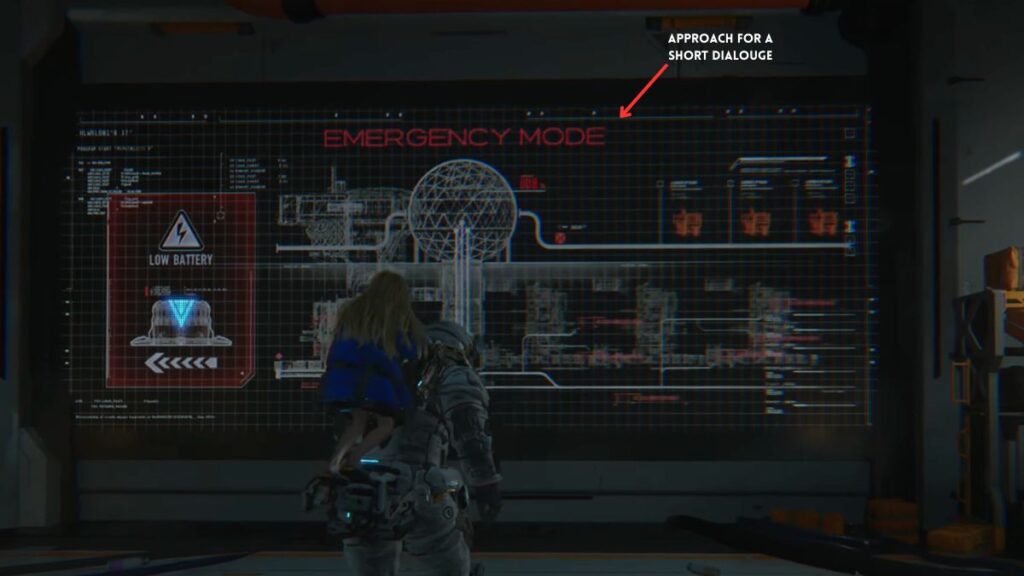
Go through the door into a larger area. As you approach a digital screen ahead, a short dialogue will play between Hugh and Diana. Keep following the linear path and when you get close to the green-lit area, the game will introduce Diana’s Scan ability.
Scan analyzes the surroundings and marks objectives and points of interest with icons. The control is:
- Square — Scan
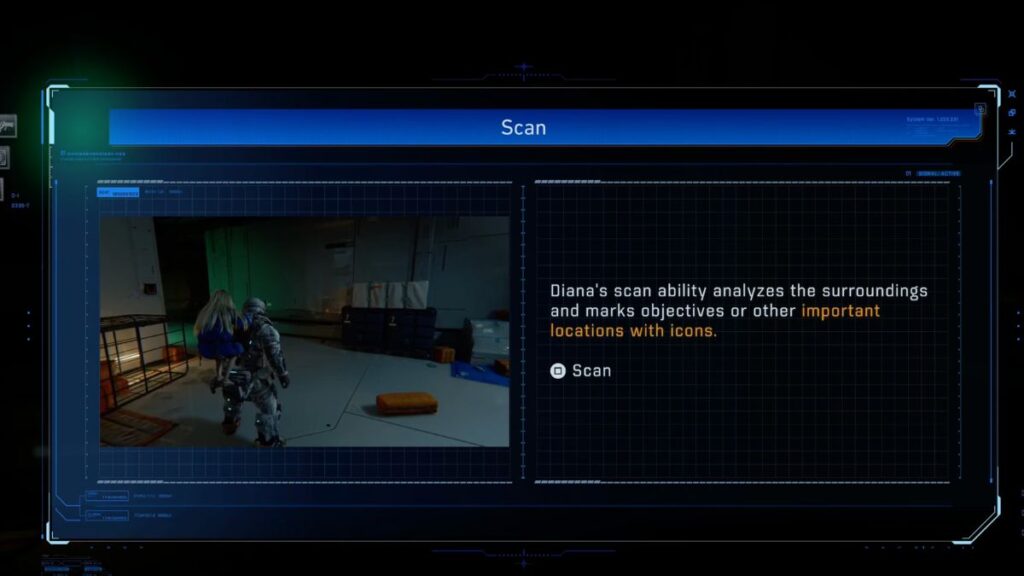
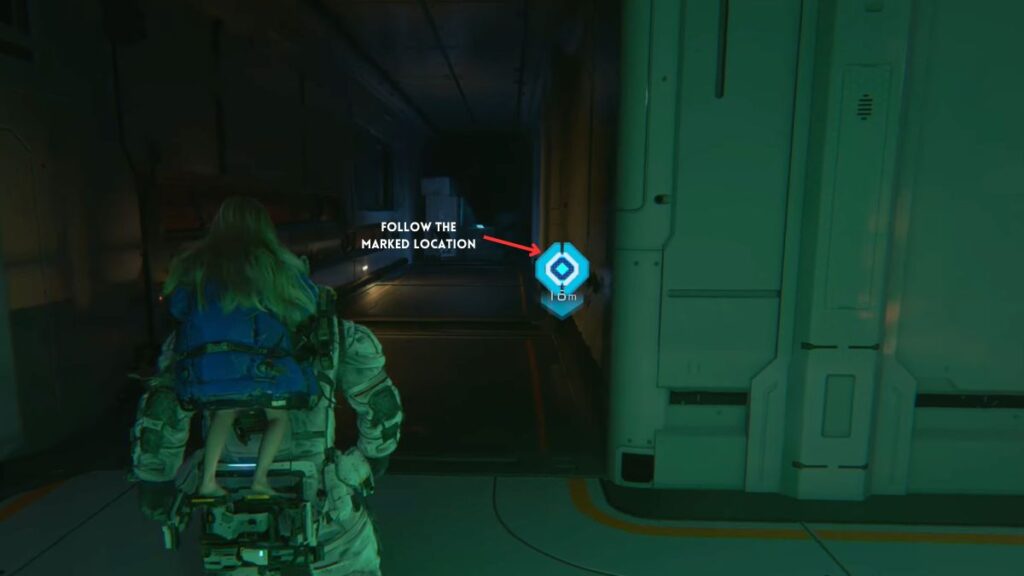
Press Square to scan the area and a pulsating icon will appear nearby marking your next destination. Head toward it and keep moving forward until you reach a terminal. Rotate the circuits to connect them to the center icon to activate the backup generators and bring some light back to the dim corridors.
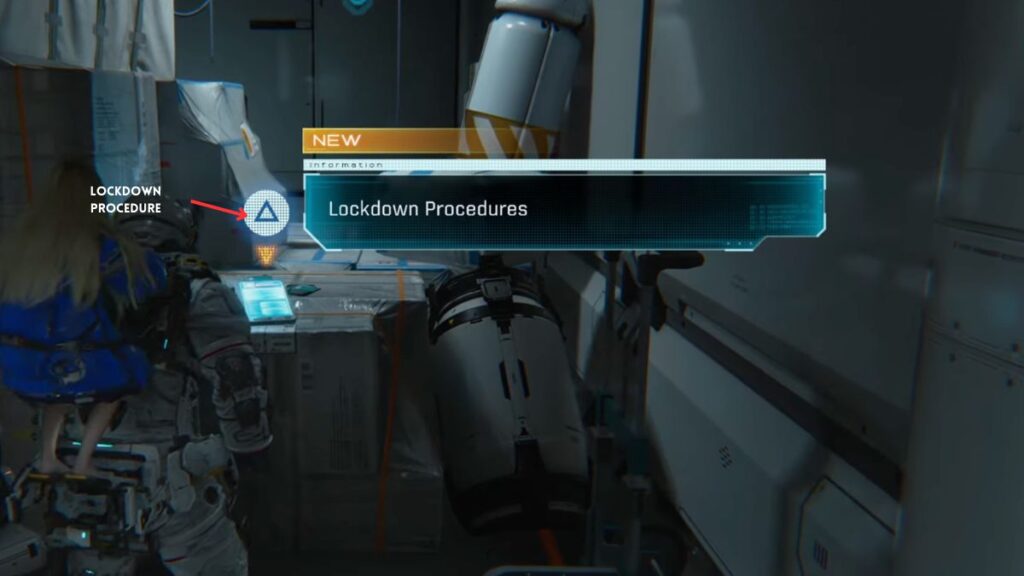
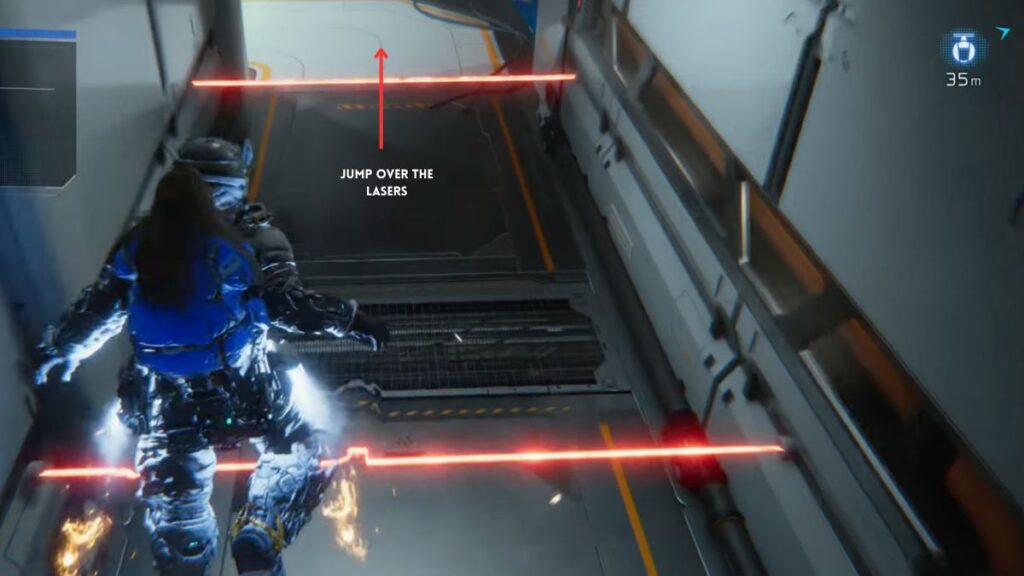
With the generators running, you’ll need to reach the top floor to fully restore the power plant. Turn around and take down the Walker waiting for you. Take a right and in the hallway immediately turn left to pick up the Lockdown Procedure email file. Turn around and jump over the two red lasers blocking the path ahead.
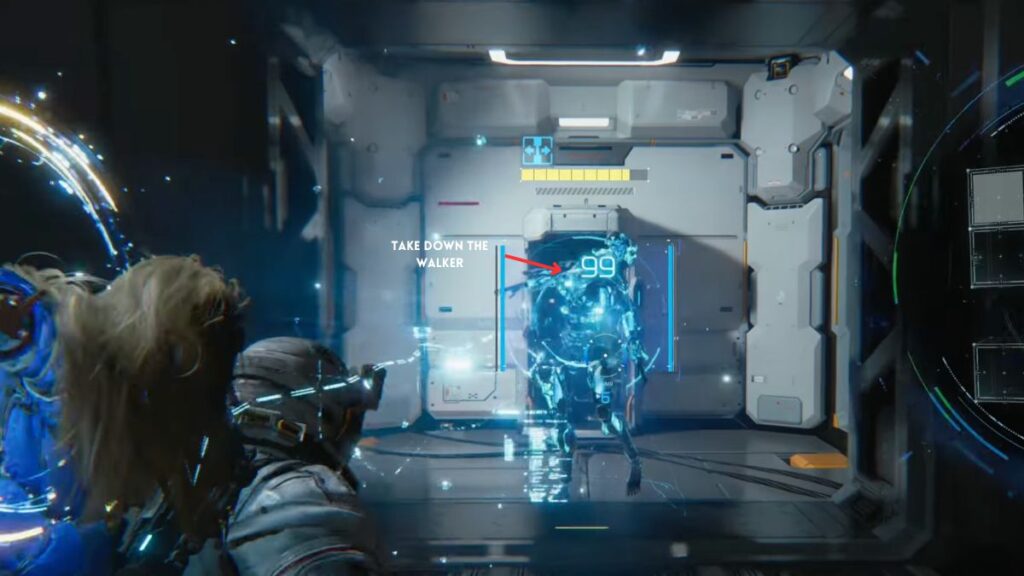
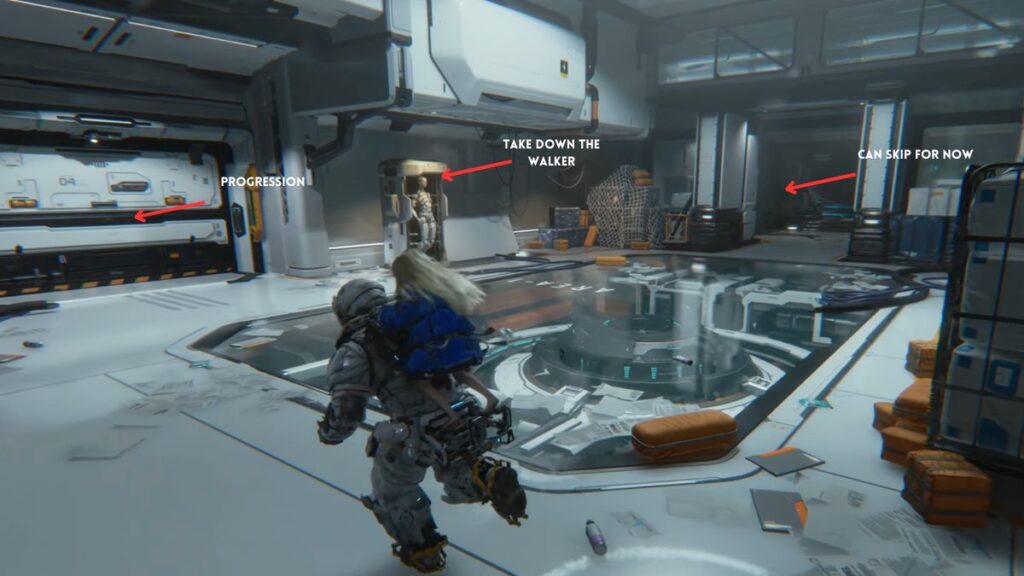
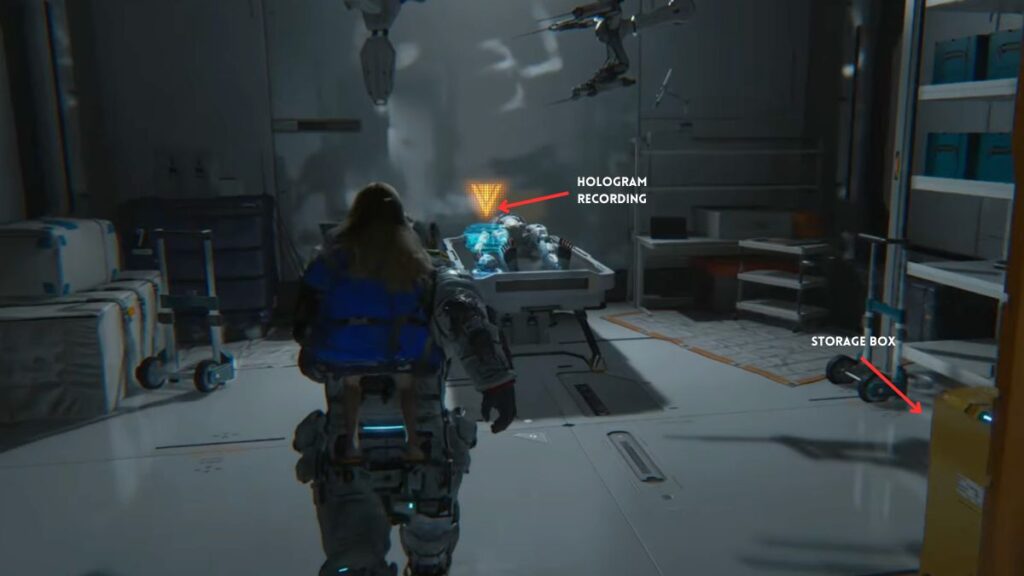
Take a right into an open room. A Walker will activate as you enter, and defeat it to remove the barrier from the exit door. Before leaving, you must have noticed a door when you entered this large area, and in the far right corner of the room. Hack the panel to get inside. Activate the item on the hospital bed to trigger a hologram recording. Check the corner near the door to find a Storage Box.

Return to the main room where the path splits in two, one going straight ahead and one going right. Take the left door first. At the T-junction, take a left to reach a dead end — there’s a collectible here but you don’t have what you need yet, so make a mental note and come back later. Take the right path instead.
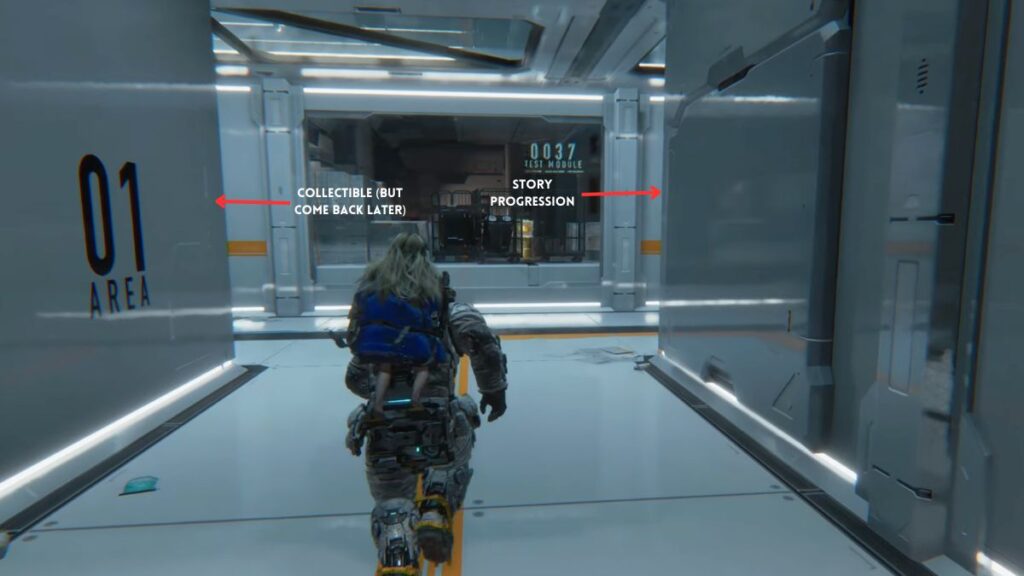
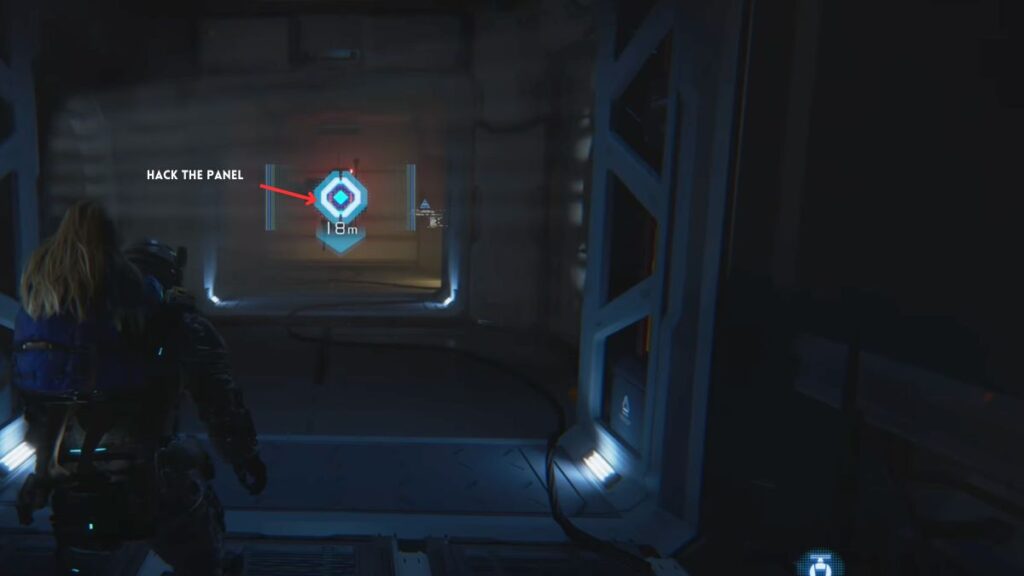
On the right path, you’ll spot a room with a blocked entrance that you can’t access just yet. Keep it in mind and continue straight into the hallway, where a flying drone called a Watcher will come at you. Destroy it. Ahead is a door sealed by two locks. You’ll need to hack two power terminals to open it. One is on the right side of the doors, and the other is inside the room on the left. Before heading to the hallway, turn around to pick up another Upgrade Component.

Go through the newly unlocked door and keep walking until you reach an area with two Walkers and a Watcher. Take them all down before moving on.
Block 2: Power Distribution Center
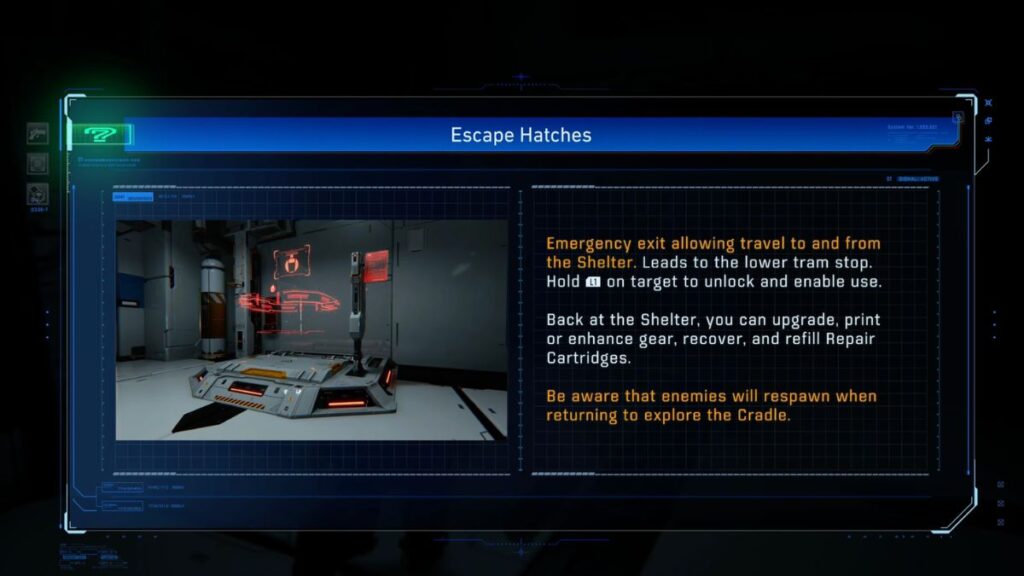
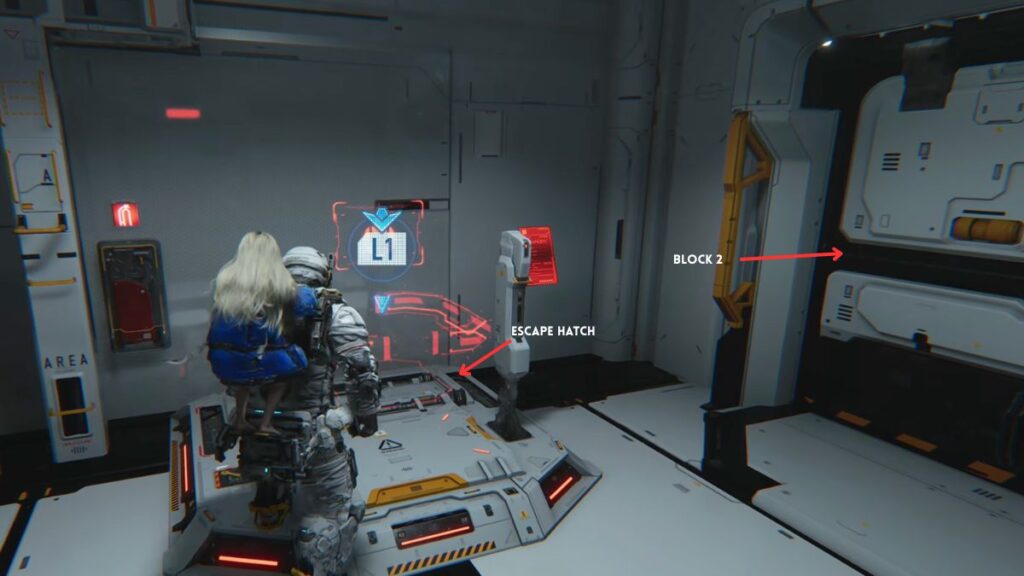
As you enter the next room, you’ll be introduced to the Escape Hatch, an exit that sends you back to the Shelter at any time. Activate it by pressing L1. Go through the door right beside it to enter the second block.
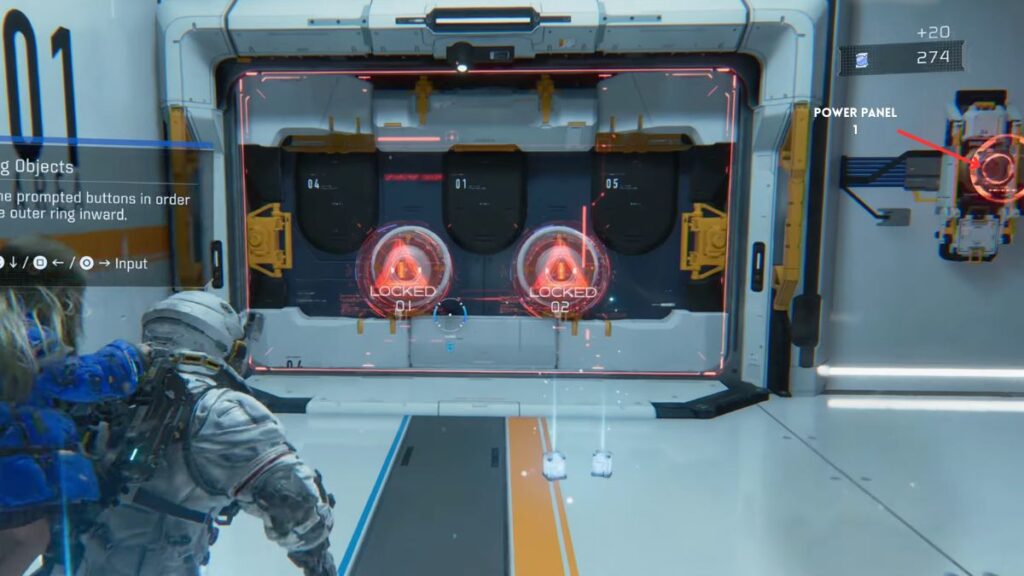
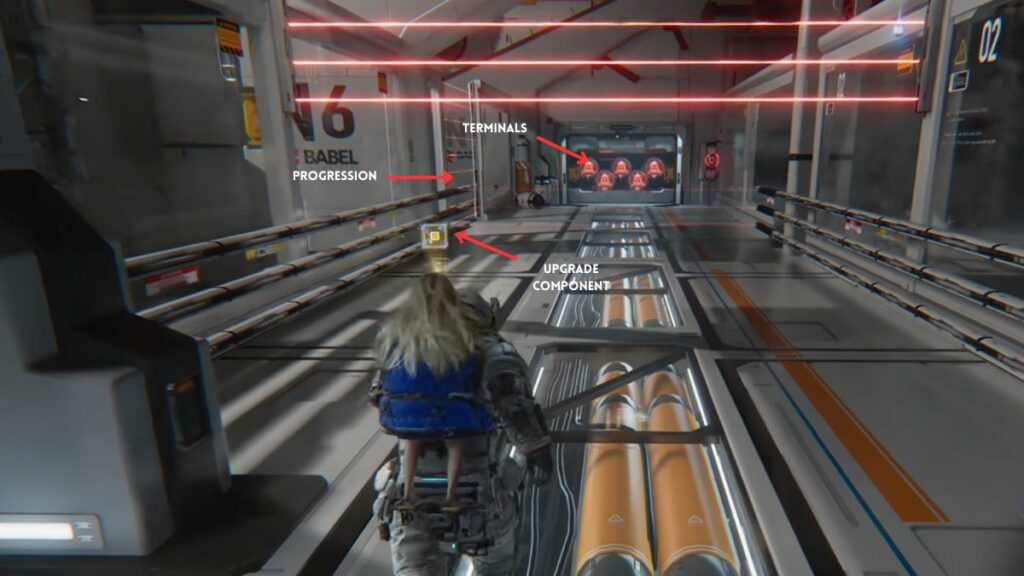
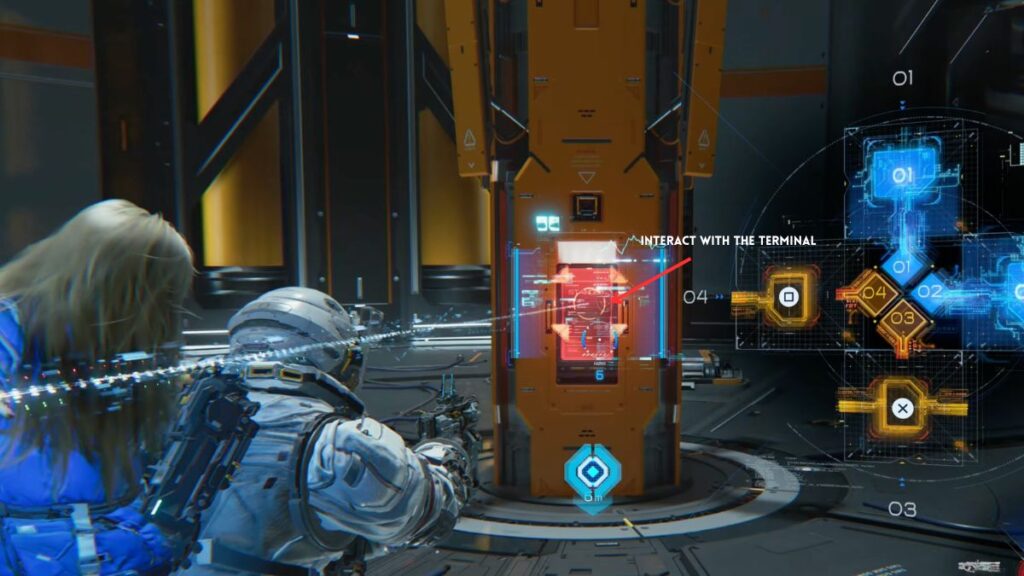
Walk down the stairs where you’ll find lasers and an Upgrade Component in your path. Grab the component and dodge past the lasers. At the end of this stretch, five power terminals are waiting to be unlocked.
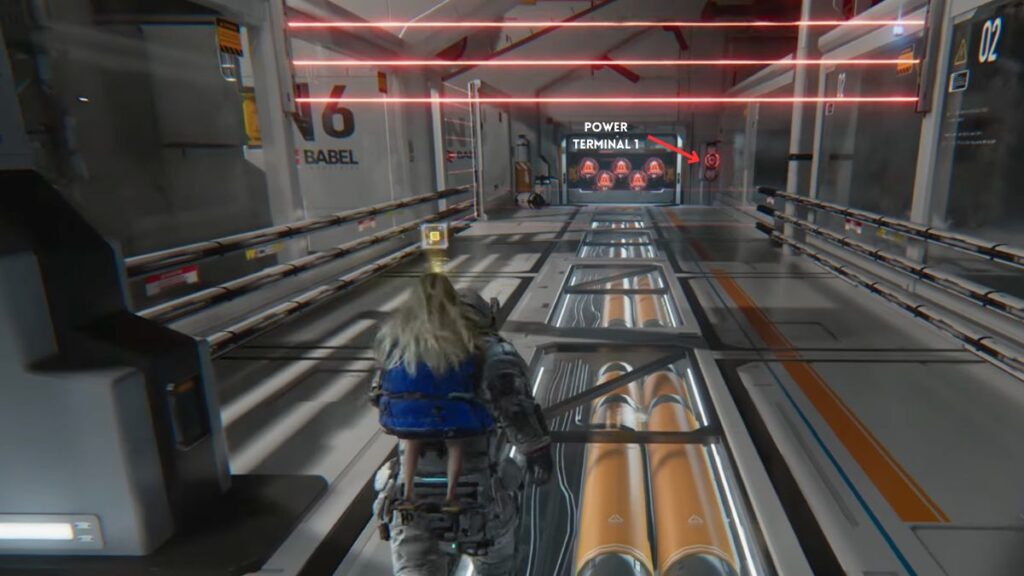
Terminal 1 (4th in sequence): Located immediately to the right of the five locks.
Terminal 2 (5th in sequence): The wall previously blocked by lasers on the left side is now accessible. Jump down on the left to find a new weapon (Shockwave Gun) on the floor — picking it up unlocks its blueprint, which you can purchase at the Unit Printer to permanently add it to your loadout at the Shelter. After grabbing the weapon, a Walker will spawn followed by a new enemy type called a Crusher. Take them both down, then hack into the power terminal in the upper right corner of the area.


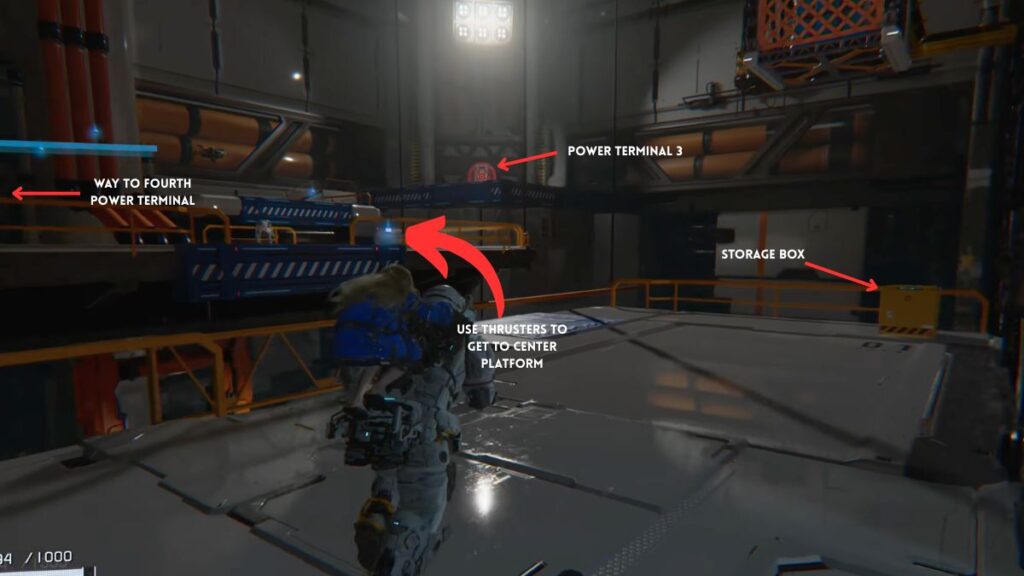
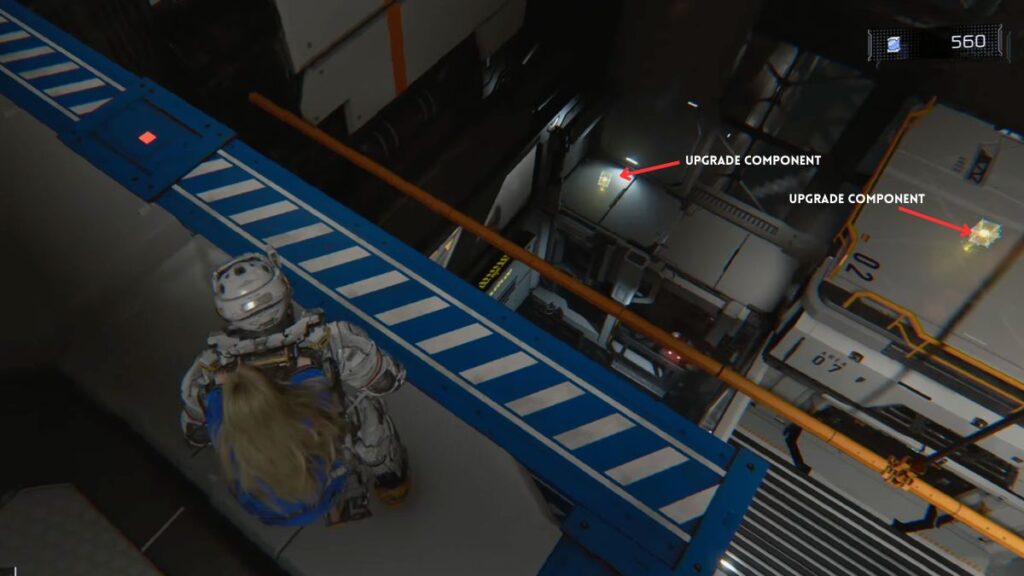
Terminal 3 (2nd in sequence): Back in the main room, step into the lift along the wall and press Triangle to ride it to the upper floor. Use Scan once you’re up there to spot the power terminal and a Storage Box on the right side. Navigate to the center platform using your thrusters, take down the enemies, then jump across the pipes to the right platform to reach and hack the terminal. If you walk to the ledge across from this terminal and look down, you’ll spot two Upgrade Components below. Use the platforms and thrusters to drop down and collect them.
Terminal 4 (1st in sequence): Head back to the lift and this time move toward the left side of the room. Look for a floor drop and use your thrusters to descend. Pick up the Stasis Net weapon on the floor below, then hack the power terminal directly in front of it.
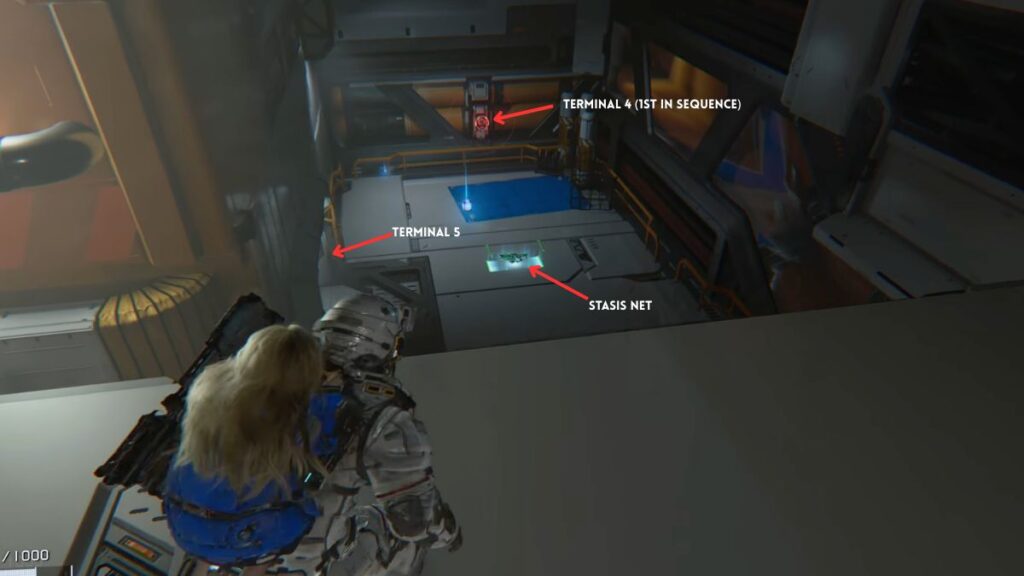
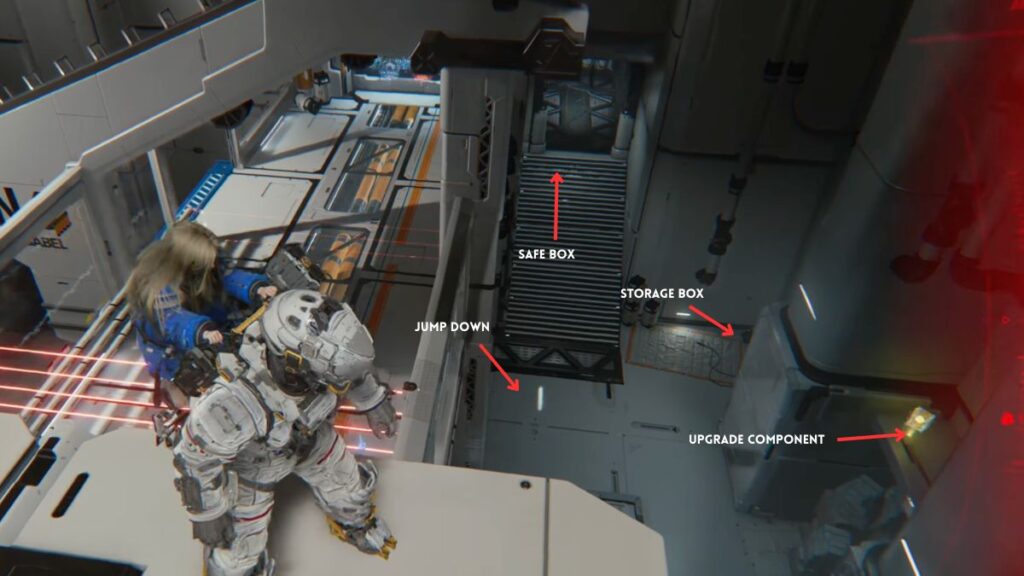
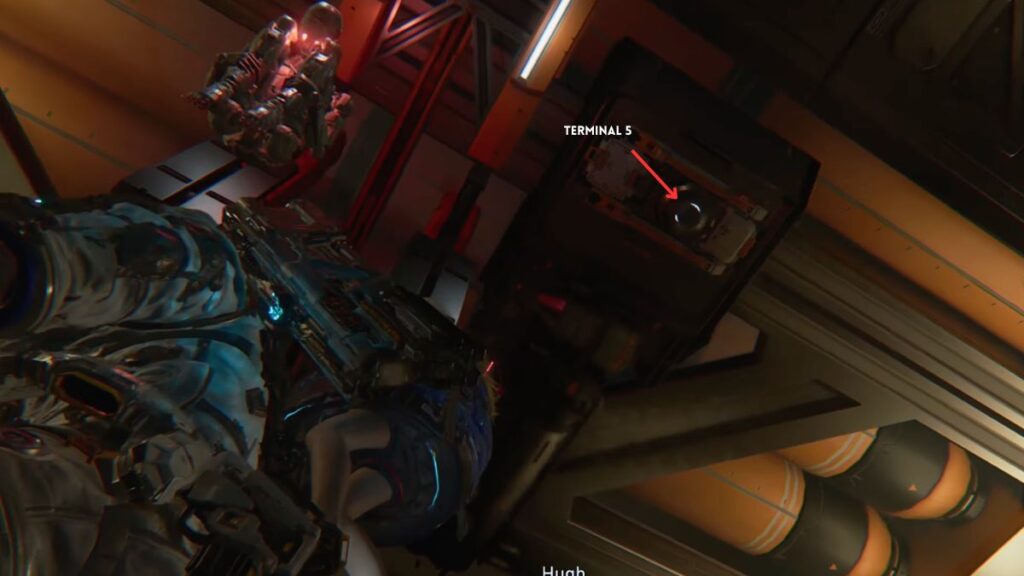
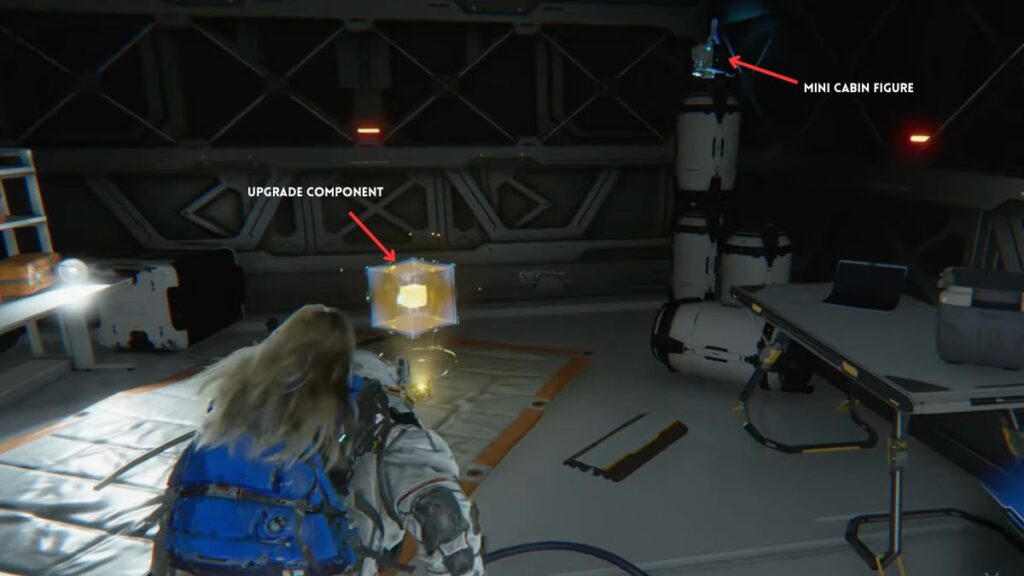
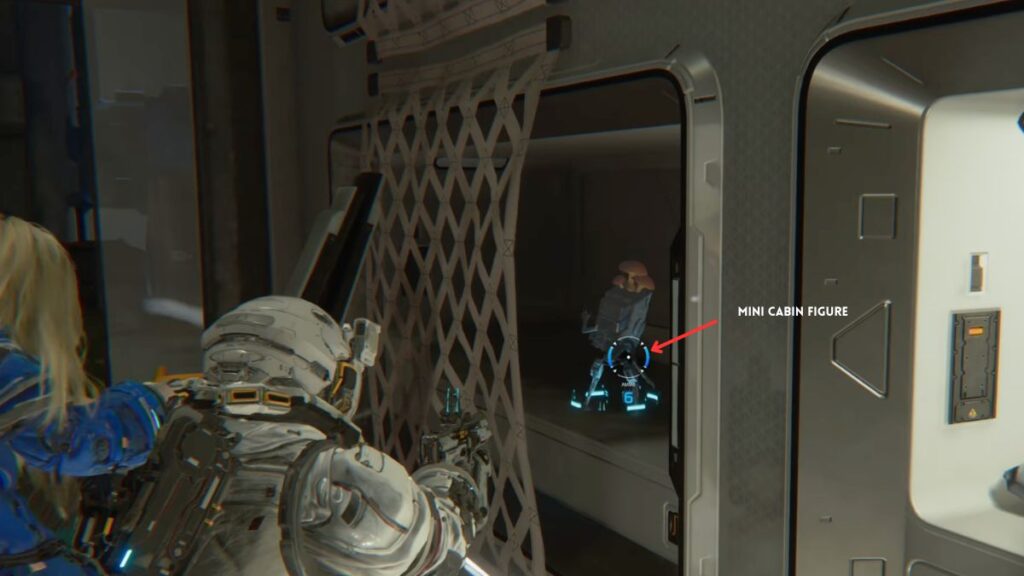
Terminal 5 (3rd in sequence): In the room with the Terminal 4 panel, you will find the yellow door along the wall. To the left of it, you’ll notice an area that resembles the start of the Power Distribution Center. Spot the Upgrade Component on one of the platforms and use your thrusters to reach it. Peek below and you’ll see a group of enemies — drop down and take them out. There’s a Storage Box to the right of the stairs. Climb the stairs into the hallway and find the Safe Box at the end. Head back to the room with the three enemies and hack one of the terminals to reach a higher position where another Upgrade Component is sitting alongside some boxes. With everything collected, head through the yellow door. As soon as you enter, the doors will seal behind you and two enemies will spawn. Defeat them and look up at the ceiling to find the fifth power terminal. Hack it to activate it. After doing so, check the corner of the room to find the first Mini Cabin Figure in the game. Shoot it to claim it.
You’ll now be prompted to proceed through the unlocked door. Exit through the opposite door from where you entered, and on the right side collect one more Upgrade Component before heading back to the main door with the five terminals and walking through.
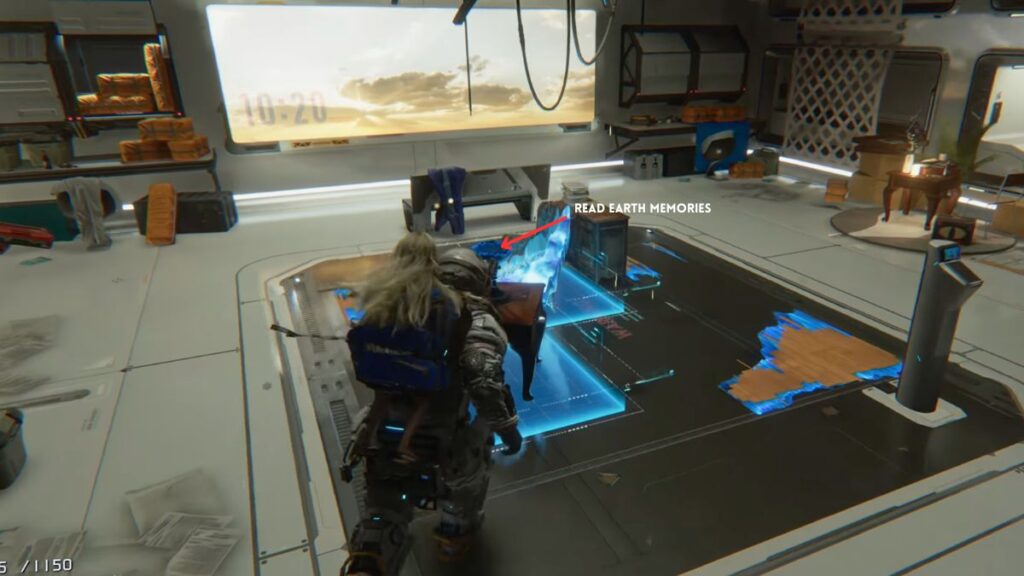
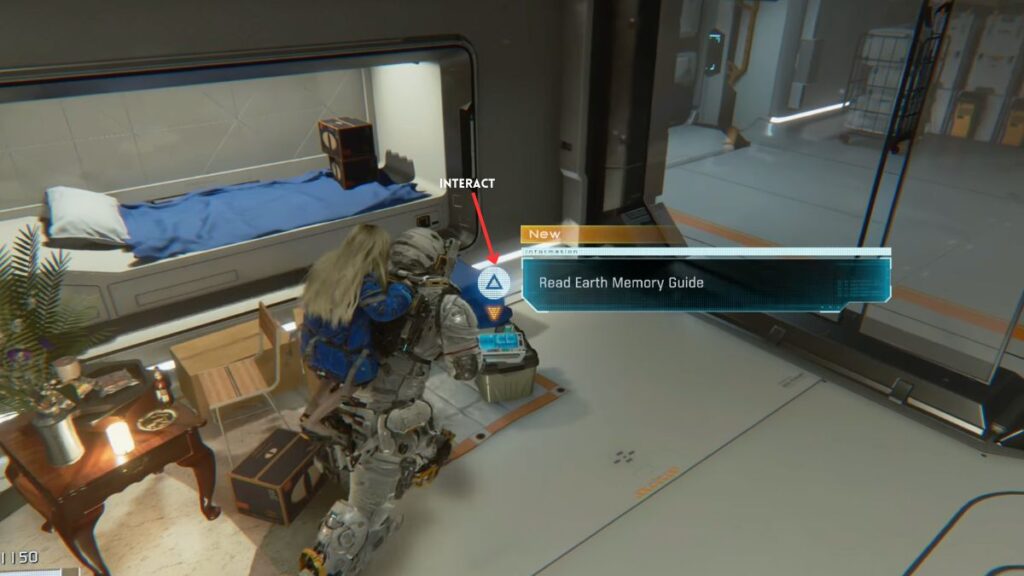
Once inside, pick up the Upgrade Component on the left. Jump down and keep walking until a cutscene introduces Read Earth Memories, recordings that can be played back at the Shelter. Before leaving the room, find the tablet on a nearby box and interact with it for more information on Read Earth Memories. Look behind a white mesh to find a bed, and behind it is the second Mini Cabin Figure. Interact with the tablet on the box in front of the blue bedsheet as well.
When you’re done, leave the room and take a left. Progress to the next area to activate another Escape Hatch. You’ve now entered the third block.

Block 3: The Concourse
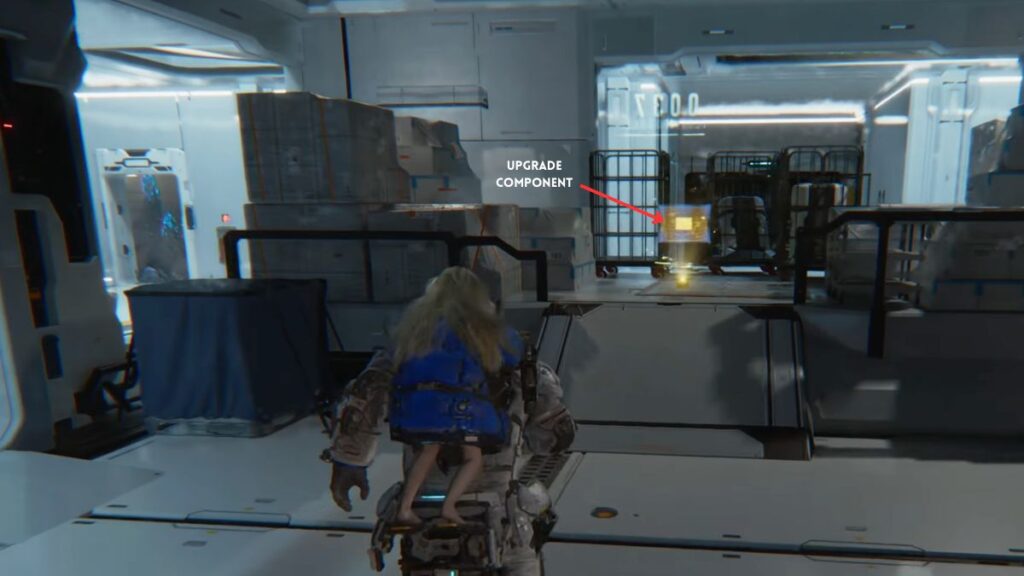
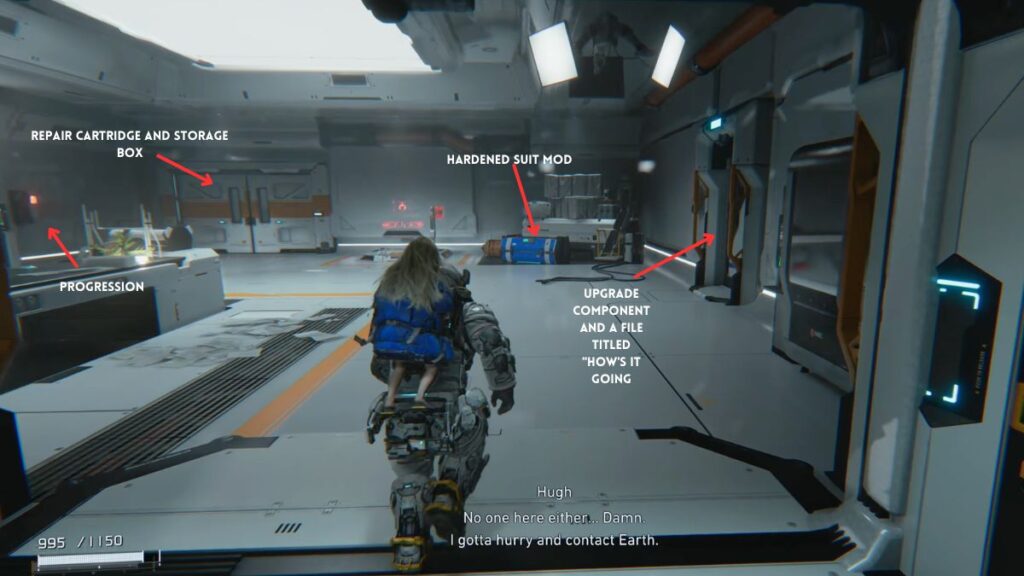
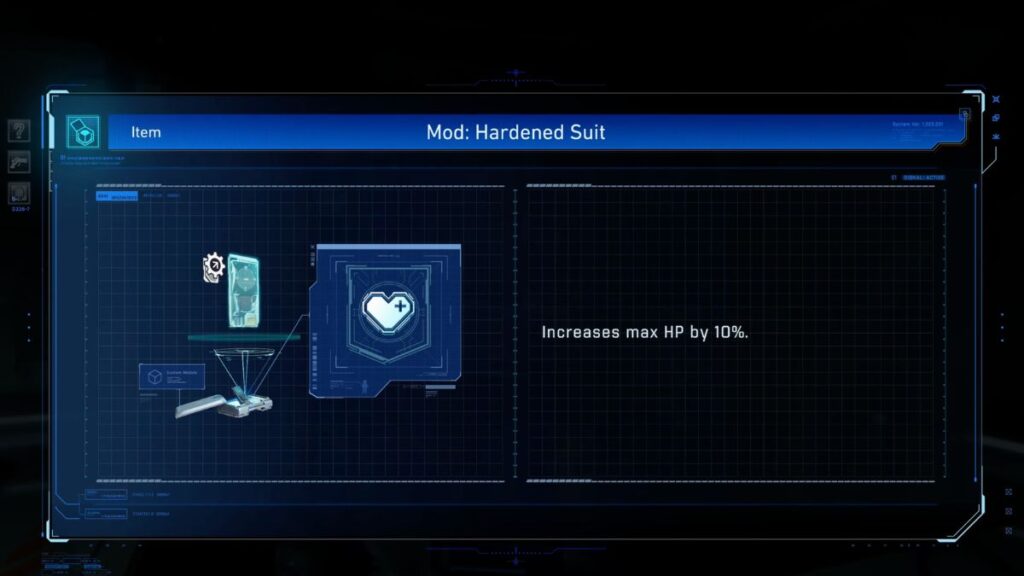
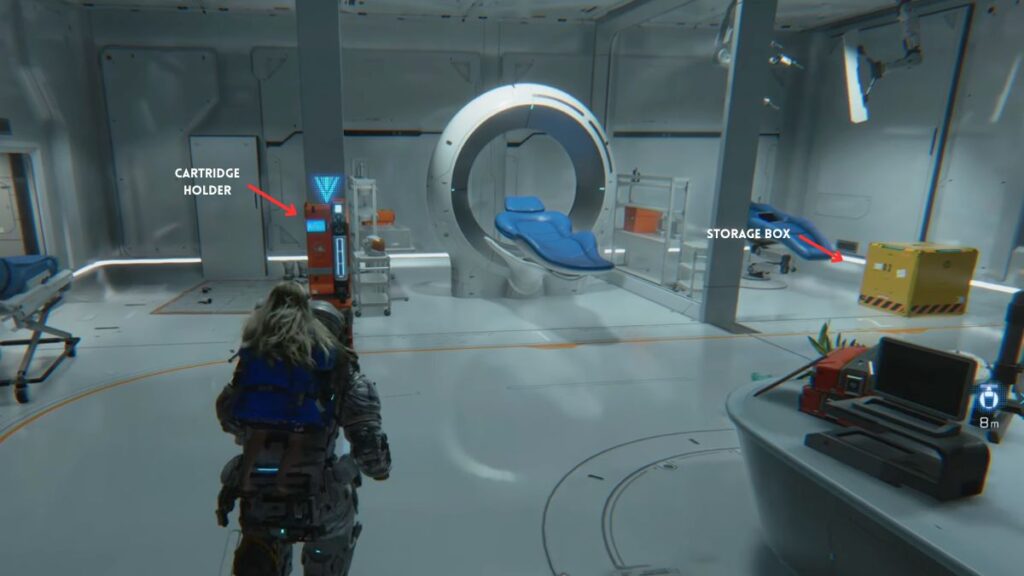
As soon as you enter, you’ll see a blue crate directly ahead. Open it to collect the Hardened Suit Mod, which increases your max HP by 10%. On the left side of the room, go through the door to find the Cartridge Holder. Activate the orange device near the gurney to collect a Repair Cartridge — at this point in the game you should have two cartridges total. There’s also a Storage Box in the corner and a hologram projector on the desk in this room.
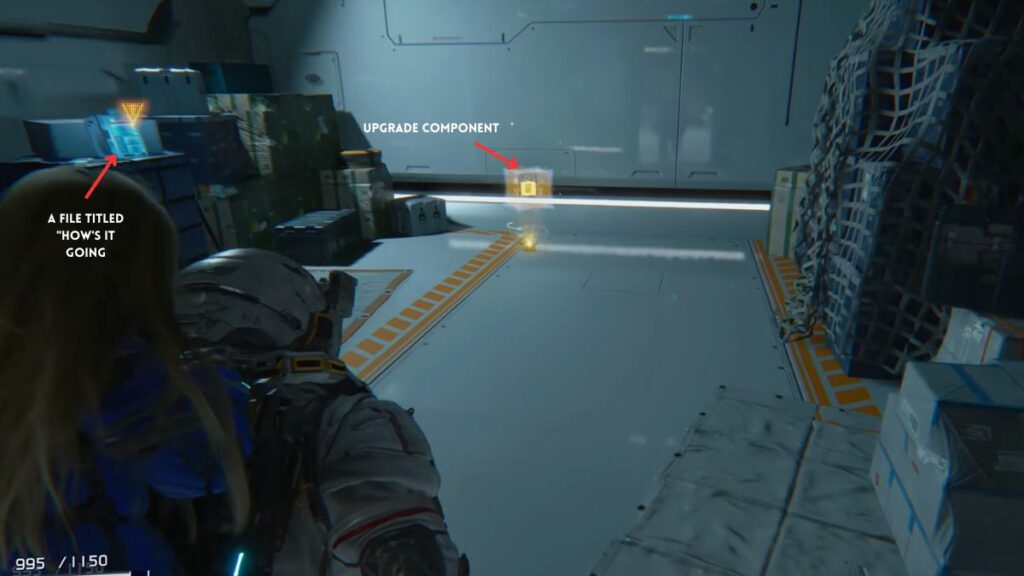
Return to the main room and go through the door along the right wall to find an Upgrade Component and a file titled “How’s It Going.” Come back to the main room once more and interact with the laptop on the left side to collect the “Welcome to the Solar Power Plant” file.
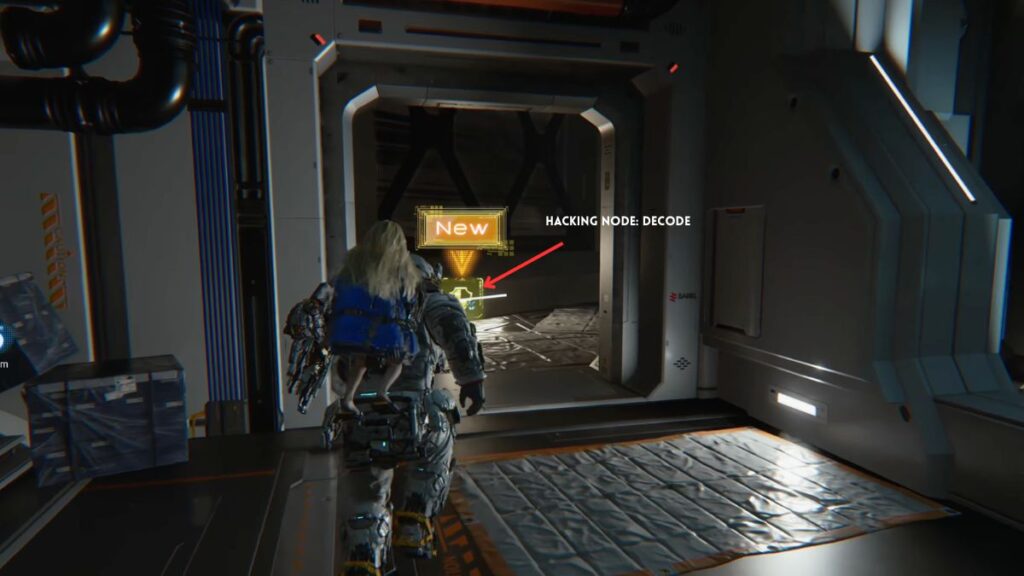
Go through the door marked A2 and follow the linear path. You’ll soon reach a spot where you need to take a left into a hallway to collect a Hacking Node: Decode. Hacking Nodes are yellow nodes with special effects that trigger when you pass through them during a hack. Passing through multiple nodes of the same type increases their effectiveness, though they can only be used a limited number of times. The Decode node disrupts enemy internal systems to temporarily increase damage dealt. Using it repeatedly on the same enemy reduces its effectiveness, but passing through multiple Decode nodes in a single hack boosts the damage bonus further.
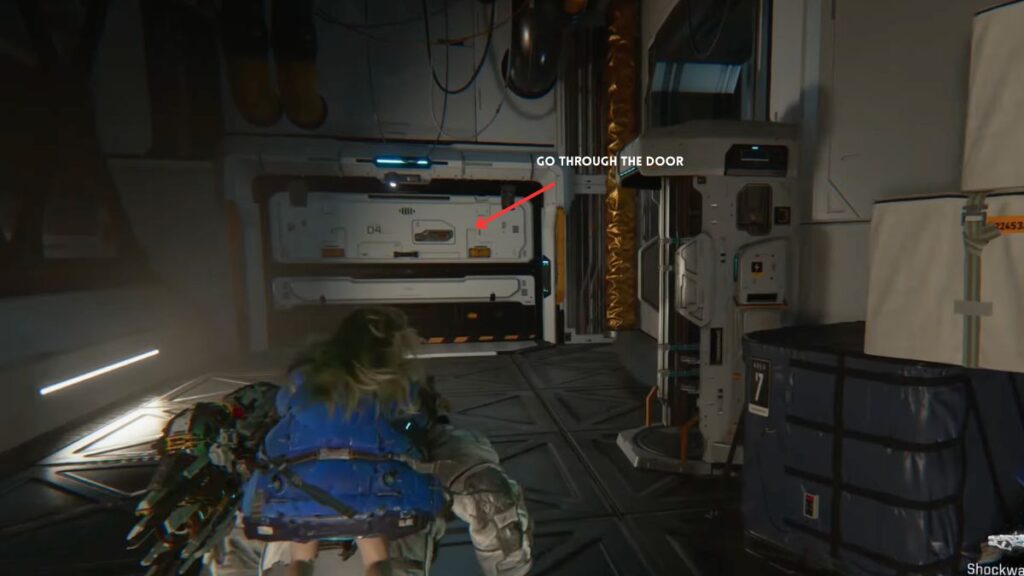
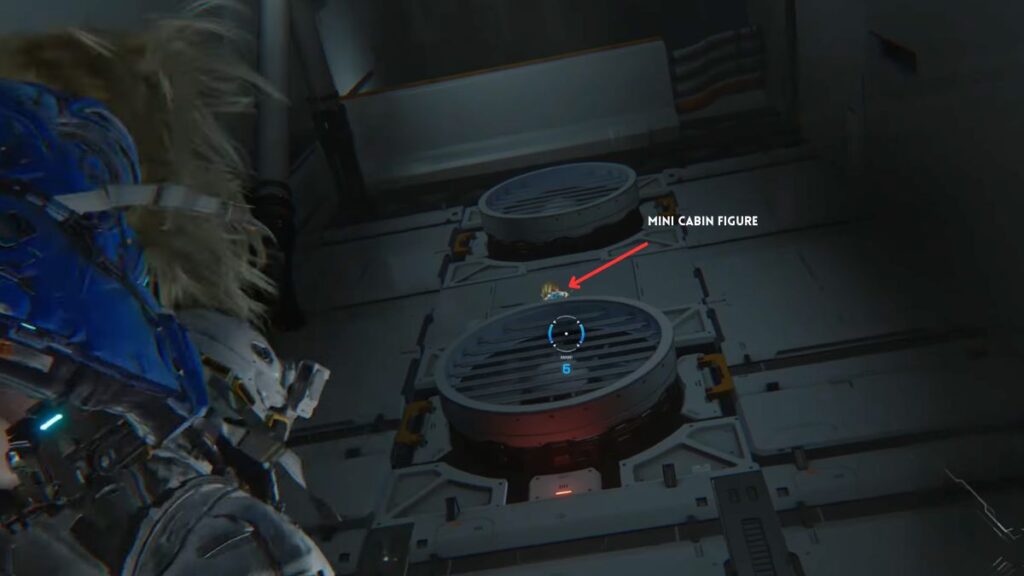
After collecting the Decode node, defeat the Walker you encounter and go through the door. Immediately after entering, look up at the vent fan above you to spot the third Mini Cabin Figure. Shoot it down.
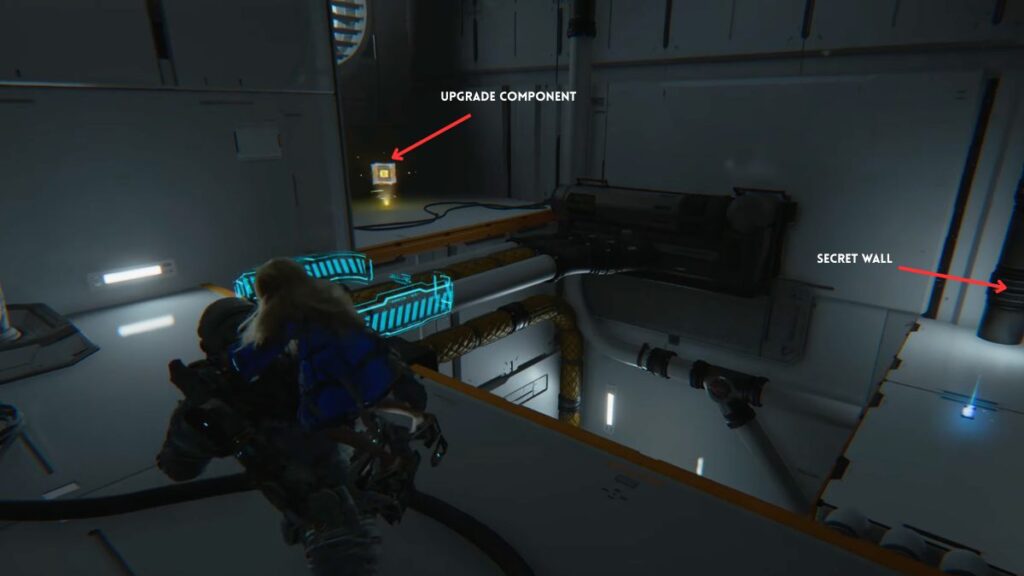
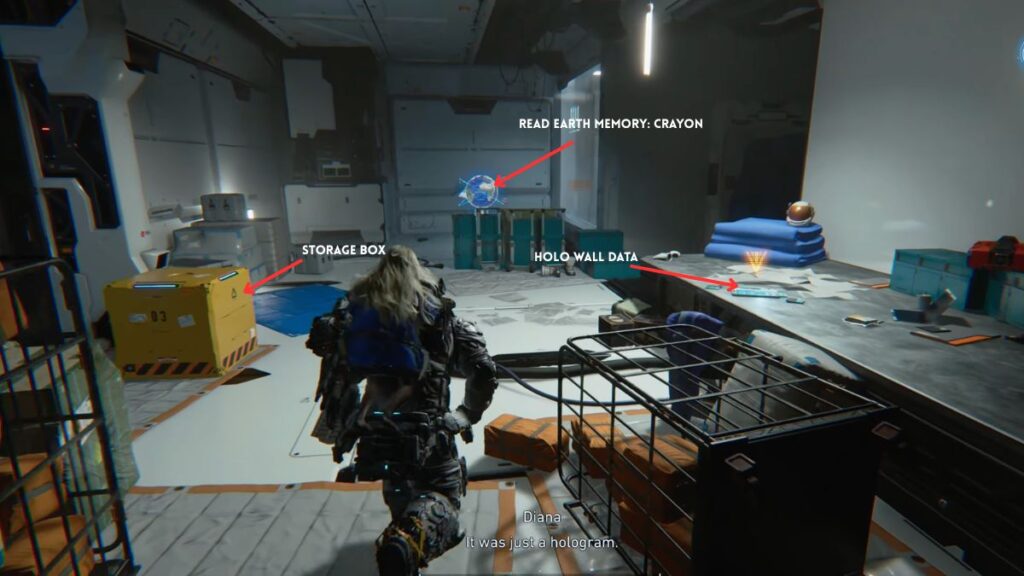
Use the hand lift on the left wall to reach the upper floor. Grab the Upgrade Component in the alcove up here, then look across to find a fake secret wall. Get close and interact to enter the hidden room. Inside, check the right side for Holo Wall Data and the opposite side for a Storage Box. At the far end of the room, collect the Read Earth Memory: Crayon.
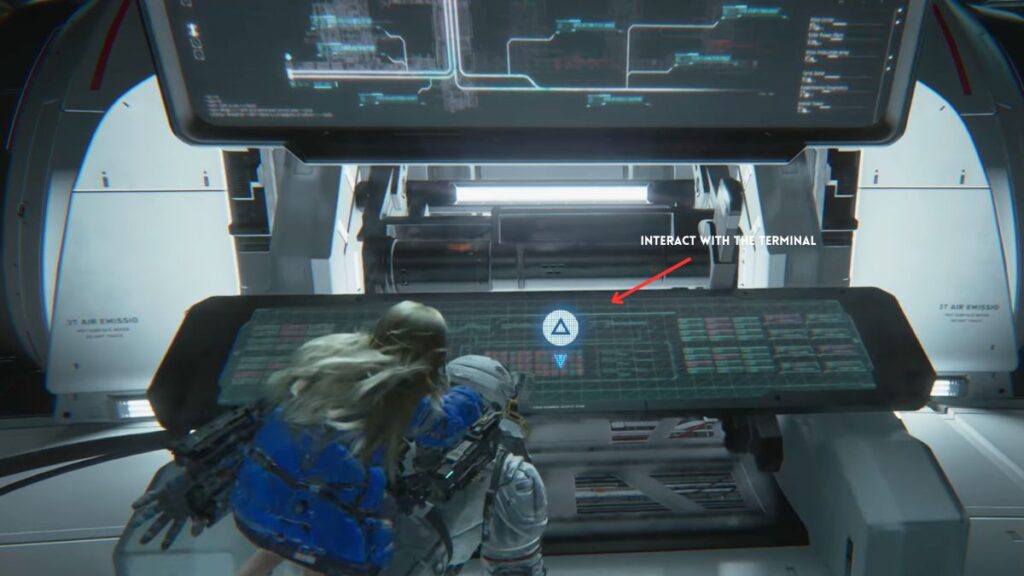
Jump back down from the hand lift area and grab the Decode from the storage box nearby before entering the large room. Activate the terminal in the center to call the elevator, which will stop halfway and spawn a wave of enemies. Take them all down, then hack the terminal again to ride up to the top floor.
At the top, collect everything from the storage boxes, then interact with the terminal. The panel begins its restoration process but the AI interrupts and activates a Sector Guard. It’s boss time.

How to Beat Sector Guard in Pragmata?
The Sector Guard is a fast, aggressive enemy but it has a clear weakness on its back, and the tools the game has given you so far are perfectly suited for exploiting it.
The most effective strategy is to bait out the Sector Guard’s dashing attack, which leaves it briefly exposed. The moment it dashes past you, deploy your Stasis Net to lock it in place. While it’s immobilised, move behind it and unload with the Shockwave Gun into its weak point on its back. The Shockwave Gun behaves like a shotgun at close range and deals significant damage to the back.
When red circles appear on the ground beneath you, move away quickly or use your thrusters to jump and dodge with R1. There are plenty of items and hacking icons scattered throughout the arena; collect them throughout the fight and use them early rather than saving them. Your thrusters are essential here, both for dodging attacks and for repositioning quickly around the arena.
During the fight, the game will introduce the Critical Shot. When an enemy is downed, a purple holographic ring will appear around it. Press R2 on a downed enemy to land a Critical Shot for massive damage.
You’ll also unlock the Overdrive Protocol during this fight. This is a super move that immobilises all enemies in front of you and is activated by filling the Hacking Gauge shown at the bottom left of the screen. The gauge fills by hacking enemies or collecting Data Shards from boxes. When it glows, it’s ready to use. Pressing both control sticks together activates it and gives you a powerful burst to follow up with.
Keep cycling between baiting the dash, hitting with the Stasis Net, and landing Shockwave Gun shots on its back. Once the Sector Guard overheats, its critical damage vulnerability spikes sharply. Finish it off to complete the encounter.
Defeating the Sector Guard rewards 300 Lunafilament and a Shelter License Key. Pick up the key to complete the mission and head back to the Shelter. Your next destination is Sector 02: Mass Production Array.
All Collectibles
| Category | Item | Location/Notes |
|---|---|---|
| Files | Lockdown Procedure | In the hallway after the first Walker fight, take immediate left |
| Welcome to the Solar Power Plant | Laptop on the left side of the Concourse main room | |
| How’s It Going | Through the right wall door in the Concourse main room | |
| Read Earth Memory: Crayon | Hidden room accessed via the fake wall on the upper floor of the Concourse | |
| Read Earth Memory (tablet) | On a box in the room before Block 3 | |
| Mini Cabin Figures | Figure 1 | Corner of the room after hacking the fifth power terminal in Block 2 |
| Figure 2 | Behind the white mesh near a bed in the Read Earth Memory room | |
| Figure 3 | On top of a vent fan above the door entering the Concourse upper section | |
| Weapons | New Weapon | On the floor in the lower left area of the Power Distribution Center |
| Stasis Net | Floor below the lift on the left side of the Power Distribution Center | |
| Hacking Nodes | Decode | Hallway to the left in the Concourse section before the hand lift |
| Mods | Hardened Suit | Blue crate at the entrance of the Concourse, increases max HP by 10% |
| Upgrade Components | Component 1 | Behind the boxes after the warning screen in Block 1 |
| Component 2 | In the hallway before the two-lock door in Block 1, turn around to find it | |
| Component 3 | On the stairs at the entrance of the Power Distribution Center, dodge the lasers to reach it | |
| Component 4 | Upper right corner of the lower left area in Block 2 after acquiring the new weapon | |
| Component 5 | First of two components visible from the ledge across from Terminal 3, drop down to collect | |
| Component 6 | Second of two components in the same area below Terminal 3 | |
| Component 7 | On one of the platforms near the yellow door area in Block 2 | |
| Component 8 | Higher spot in the same room after hacking the wall terminal near the yellow door | |
| Component 9 | On the right side after exiting through the opposite door of the fifth terminal room | |
| Component 10 | On the left side immediately after walking through the main five-terminal door | |
| Component 11 | In the alcove on the upper floor of the Concourse after taking the hand lift |
The Solar Power Plant is an effective first mission that builds naturally on the mechanics introduced in the Prologue while layering in new systems like Scan, Hacking Nodes, Critical Shots, and the Overdrive Protocol.