
Terra Dome is the third Sector you’ll visit in Pragmata. Hugh and Diana head here chasing a distress signal from a mysterious figure named Eight. Before heading in, make sure to see what the Shelter Level 2 Key unlocks.
Pragmata Sector 03: Terra Dome Walkthrough
Finishing Sector 02: Mass Production Array earns you the Shelter Level 2 Key, and bringing it back unlocks a solid batch of new content:
- The Unit Printer gets new items including Hacking Mode chips, which slot into your Tram Terminal Menu and change how your open nodes work during hacks. Only one chip can be active at a time. The first available is Offense Mode, which ramps up your damage when passing through nodes or targeting a vulnerable enemy.
- The Firmware Updater also gets expanded upgrade limits.
- New abilities: Auto-hacking, Bot Scan, Object Scan, and EC Thrusters.
- Training Simulations become accessible through Cabin or the simulation machine in the Shelter.

Training Simulations are optional challenge missions with objectives like defeating enemies or hitting a goal within a time limit. Bonus challenges within each one offer extra rewards on top of the standard payout, which includes Lunafilament, Upgrade Components, Pure Lunum, and Cabin Coins. If you are looking to collect outfits for Hugh and Diana, these are your main source of Cabin Coins so they are worth running regularly.
Now let’s continue into Block 1 of Terra Dome area.
Block 1: Entering Terra Dome
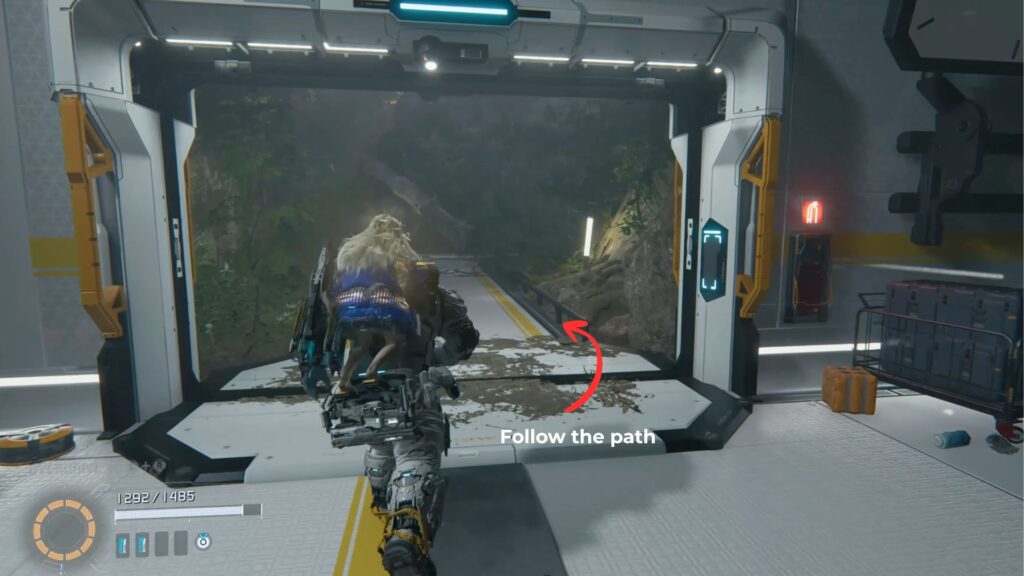
Once you’re ready, take the tram to Terra Dome and begin. Hugh and Diana don’t know where Eight is, so they just have to keep moving forward.
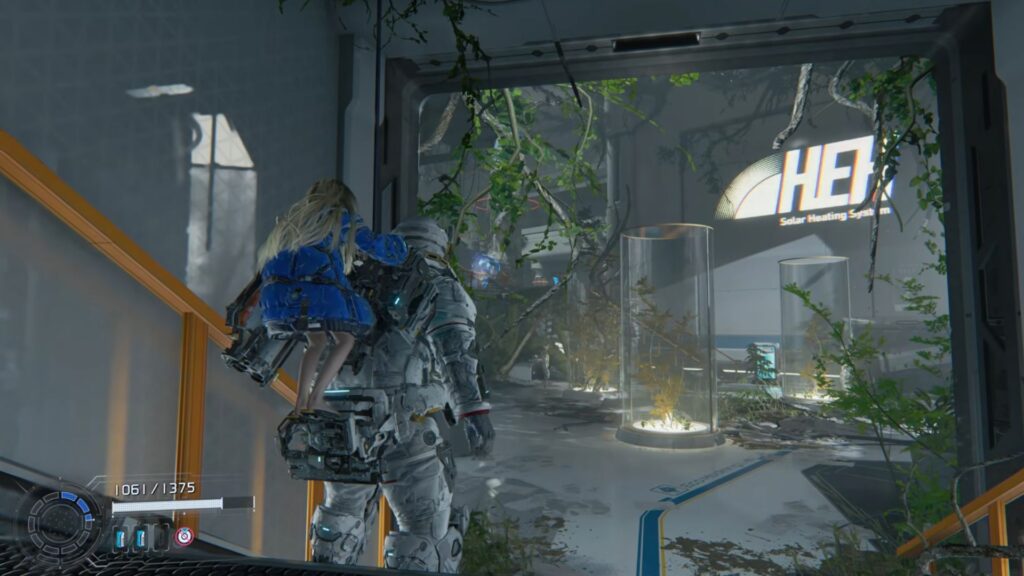
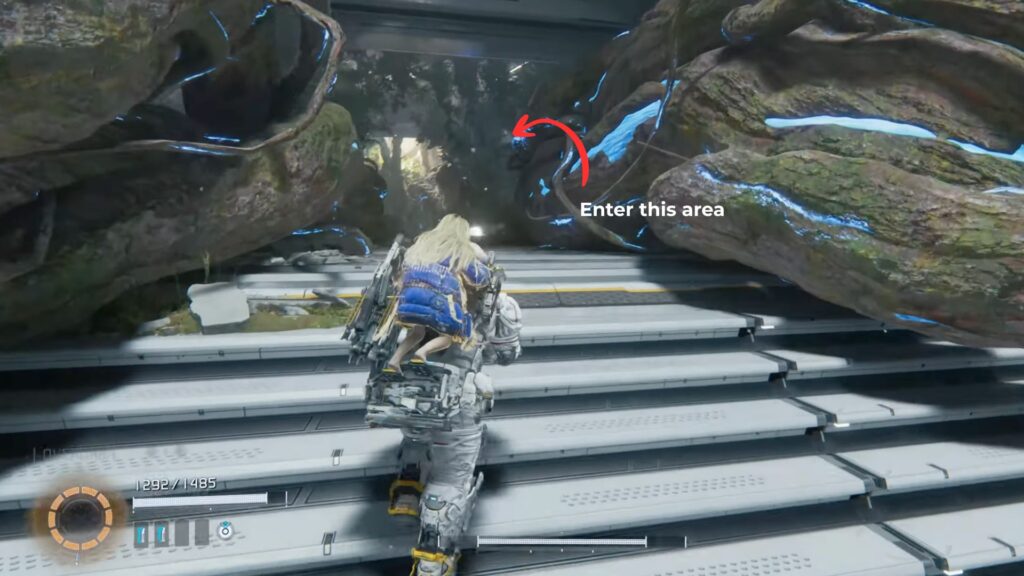
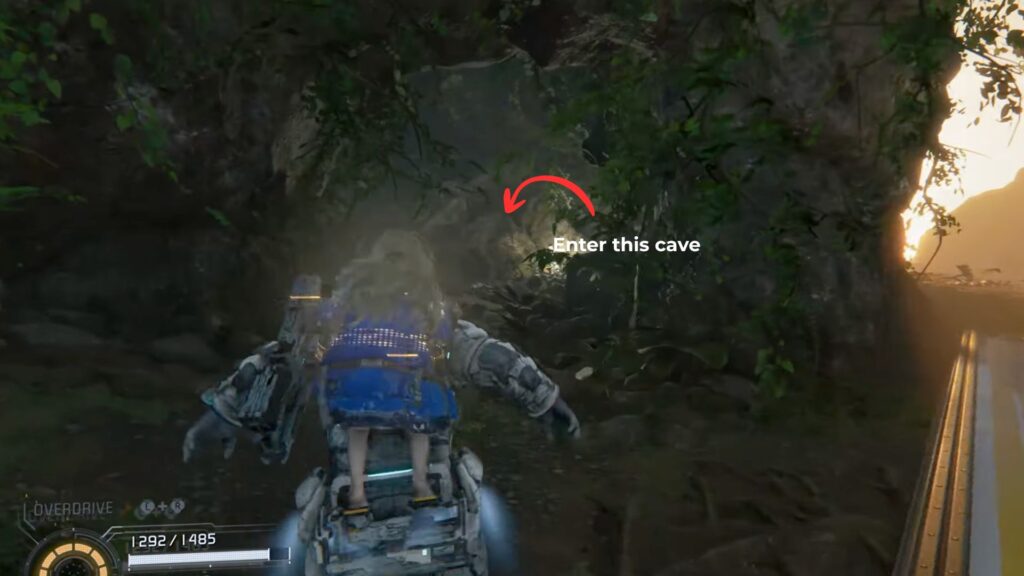
Step off the tram and go through the doorway onto a set of connected walkways. You’ll see the Terra Dome in the distance, covered in overgrown plants. Scan the area to mark a door buried under the vegetation as your next objective, but grab a few collectibles first.

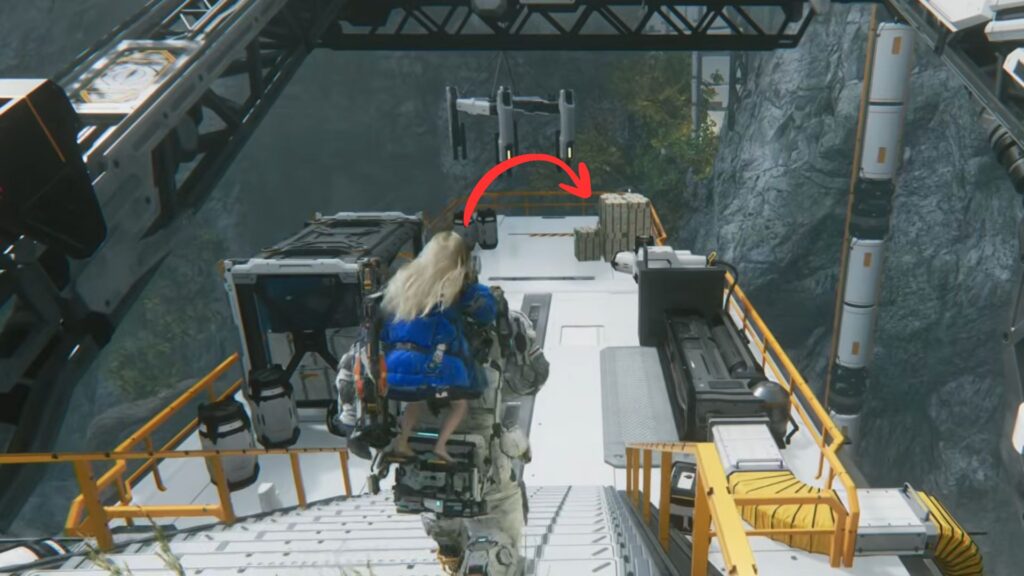
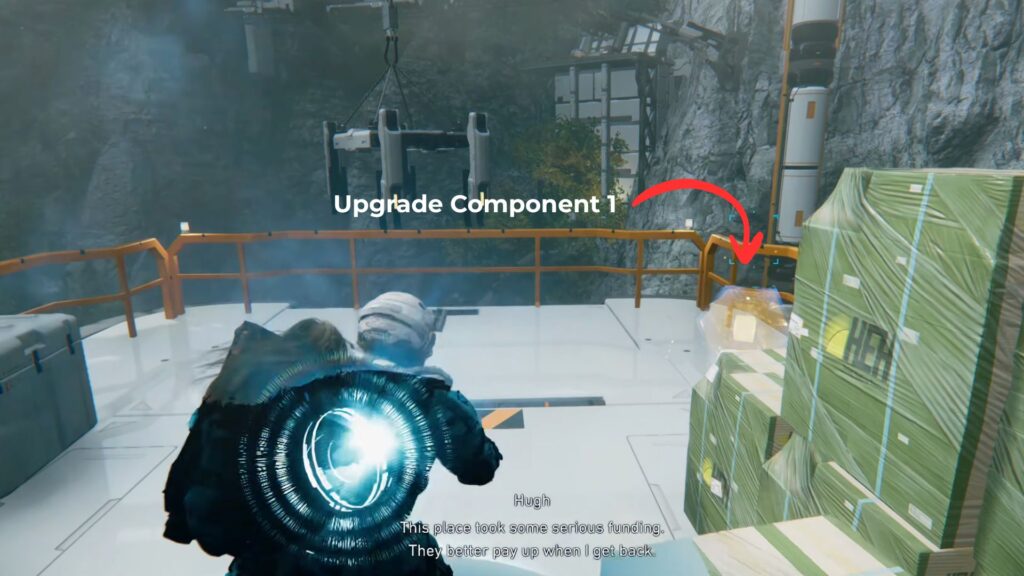
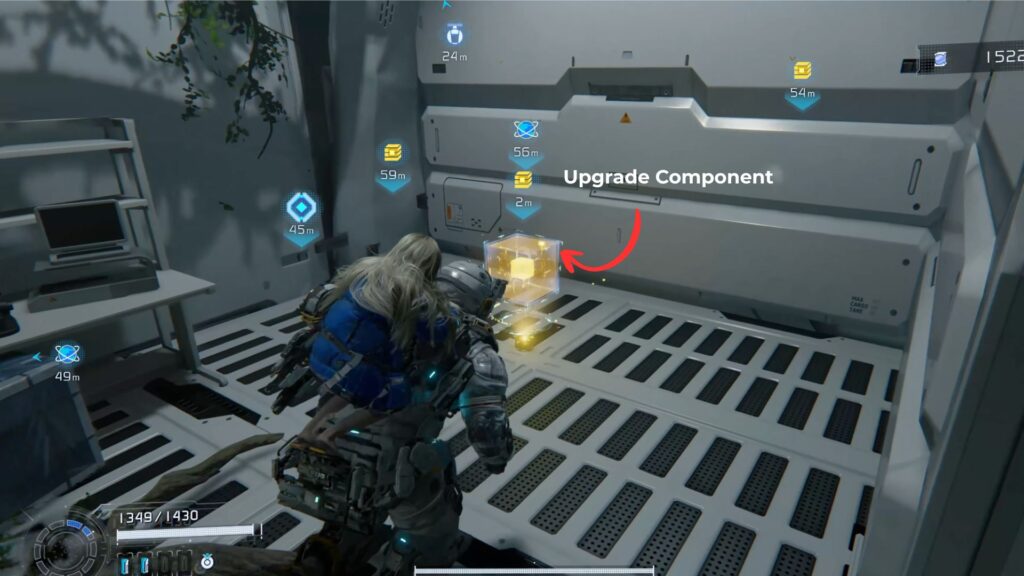
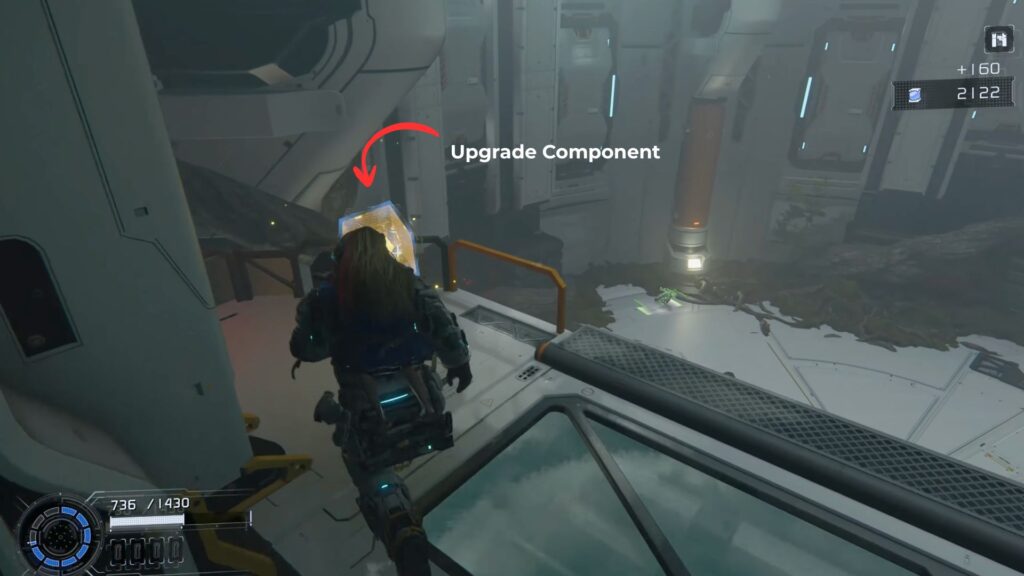
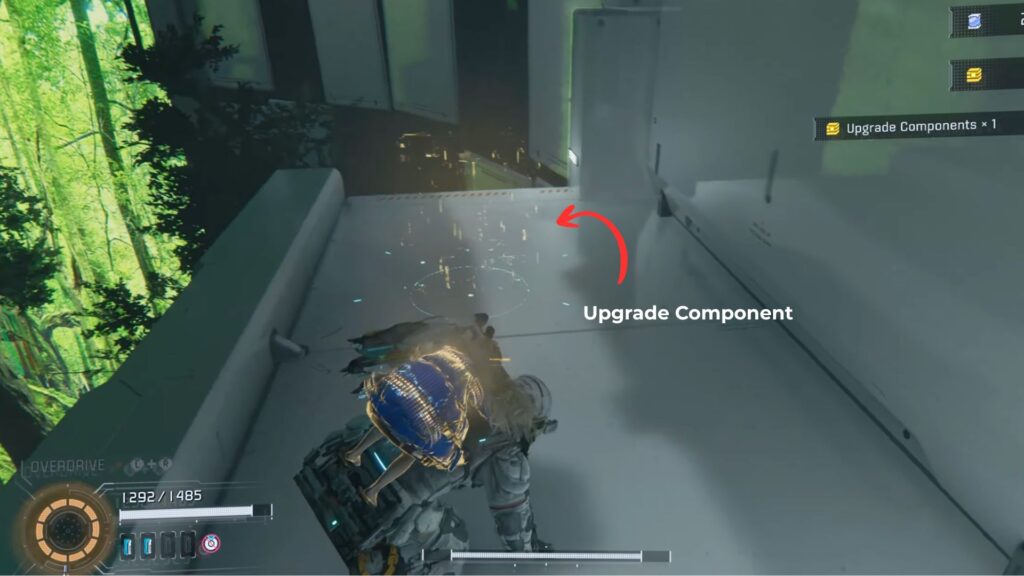
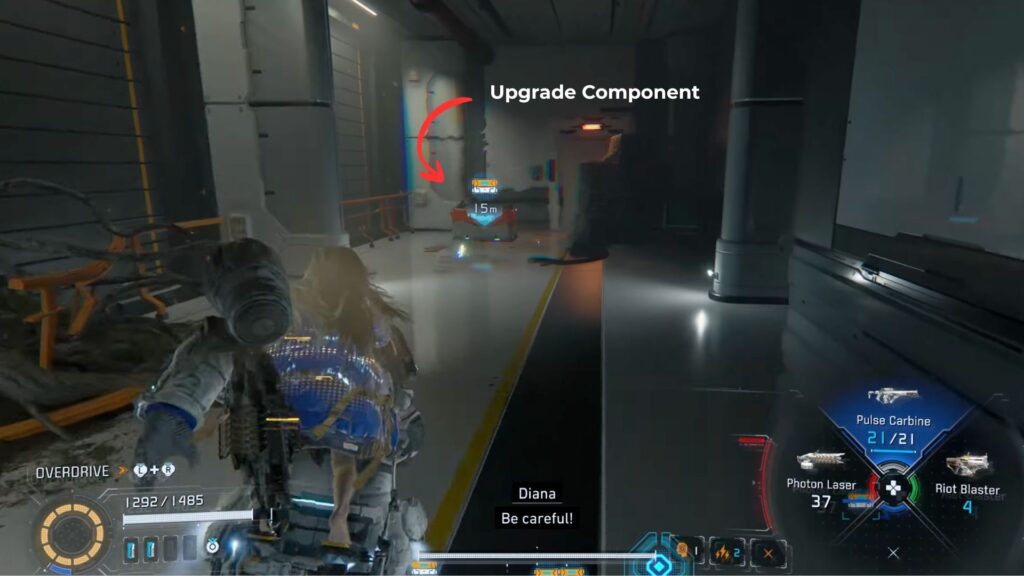
After getting off the tram, go up the ramp and stop at the top. Look right to find a small cluster of items. The Upgrade Component 1 is behind some stacked boxes.
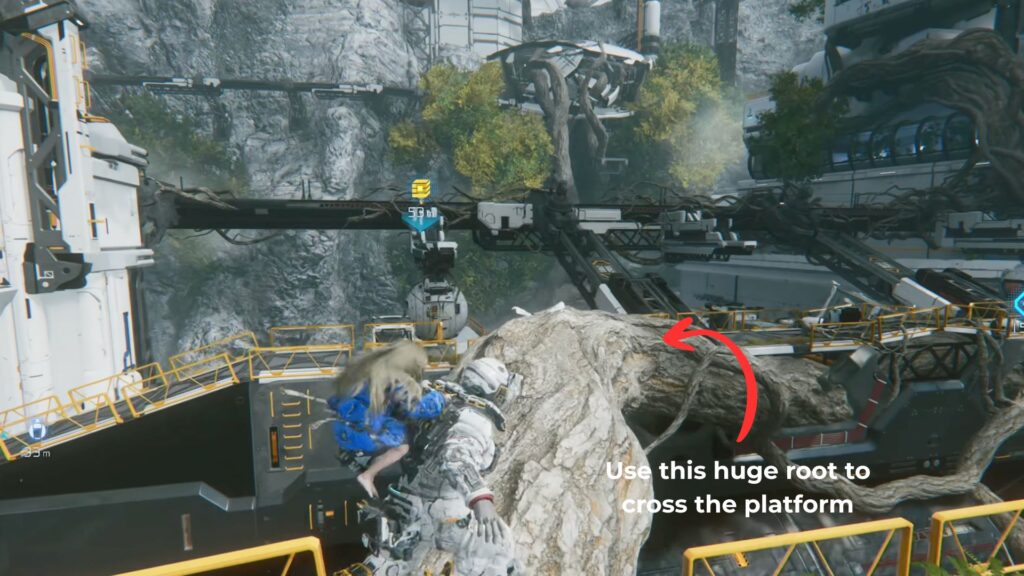
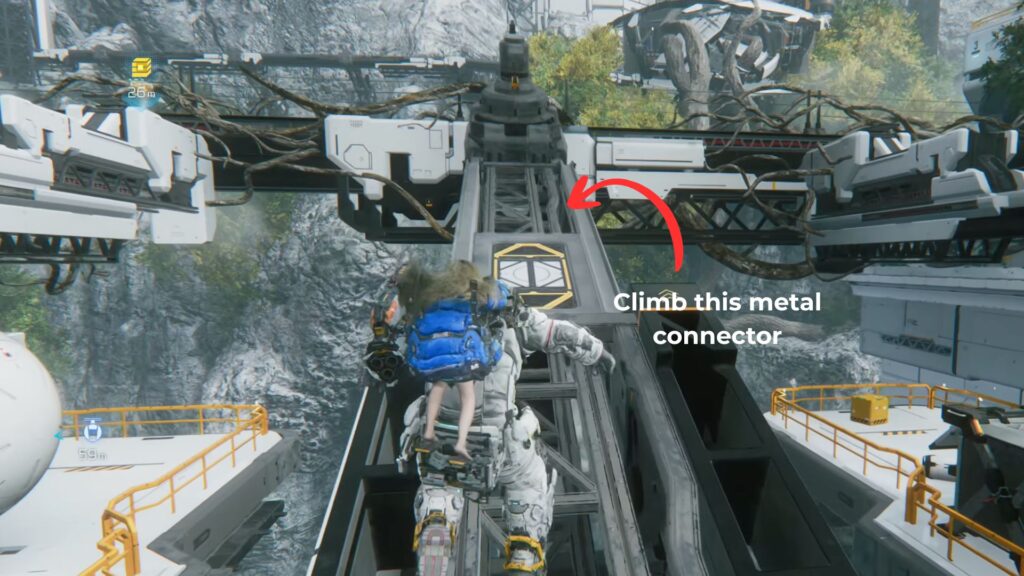
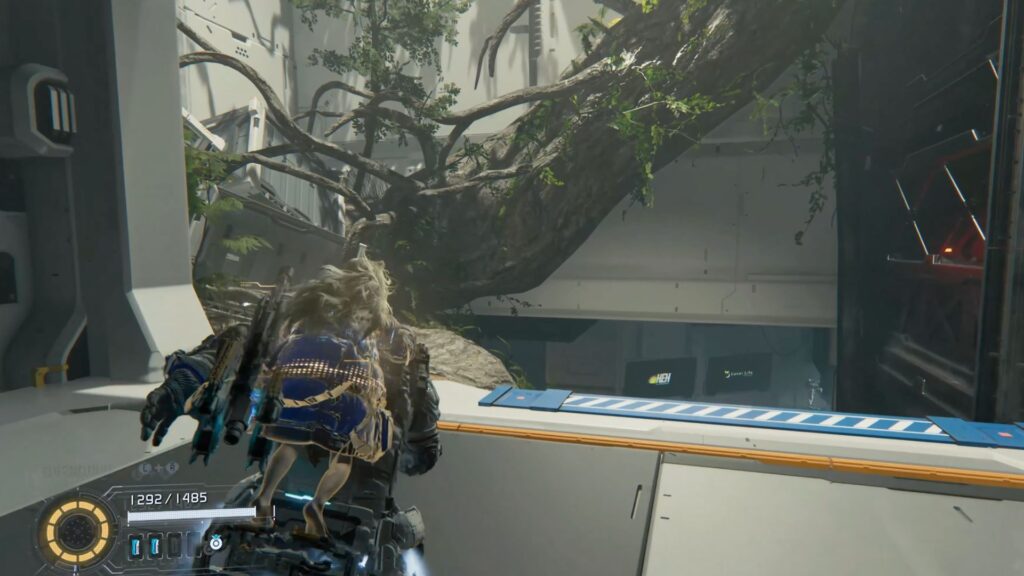
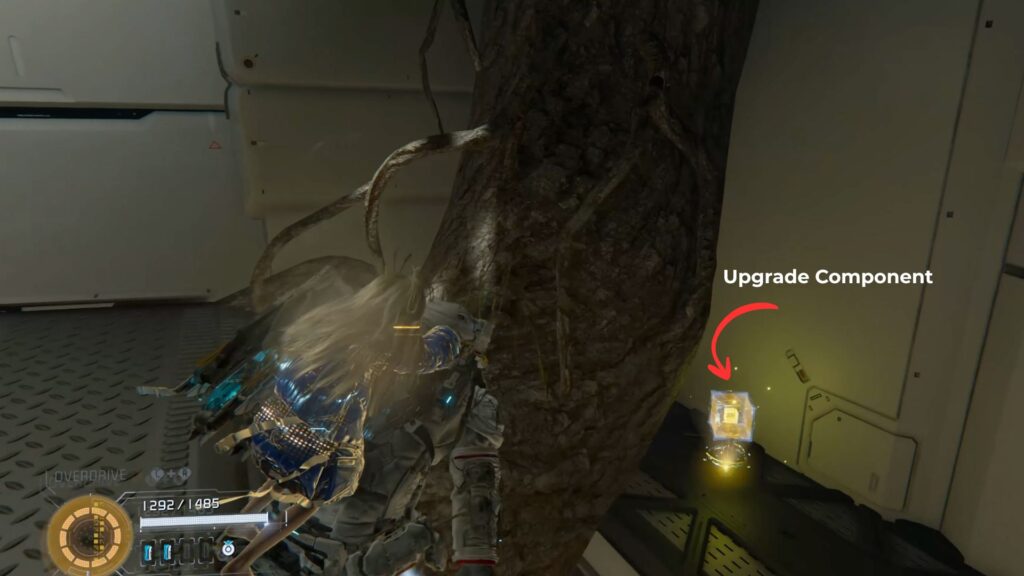
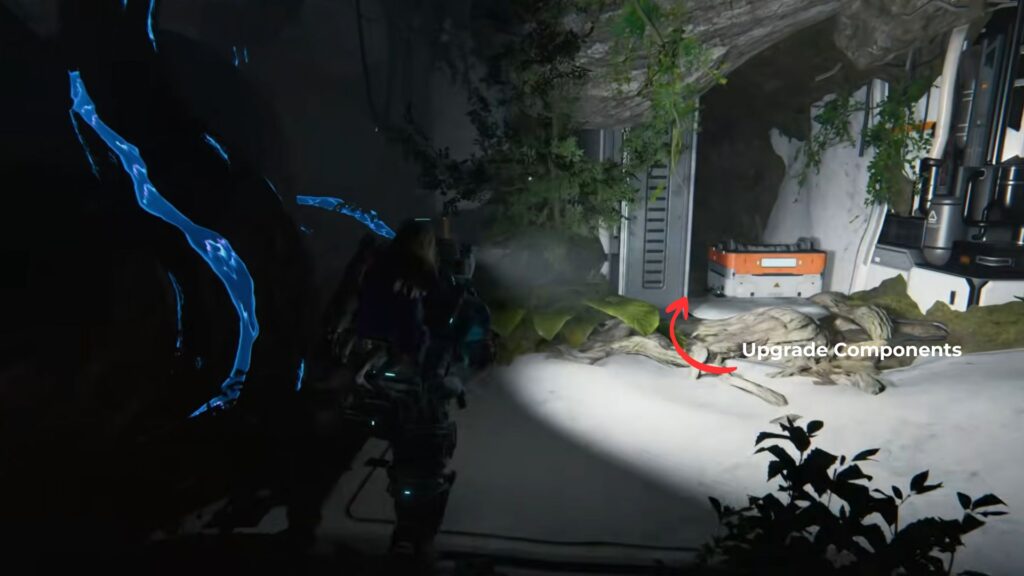
Then, go back up the ramp and look left. You’ll see another Upgrade Component in the distance. Use the large root to cross to the next walkway, then move across the metal connector to the raised section. Jump to the white metal arm holding the component to collect it.

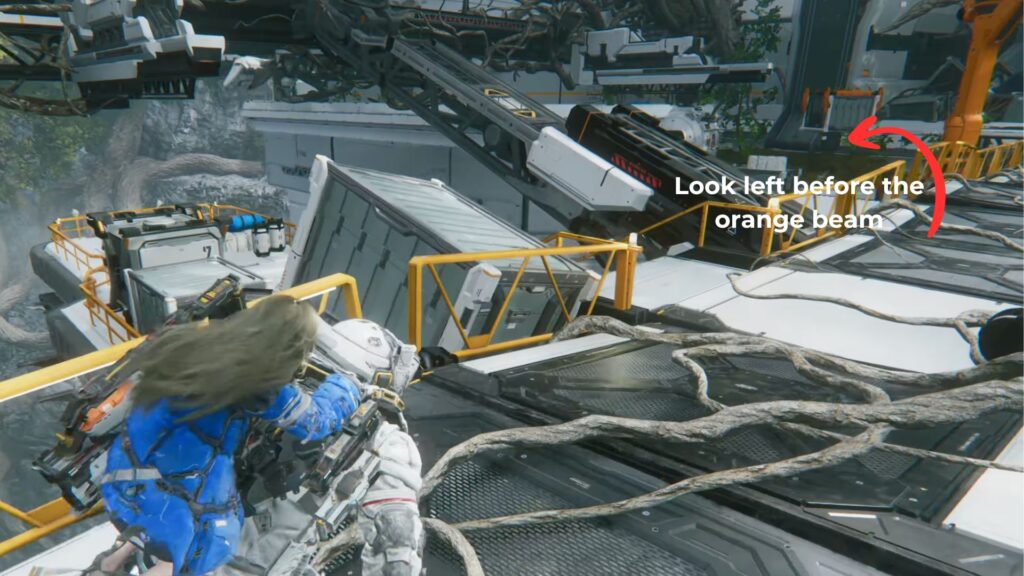
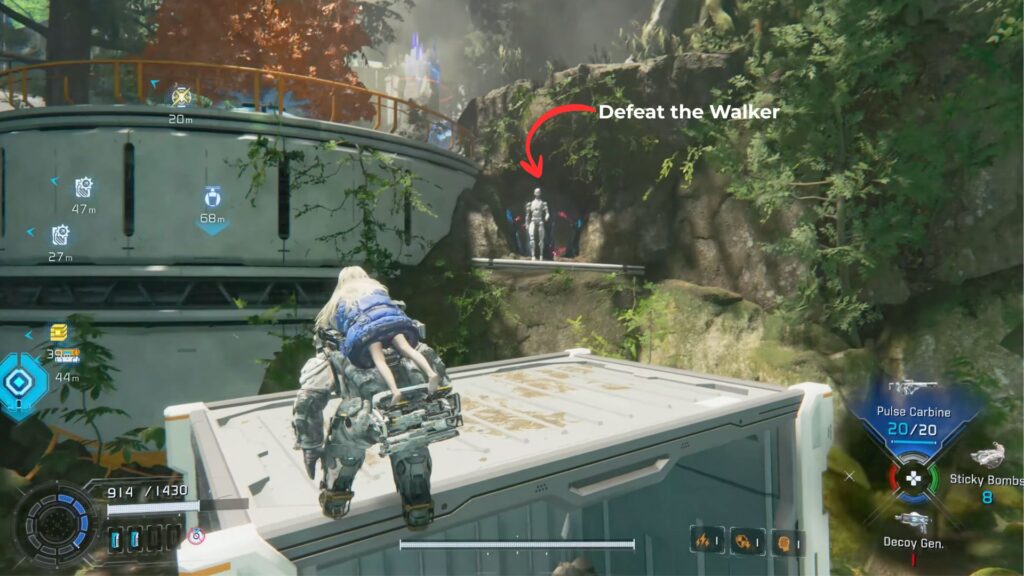
Next, you need to go up the ramp toward the entrance, but stop at the orange beam on the left. Look left to find the third Upgrade Component next to a tram pod. A Walker is hiding behind it, though, so be prepared because it will attack when you get close.

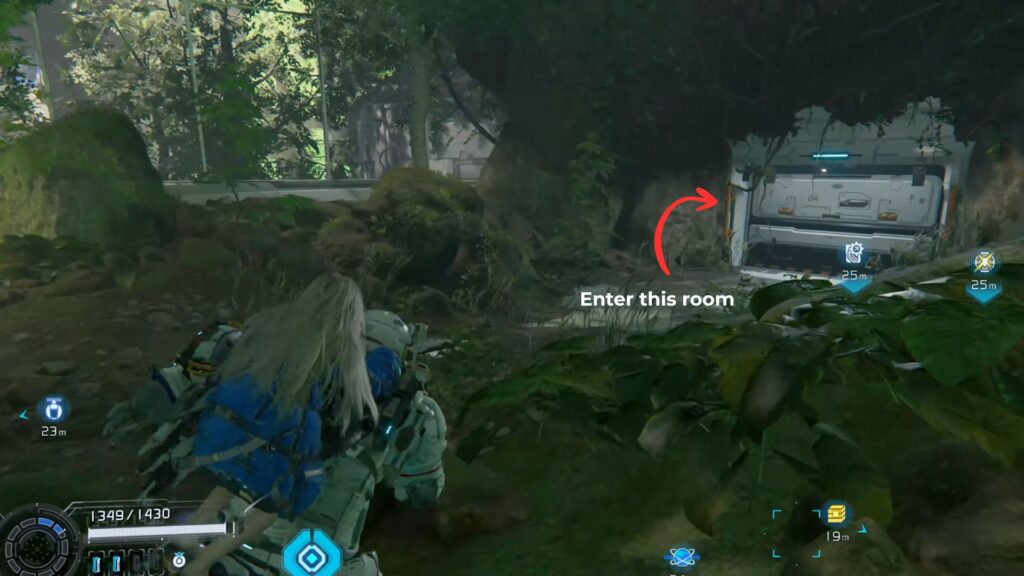
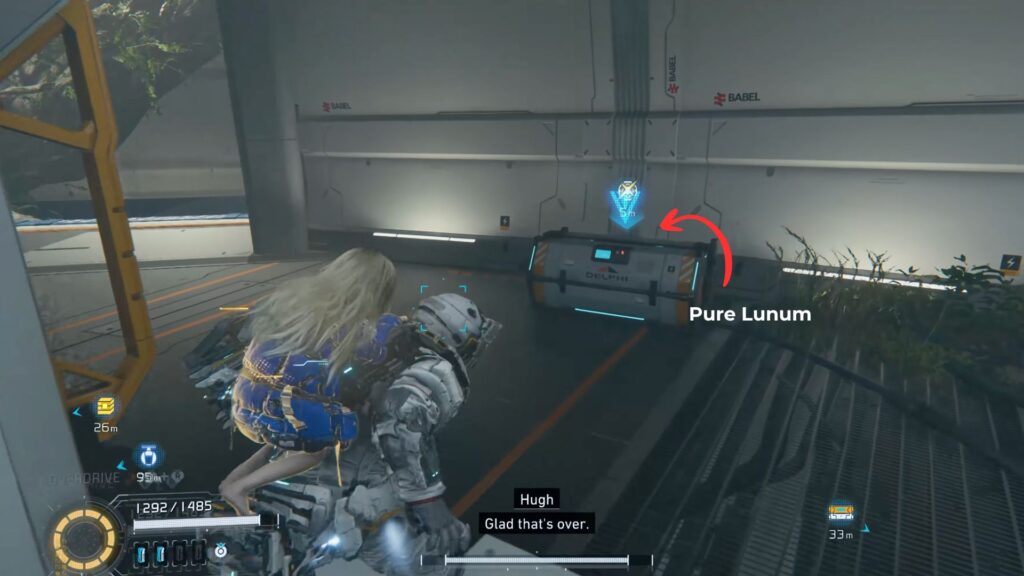
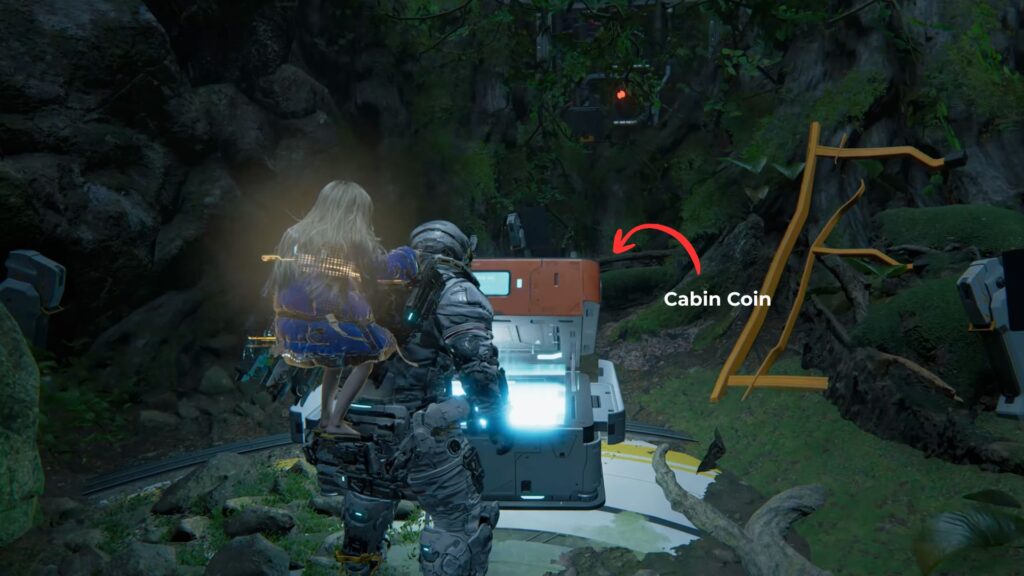
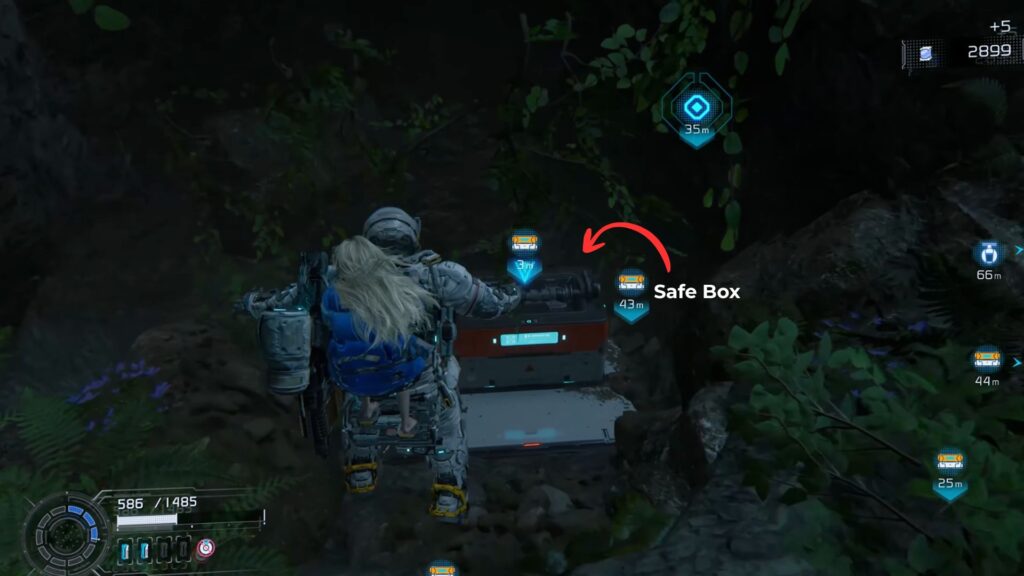
Now, we want to collect the Safe Boxes. Just before the entrance, cross the large root and follow the walkway near the end. Stop at the orange beam and look left, where you will notice a floating crate with a Lunafilament on top.
Go over to it, then look for the first Safe Box in this sector on a rooftop under some branches. Use your thrusters to reach the tram arm and land on the blue objects near the box. Open it to get 400 Lunafilament.

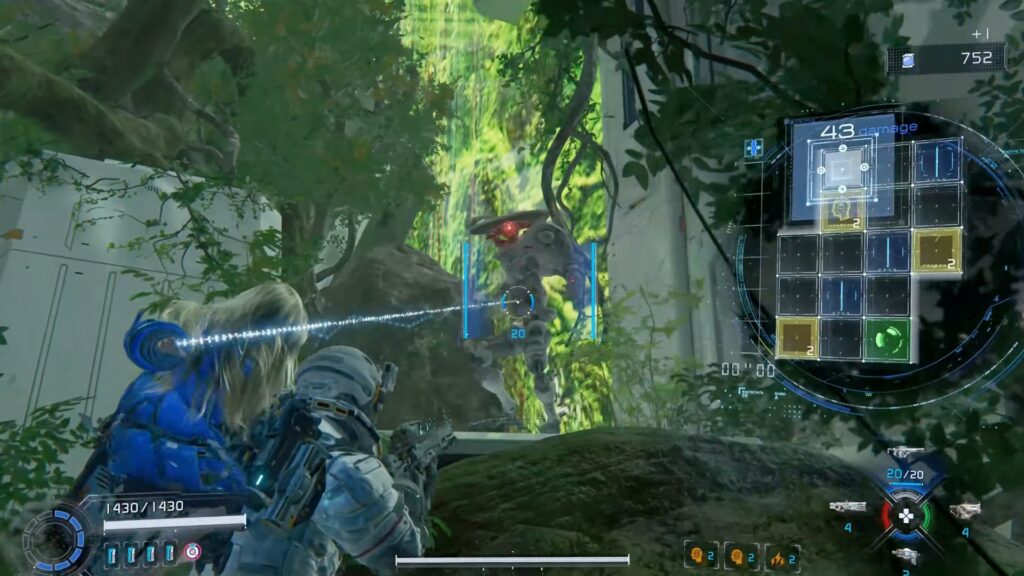
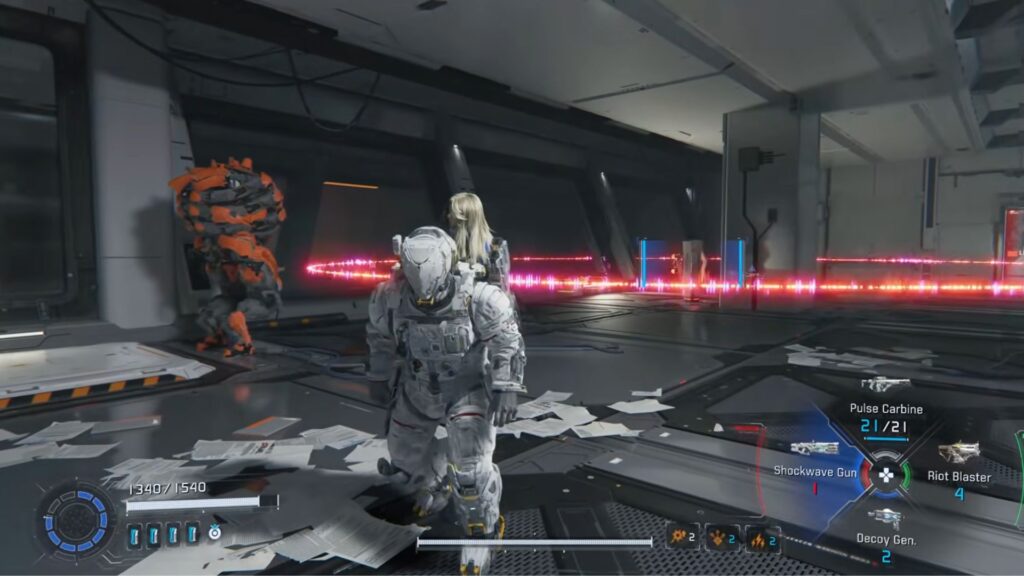
When you’re done, cross back using the large root and head to the entrance. A new enemy, the Lancer, will appear.
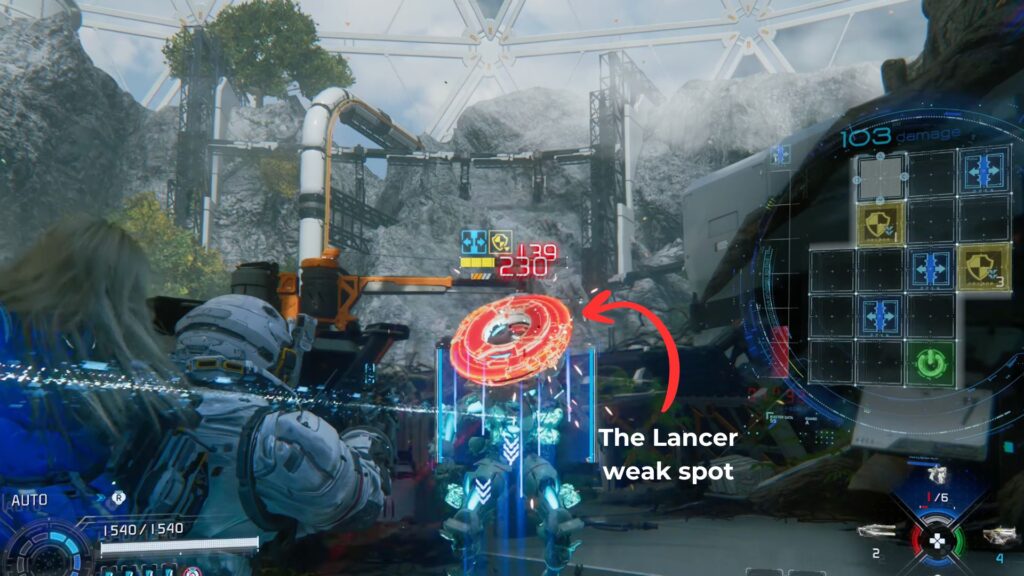
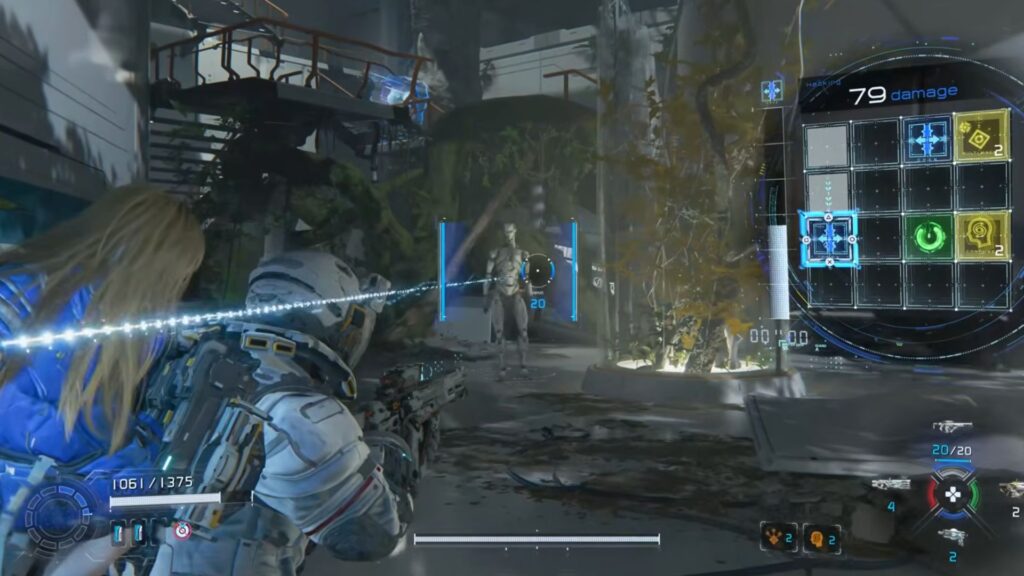
How to Beat the Lancer in Pragmata
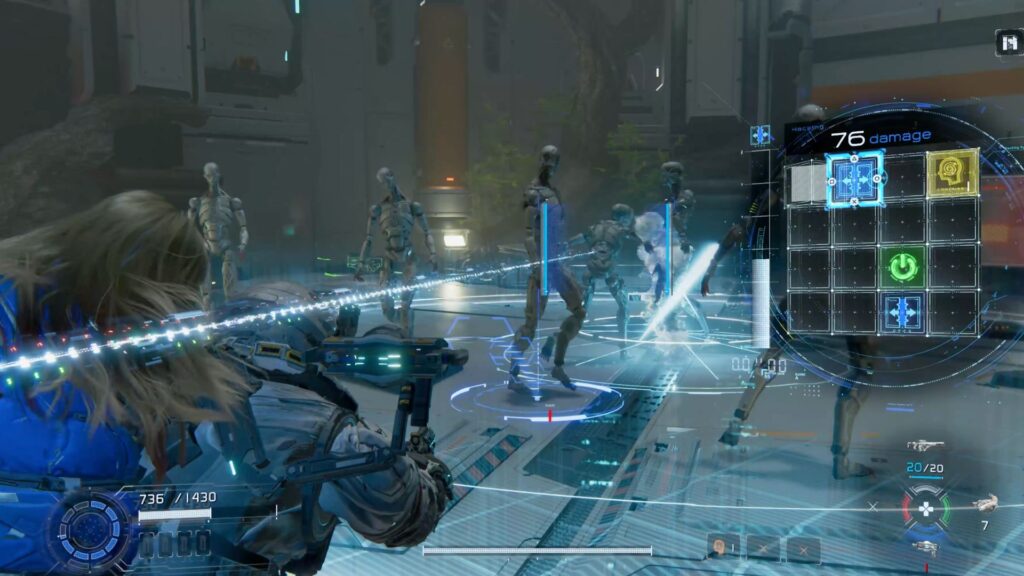
The Lancer deals heavy damage. Its main attack is a charged beam it fires after pulling its arm back. When you see this, dodge before it fires. Hack it to make it vulnerable, then aim for its head.


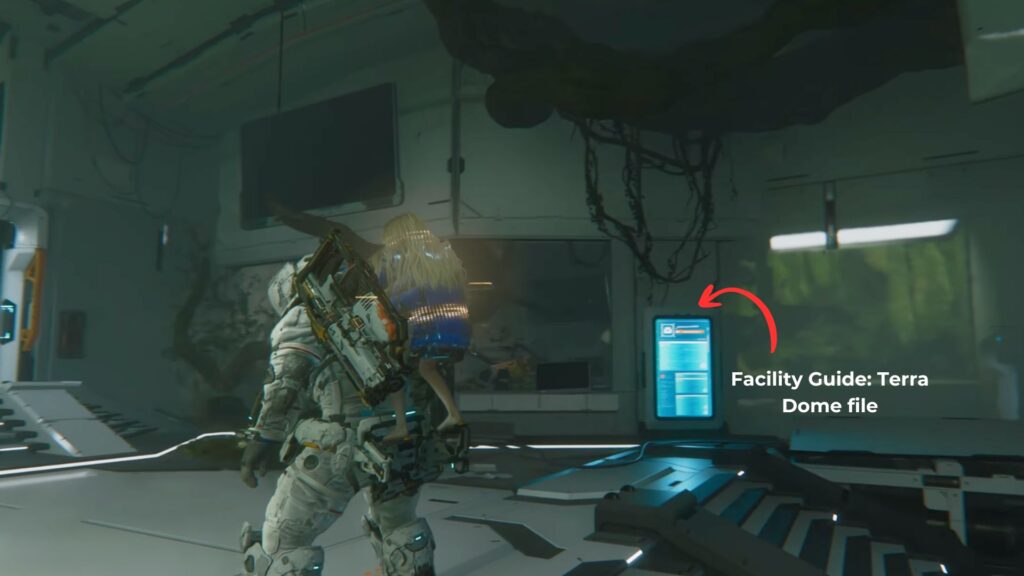
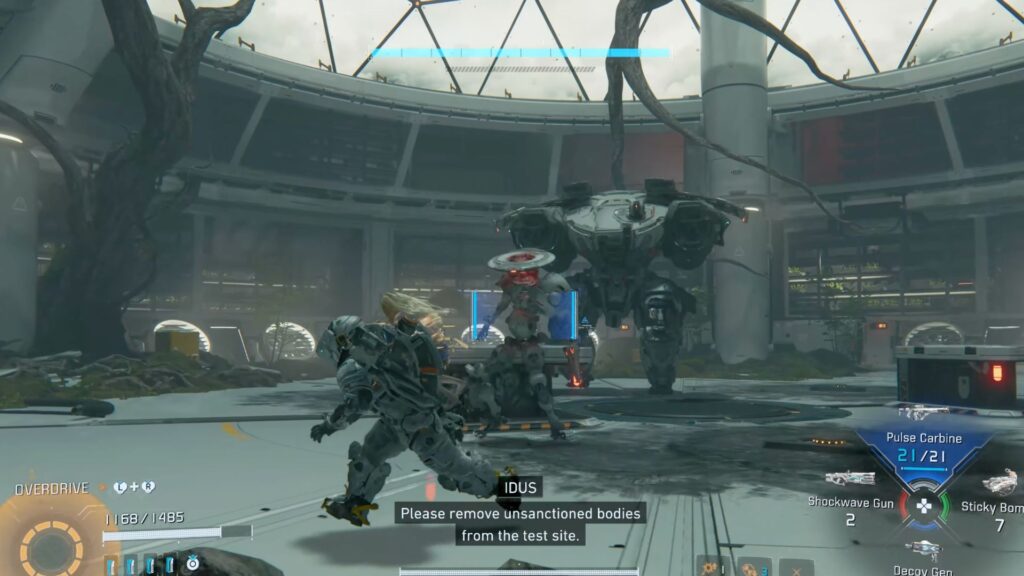
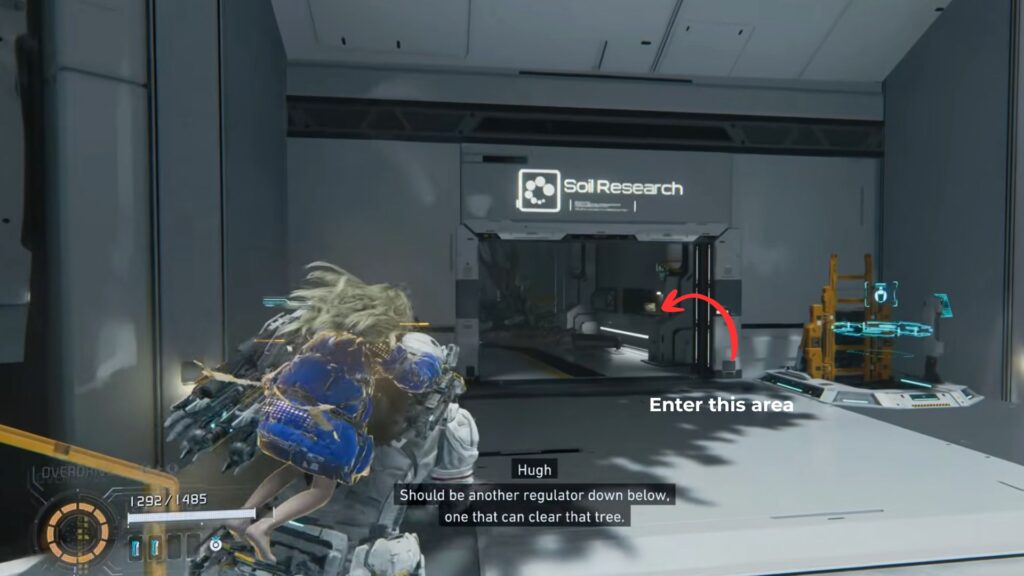
After defeating it, go inside the Terra Dome Entrance. Check the sign on the right to get the Facility Guide: Terra Dome file.
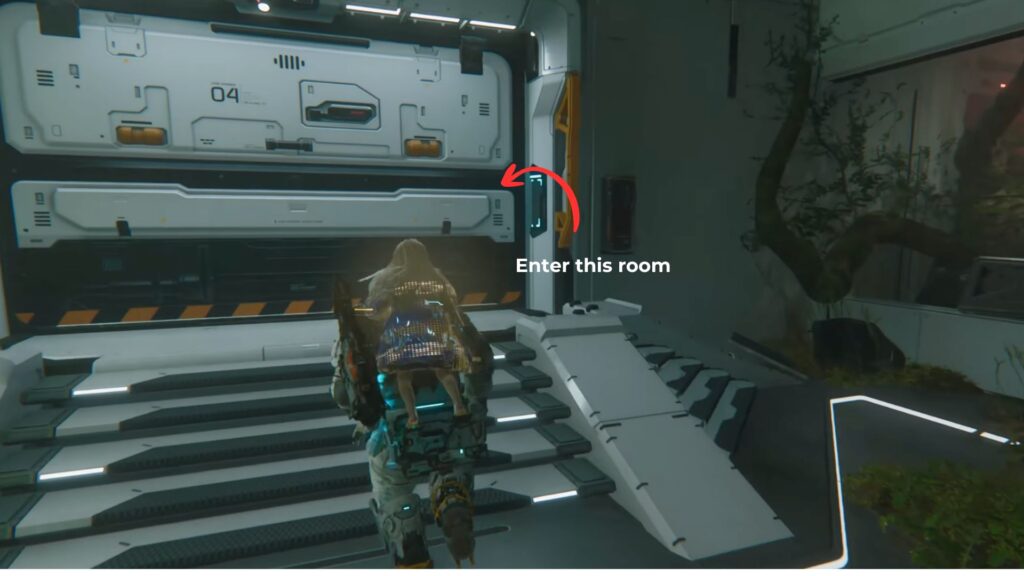
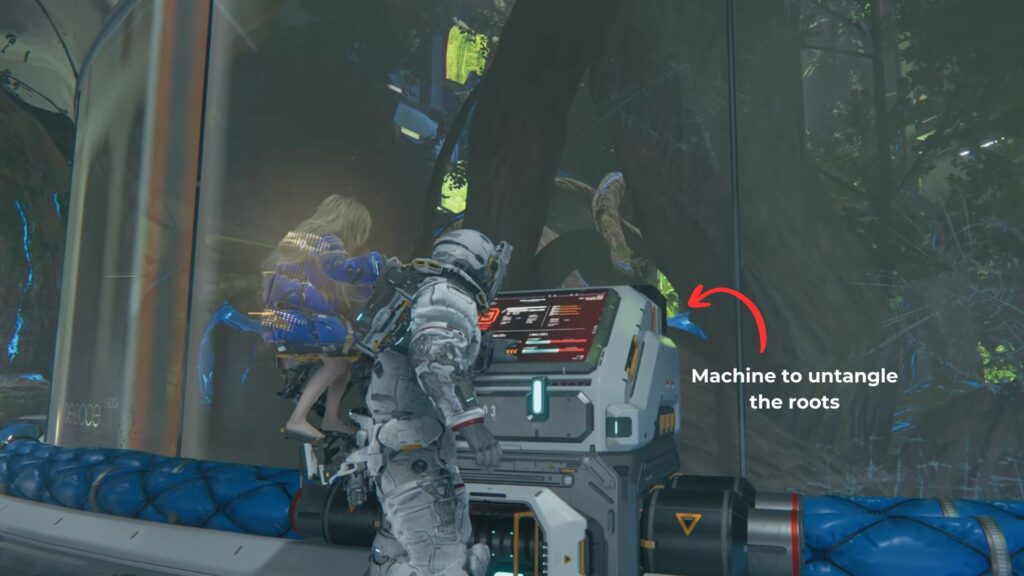
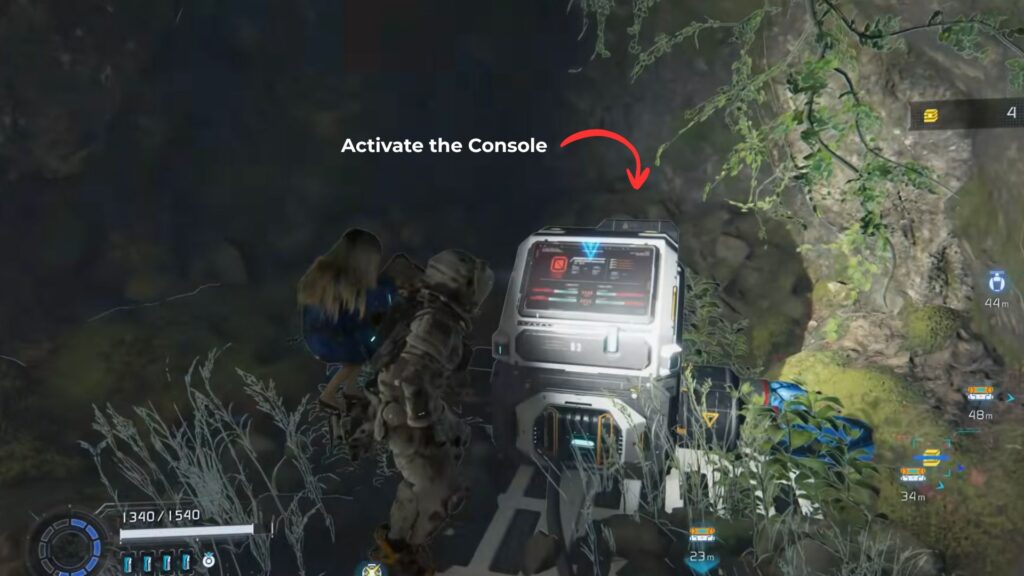
Move into the next room and use the device at the far end to clear the tangled roots in the center. IDUS will stop the process early, so you’ll need another way.
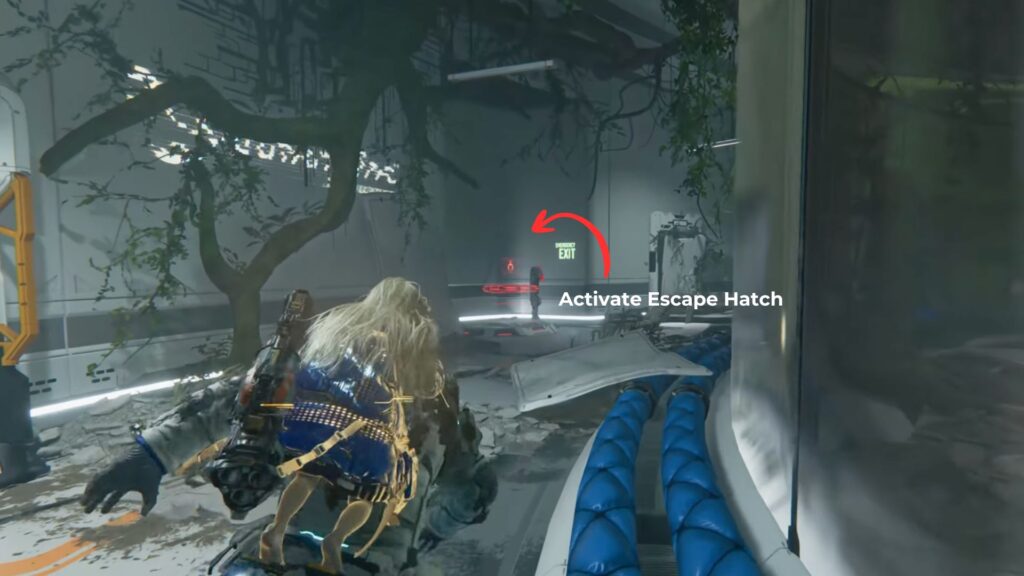
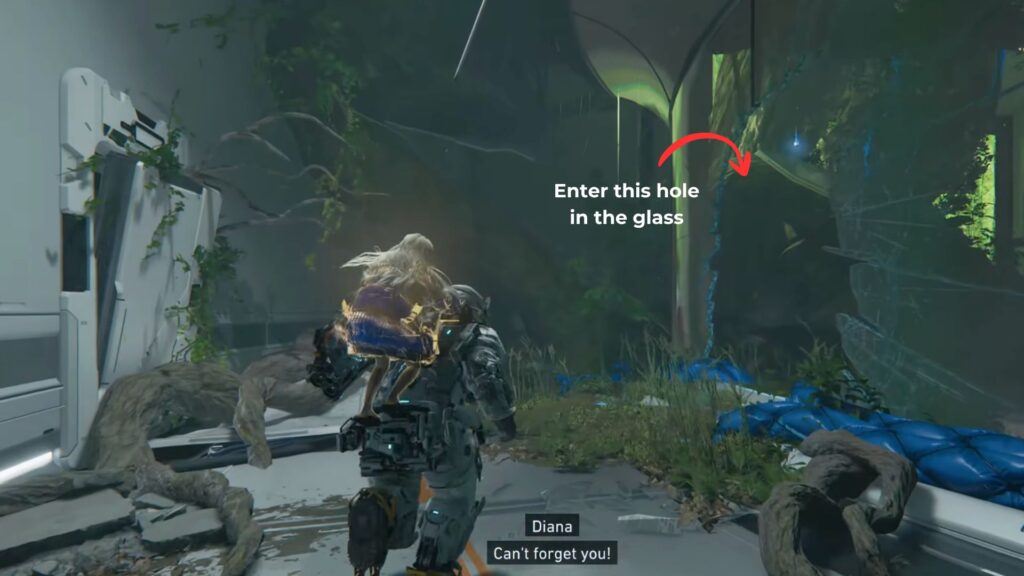
Follow the path to an Escape Hatch and activate it to unlock fast travel back to the Shelter. Near the glass wall, find a gap and go through it.
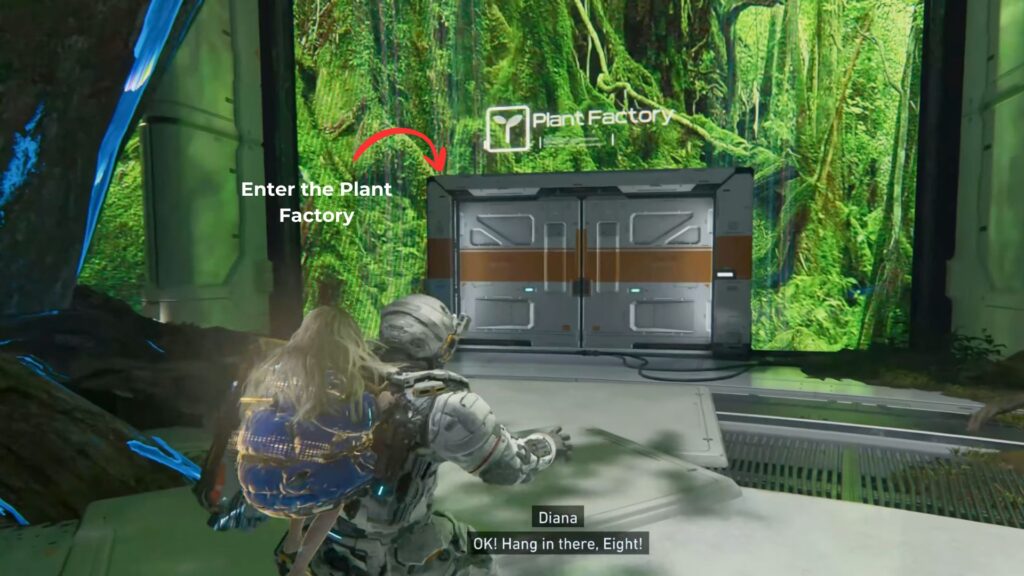
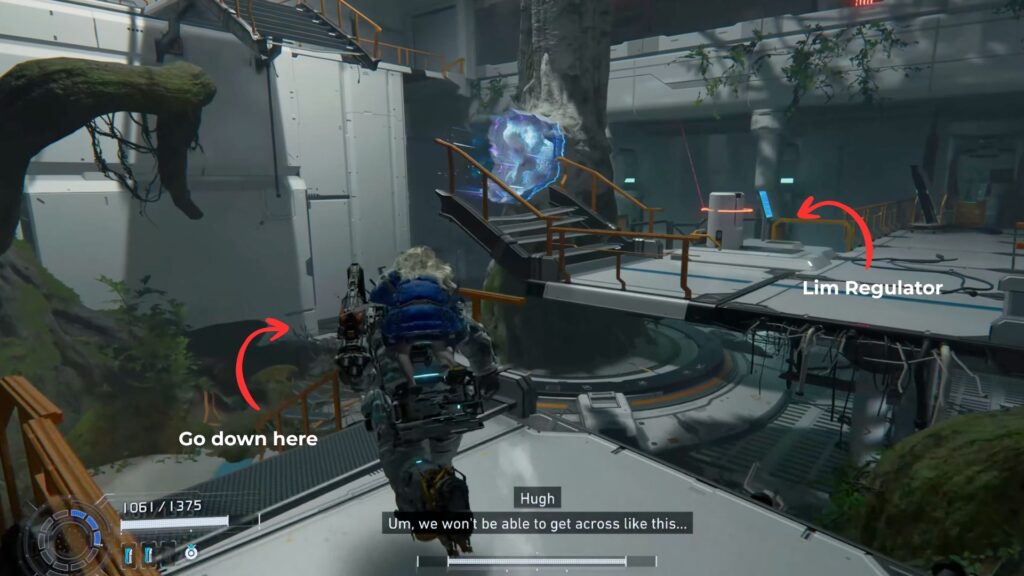
Eight contacts you again, this time as a cat. Her real body is somewhere above, but the central lift is blocked by plants. To clear it, you need to reboot two Lim Regulators in the Plant Factory and the Eco Modeling Lab.

Block 2: Plant Factory
The Plant Factory is made up of yellow challenge rooms. The first one is right through the door ahead. These fights can be tough, so make sure you’re prepared.
Initial Challenge Room
Two Crushers and a Lancer attack as soon as you enter. The space is small, so it’s hard to move around. You can use your Stasis Net while they’re grouped up to gain an advantage.

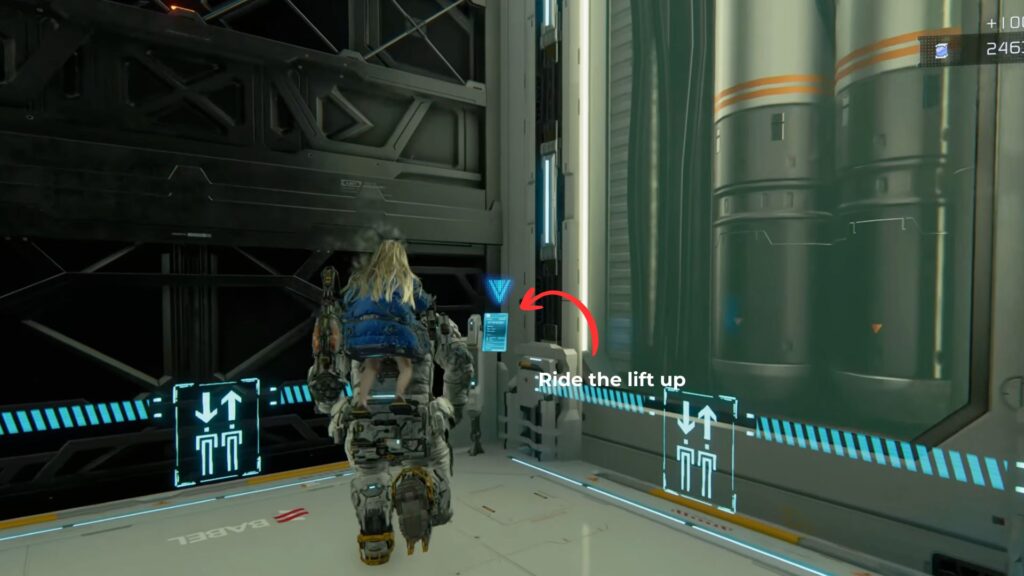
Once they’re down, the path opens. Take the lift up and check the board near it for the WARNING: Cleanroom Usage file.
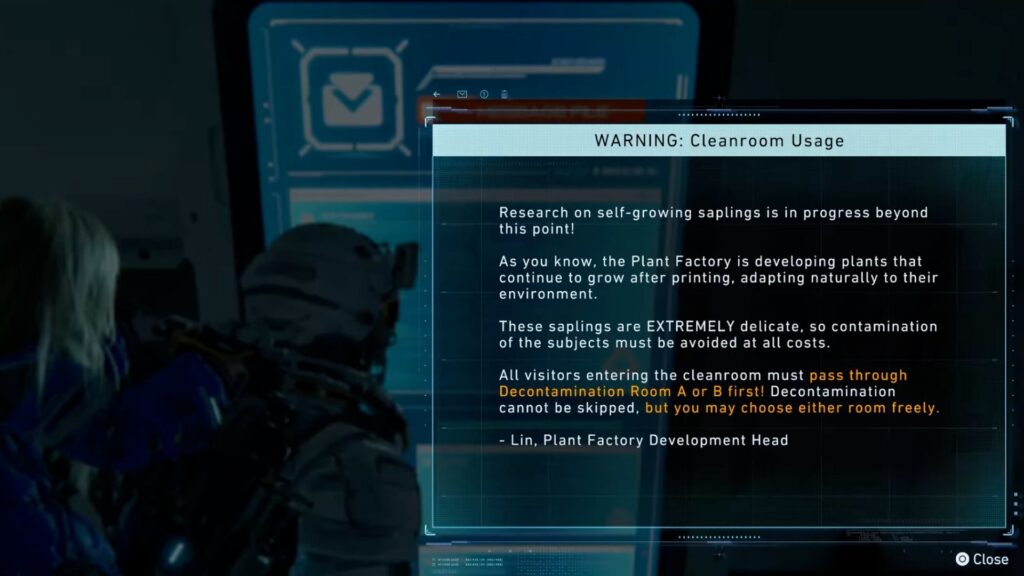
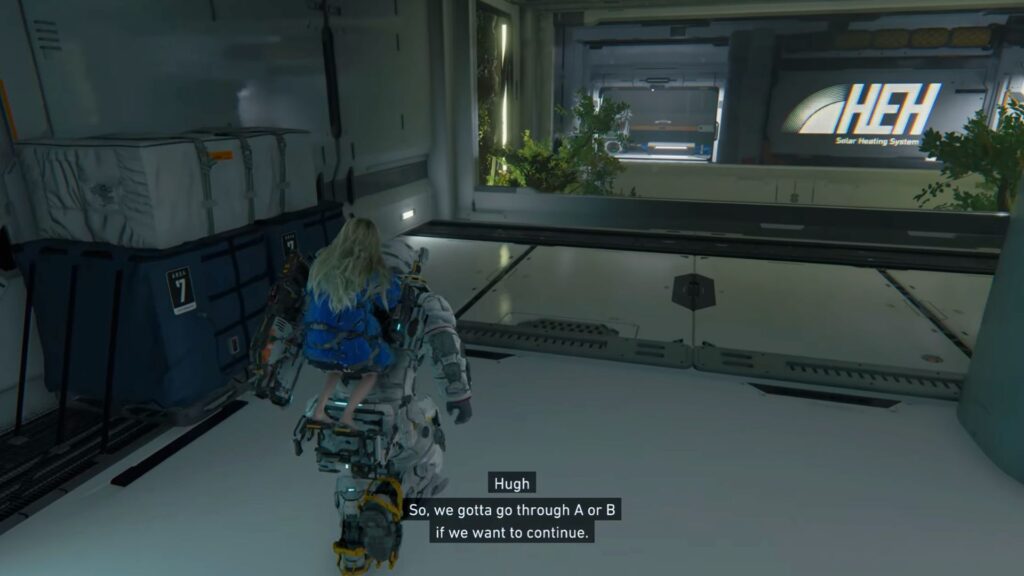
Leave the lift and follow the path until it splits. You only need to clear one of the two rooms here to move on to Area-2. Check the information boards beside each door to see what you’re in for before committing.
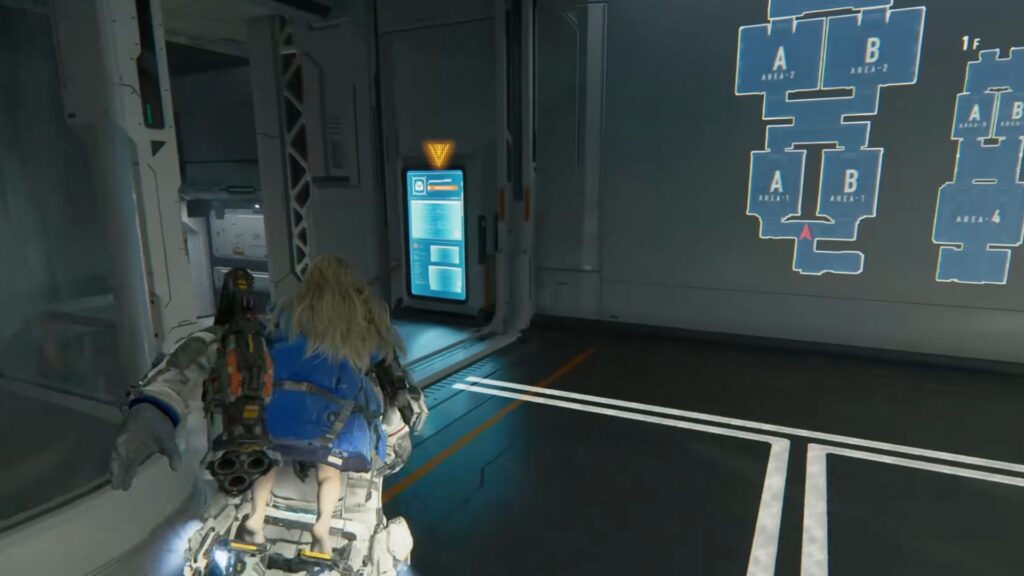
Area-1A contains two Walker MK-IIs and one Impeder. Area-1B contains two Watchers and two Impeders. Choose whichever you are more confident with.

Challenge Room Area-2
After clearing Area-1, move forward to another split leading to Area-2A and Area-2B. Before you see the board, you’ll also find a Hacking Node: Confuse.
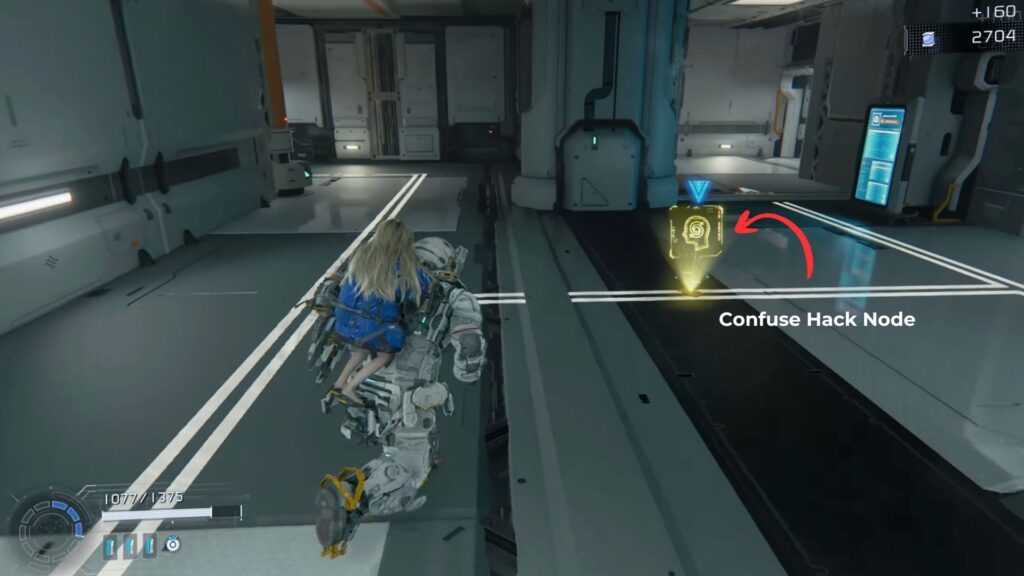
Confuse lets you turn a hacked enemy into a temporary ally. It works on most enemies and is especially useful on Lancers, flying enemies, and Reassembler bots, which can even heal you while confused.
Once you enter a room, the other one locks, so choose carefully. Each room also gives a bonus when you enter:
| Area | What’s Inside |
|---|---|
| Area-2A | 100x Lunafilament 1x Spider 1x Impeder Low Laser |
| Area-2B | 1x Upgrade Component 1x Crusher 2x Impeders High Laser |
Clearing only one room means you’ll miss one Safe Box later. To get all of them, you’ll need to come back and clear the other room.
Here are the Safe Box locations:
| Safe Box | Location | Reward |
|---|---|---|
| Safe Box 2 | Right after Area-2B, in front of a window as you enter the next section | 3x Upgrade Components |
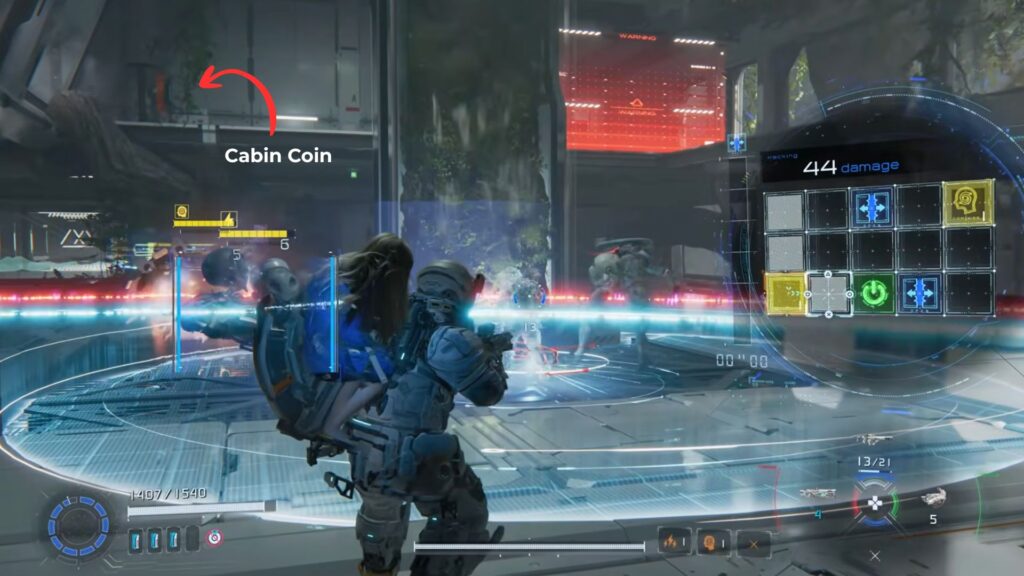
| Safe Box 3 | Between two information boards to the right of the Red Zone (after clearing either Area-2 room) | Cabin Coin |
| Safe Box 4 | Left of the Red Zone door (only after clearing Area-2A) | 350x Lunafilament |
Challenge Room Area-3
Area-3 has two rooms but you may only have access to one right now. Area-3A is a Red Zone and requires a Red Zone Key to enter. These keys are found inside Sectors or through Cabin’s Stamp Club.

If you don’t have one yet, you’ll be going through Area-3B by default.
| Area | What’s Inside |
|---|---|
| Area-3A | 100x Lunafilament 2x Lancers 1x Spider High-powered Laser |
| Area-3B | 1x Upgrade Component 2x Crushers 2x Crusher MK-IIs High-powered Laser |
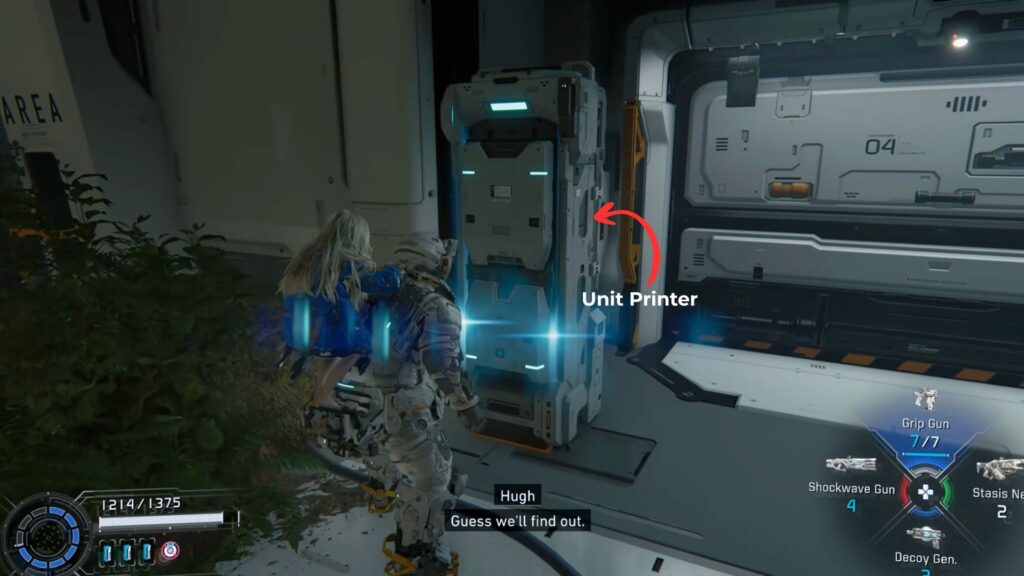
You may also come across a Unit Printer in this area. Activating it lets you choose between a Charge Piercer Attack Unit and a Riot Blaster Tactical Unit to add to your loadout. Once you choose, it shuts down and can’t be used again.

Final Challenge Room
Push through until you reach a large open arena. This is the final challenge room of the Plant Factory and it introduces a new enemy type, the Bomber.

How to Beat the Bomber
The Bomber is a heavily armored enemy that uses explosives. Watch the ground for blue circles from its laser. These circles explode after a short delay, so move away as soon as they appear.
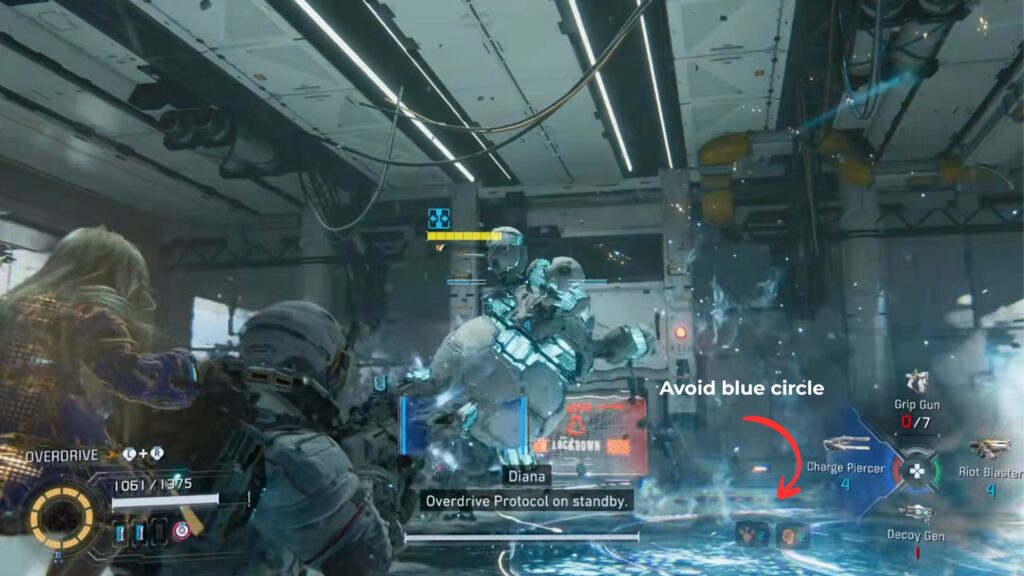
It can also charge at you and trigger a blast, so when you see it wind up, run out of its path. Hack it to make it vulnerable, then aim for the four heads on top of its body.
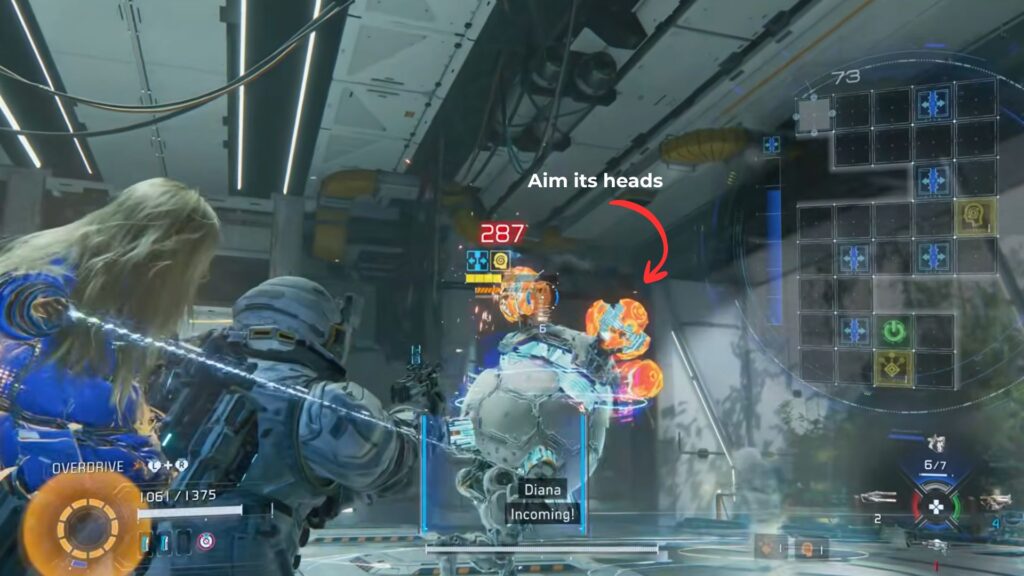
After the Bomber dies, two Lancers and one Impeder join the fight. There are no laser traps here.

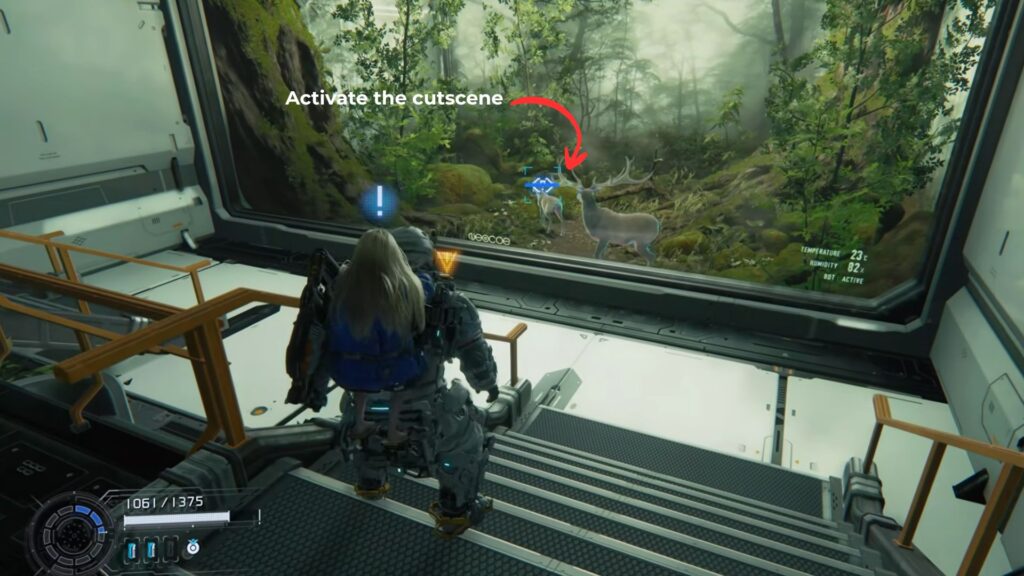
After the fight, go into the next room with holographic deer. Activate the blue circle in front of the display to trigger a short conversation.
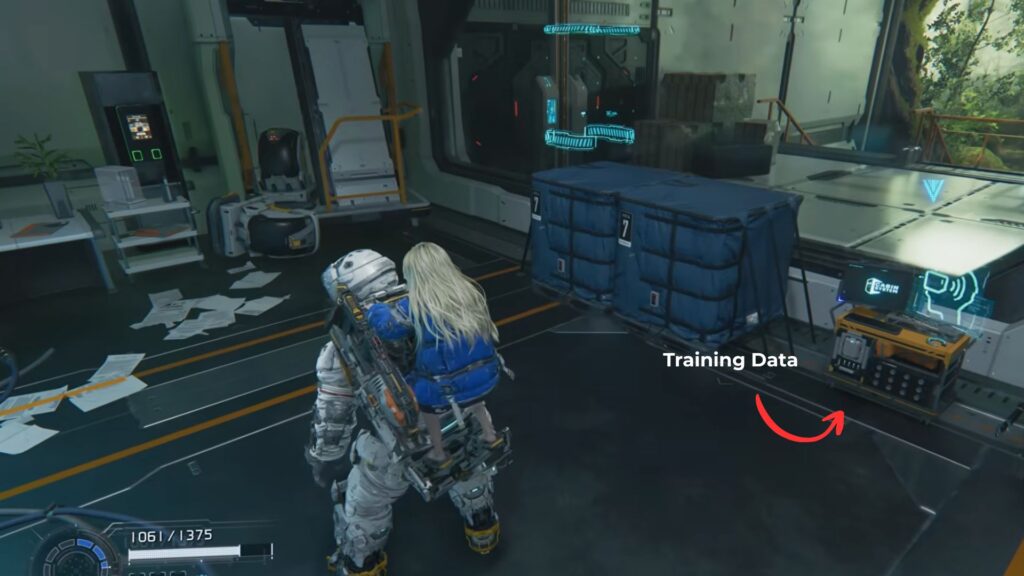
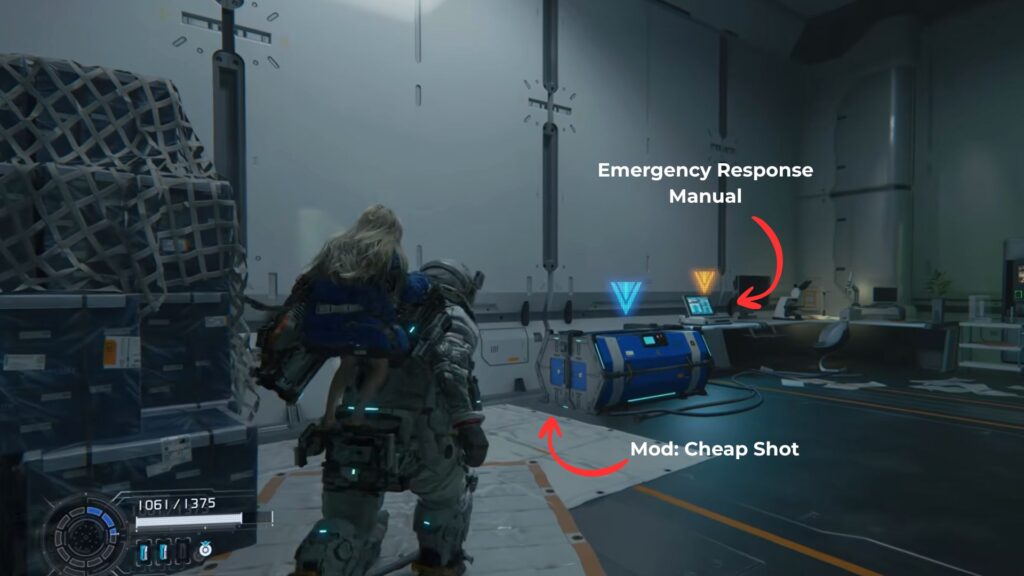
Ahead, there’s a room and a lift going up. Check the room first. Inside, interact with a broken Cabin unit to get Training Data, which unlocks more Training Simulations at the Shelter. Also check the desk on the left with the Emergency Response Manual file on the laptop.
You’ll also find the Mod: Cheap Shot here. Open the blue chest right next to the desk to get it. This mod increases your attack by 15% when hitting enemies from behind.
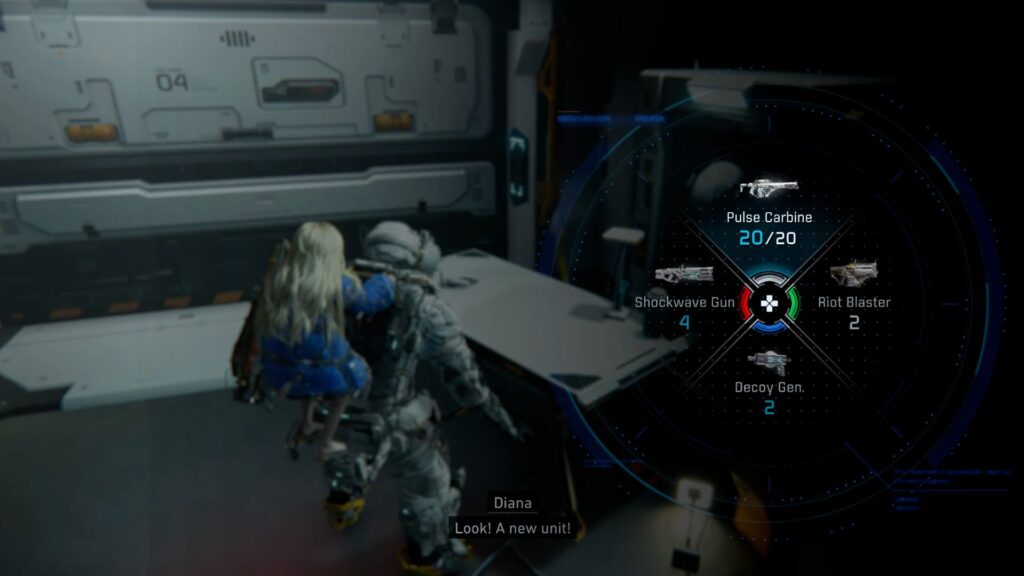
Take the hand lift up when you’re ready. At the top, you’ll get a new weapon: the Pulse Carbine.
How to Use the Pulse Carbine
The Pulse Carbine replaces your Grip Gun when equipped. It has 30 rounds and fires automatically. It does less damage per shot, but builds heat the longer you fire. When enemies overheat, they become open to a Critical Shot kill.
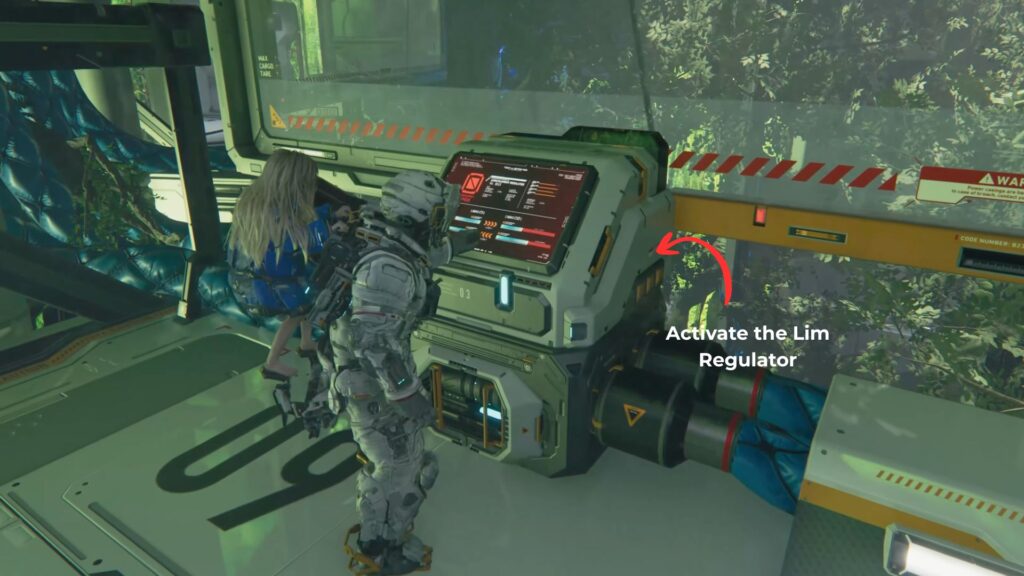
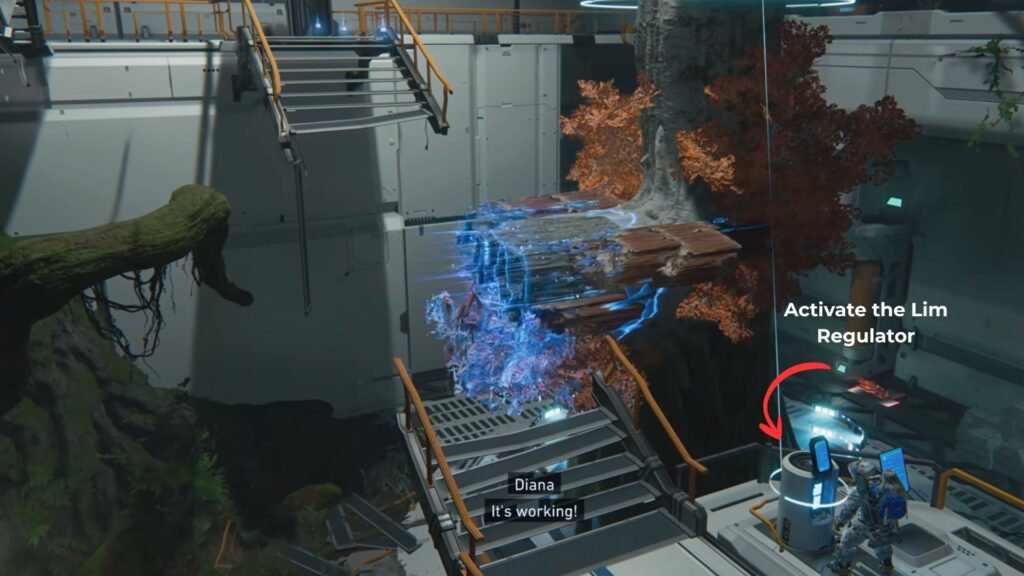
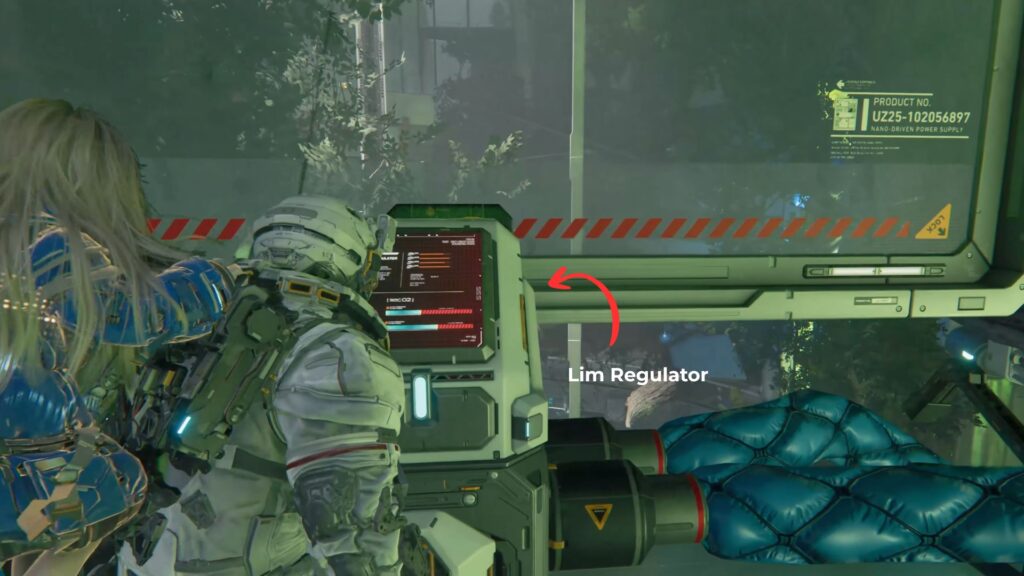
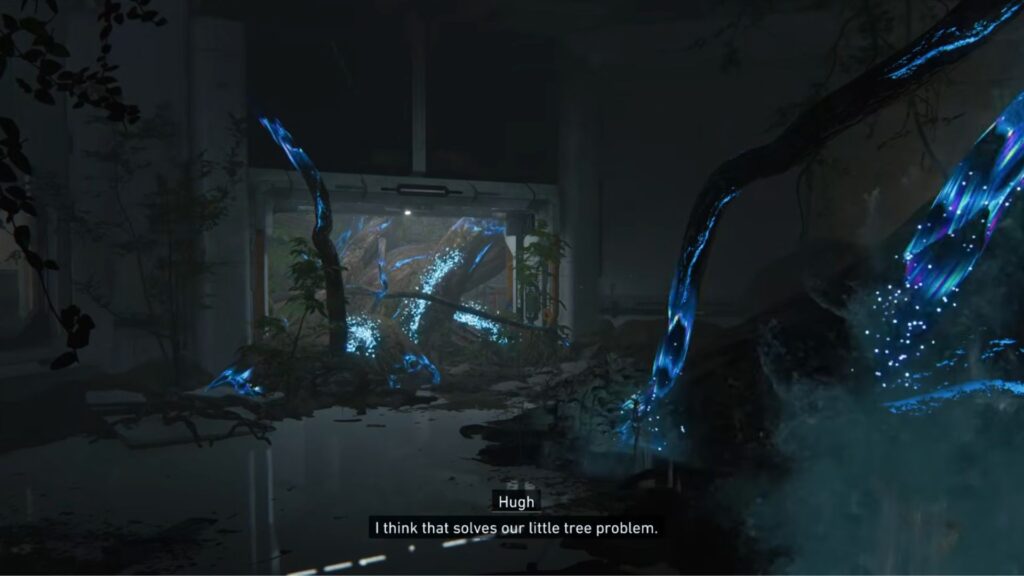
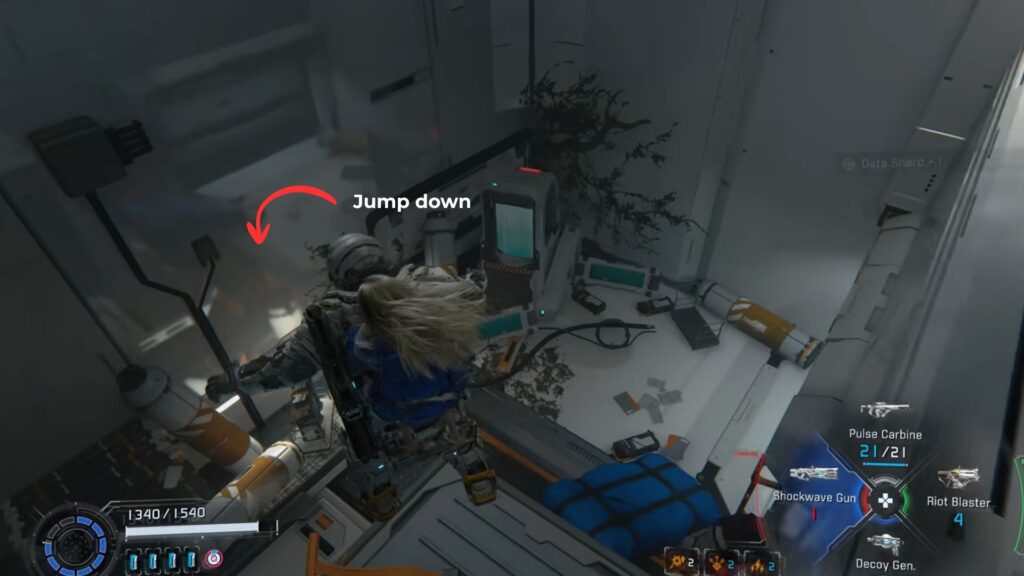
Go through the next door and activate the Lim Regulator to clear more plants, then jump down back to the center area after that. If you still need to finish the Eco Modeling Lab, go there next. Otherwise, continue to Block 3.

Block 3: Eco Modeling Lab
The Eco Modeling Lab has the second Lim Regulator needed to clear the central lift. The path is long and has a lot of hidden items.
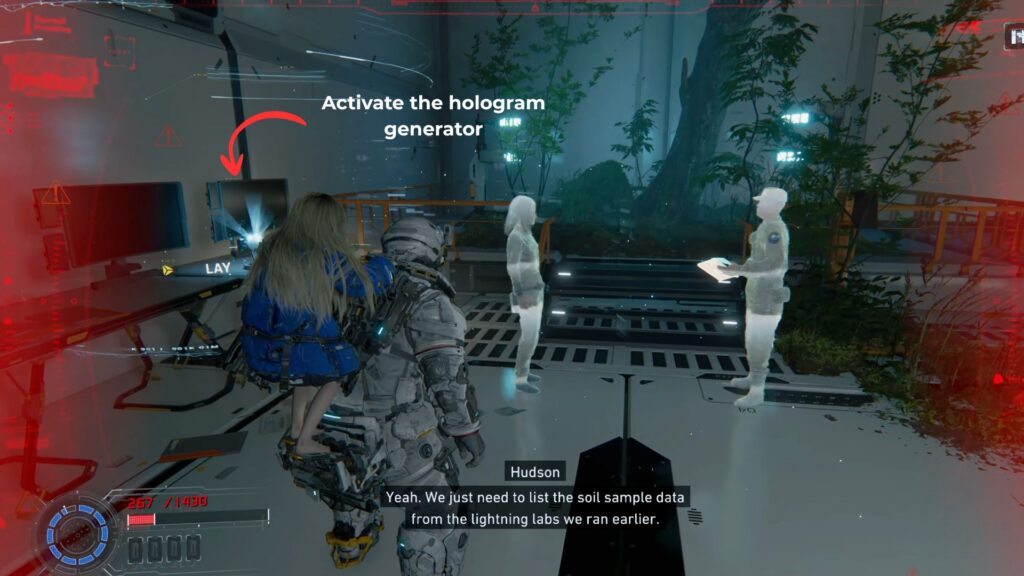
Go through the entrance and head downstairs. At the bottom, activate the circle near the habitat to trigger a short conversation about insects with Diana.

Then, keep on walking into the large area ahead with a huge HEH Solar Heating System writing on the wall. But be careful of the display cases, because the Walkers inside will activate if you get too close.
Go up the stairs and stop at the first platform since the rest is broken. There’s a Lim Regulator here, but it isn’t working yet.
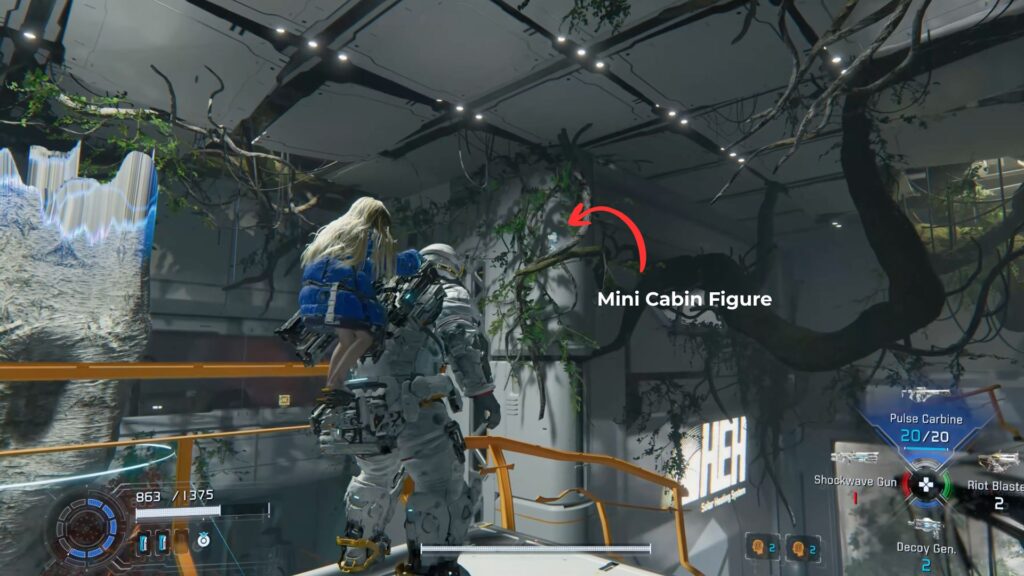
Now, you can turn around and look up near the ceiling. The Mini Cabin figure is perched on a branch or root high above. Shoot it down to claim it.
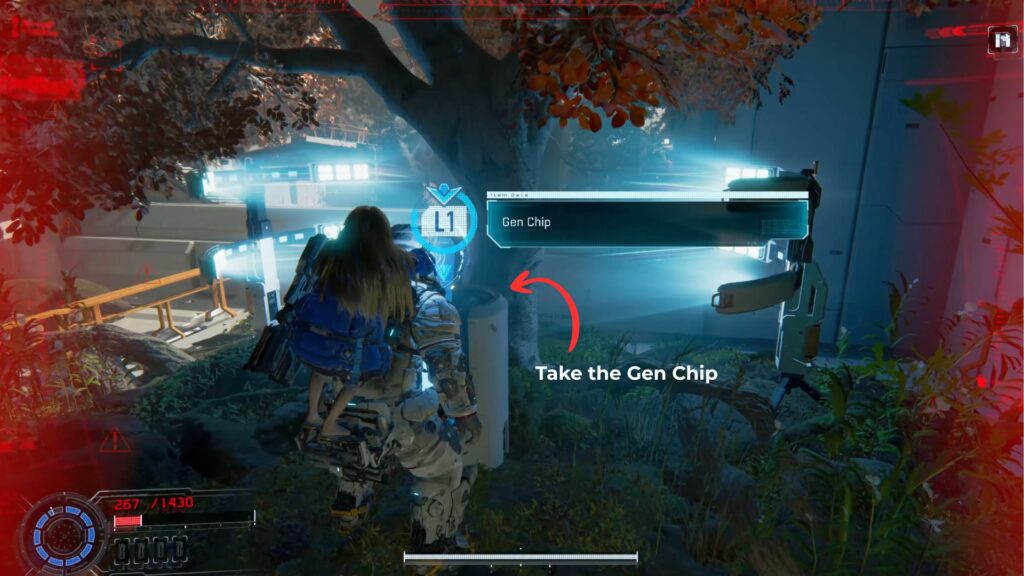
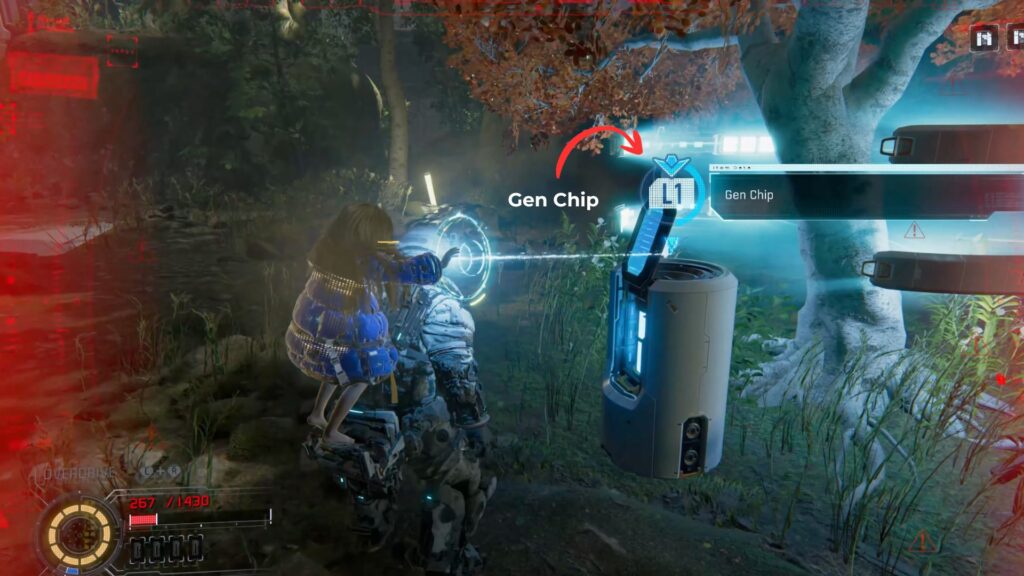
The gap ahead is too wide to cross, so you need a Gen Chip. Drop down near the large tree and find a hole in the wall by some broken stairs. Go inside, defeat the Impeder, and interact with the small tree to take the Gen Chip.
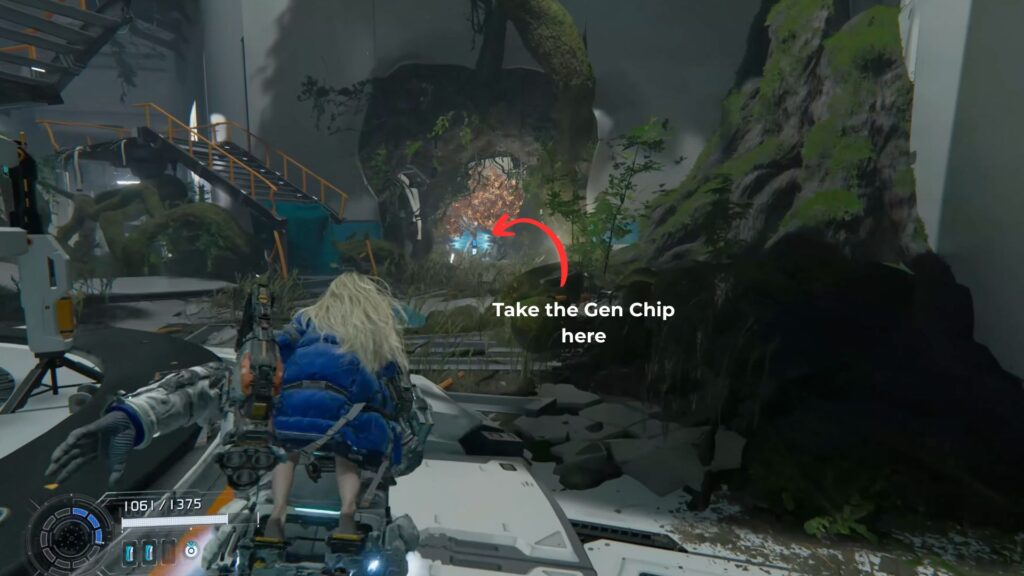
Bring it back and use it on the regulator to grow a branch you can cross.
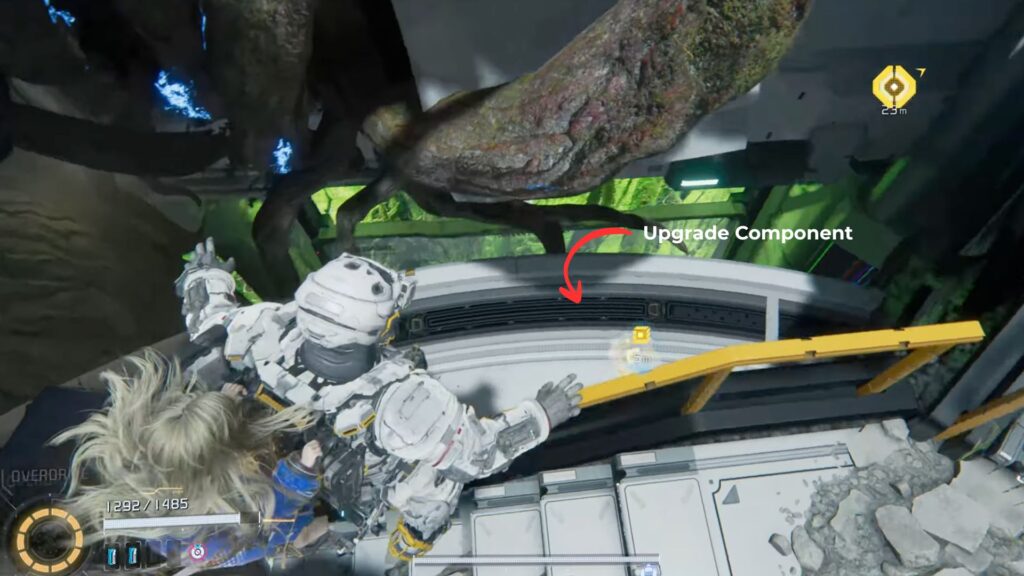
After using the regulator to regrow the branch, cross over it and immediately turn around. You’ll see a broken catwalk along the wall with an Upgrade Component at its far end.
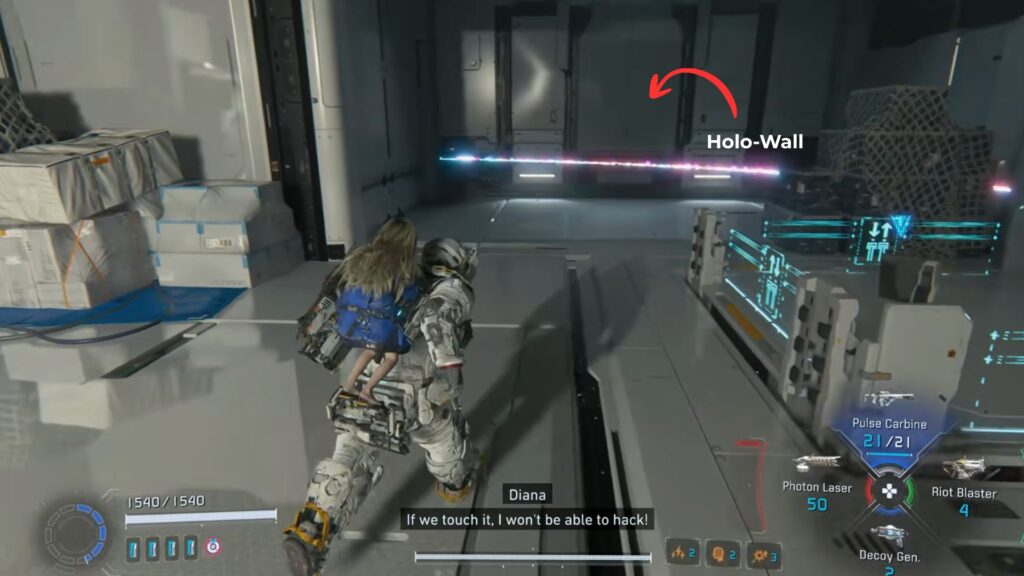
Then go back to where you came from after crossing the branc and look right along the pathway to find the first Holo-Wall at the end.
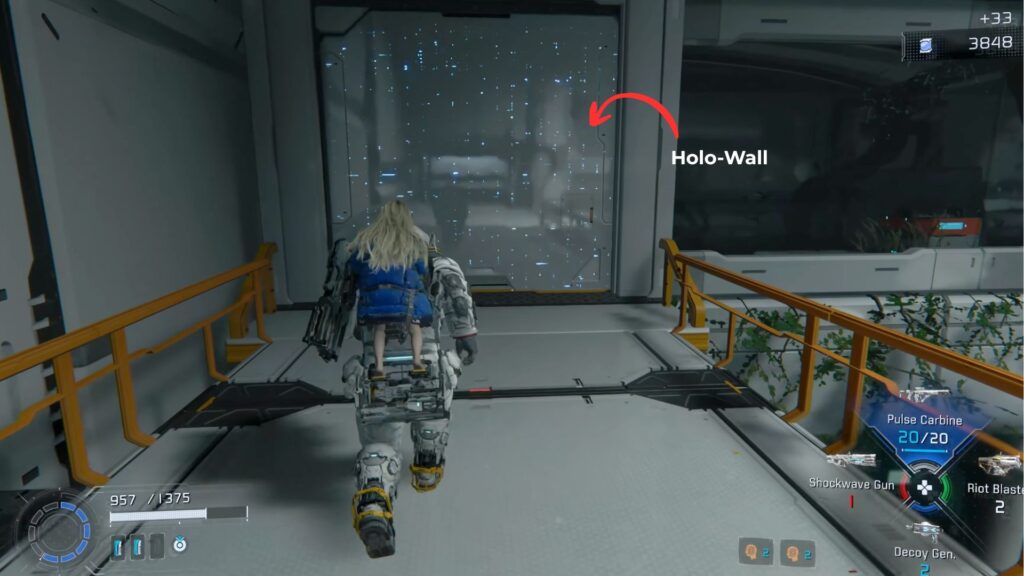
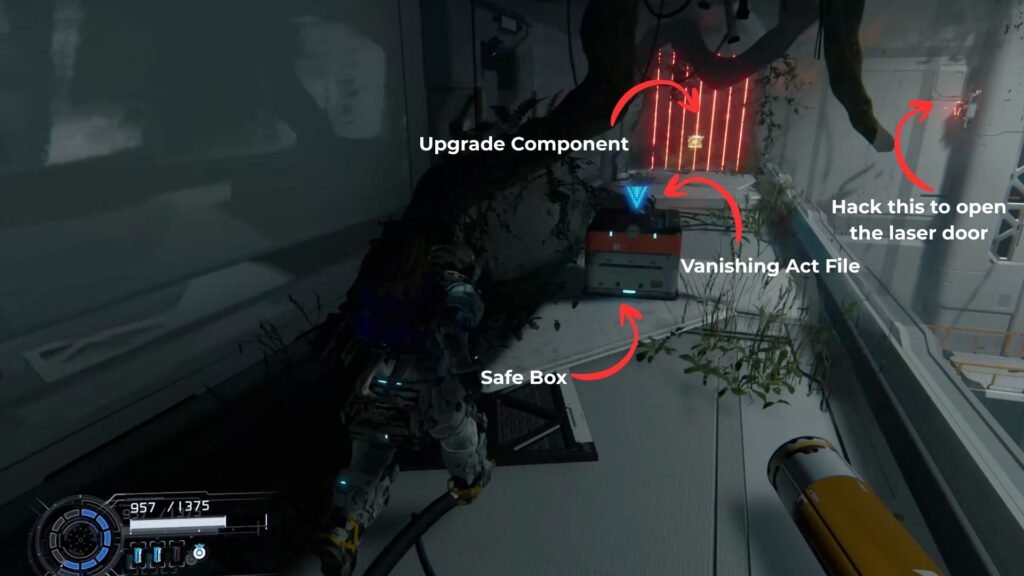
Inside is a Safe Box with 300 Lunafilament, a tablet containing the Vanishing Act information file, and an Upgrade Component locked behind lasers. You need to leave the room first, and hack the terminal on the wall outside to deactivate the grid and grab it.
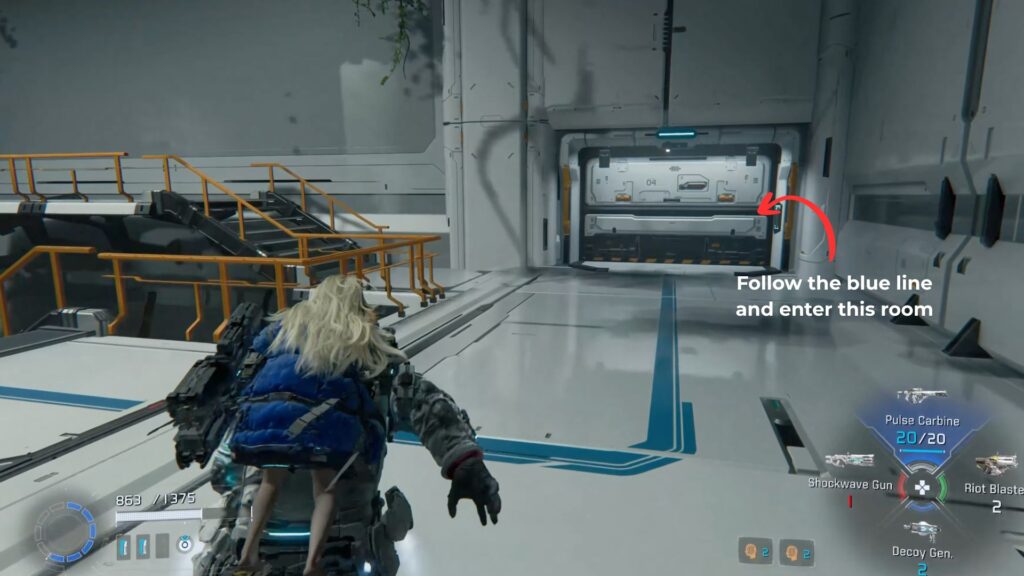
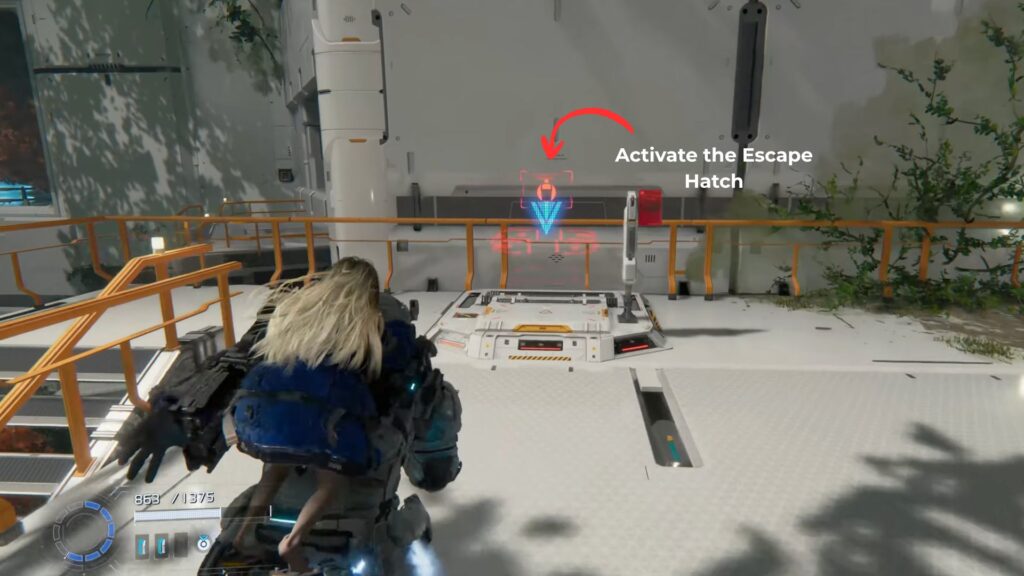
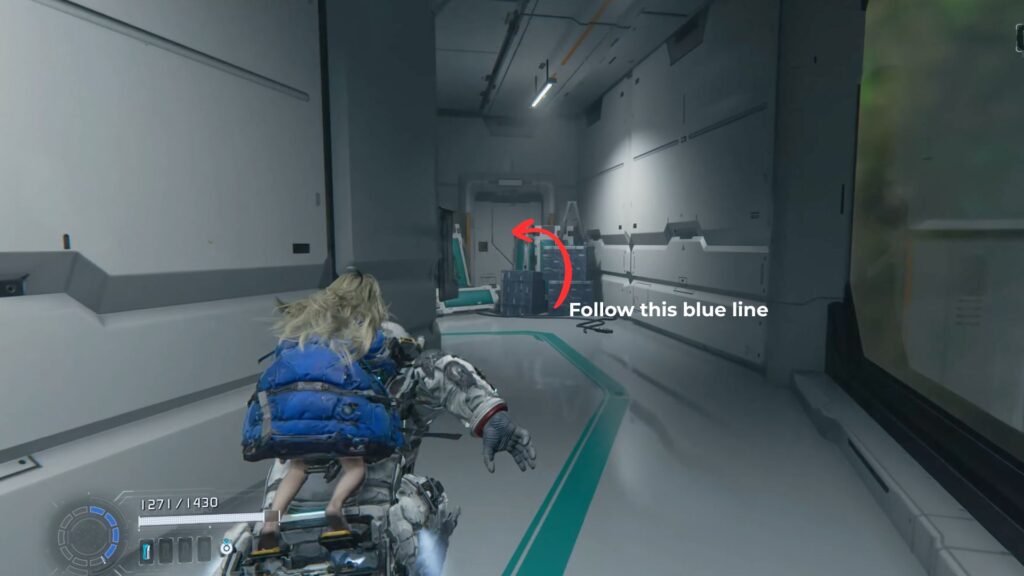
Follow the blue line on the floor to a large door. Inside are three trees missing branches. You need three Gen Chips to fix them and open the path. Before looking for them, go up the stairs near the generators, turn right, and activate the Escape Hatch.

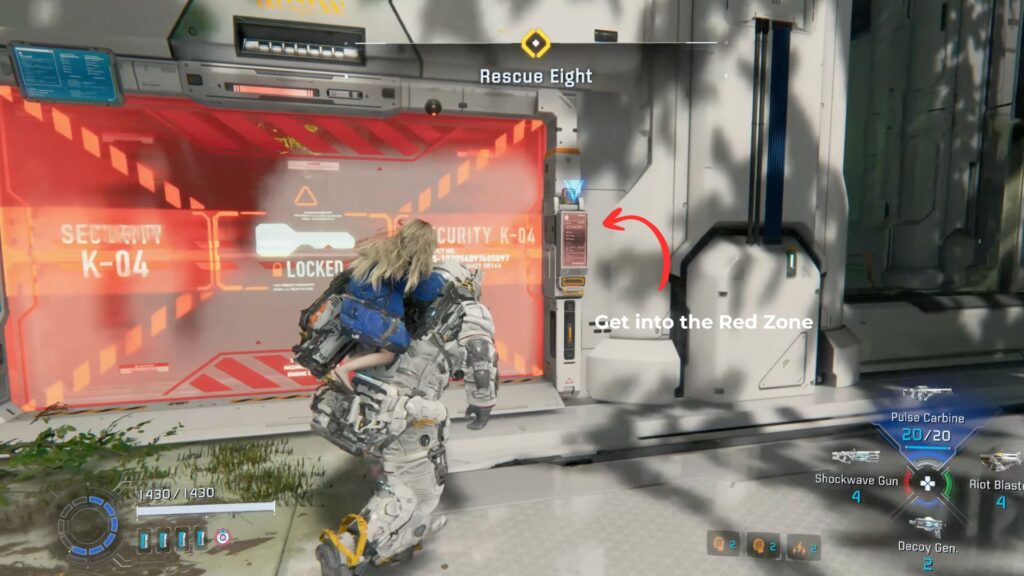
If you have the Red Gate Key, the entrance is to the right of the Escape Hatch. Inside, avoid the lasers on the lower floor and take the right path first. You’ll face a Lancer and a Watcher together. The Watcher’s lasers will target you during the fight, so listen for Diana’s warnings and dodge when she calls it out. After defeating them, more Lancers, Crushers, and an Impeder join. The lower laser floor becomes part of the arena, so be ready to move and jump while fighting.

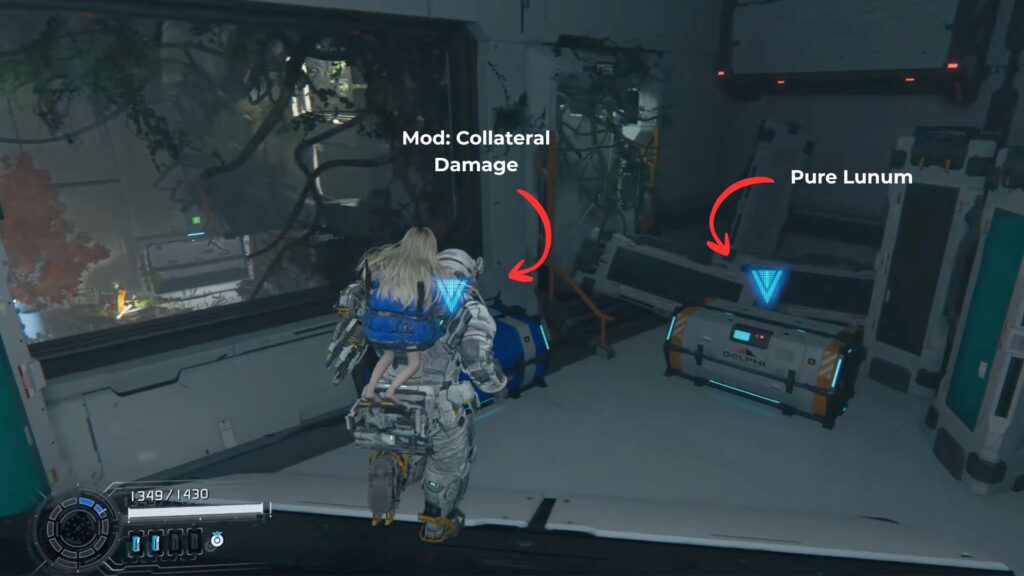
After clearing the Red Zone, head into the room next to the one with the large glass wall. Inside you’ll find Mod: Collateral Damage, which causes Critical Shot damage to spread to nearby enemies at 30%, along with a Pure Lunum.
Diana will point out a Gen Chip visible below but you cannot reach it from here yet. Head up the stairs and check the first open room on the left for an Upgrade Component before looping back to the Escape Hatch area.
Gen Chip 1
Head past the first Gen Chip tree and weave through the elevated land masses on its left side. Stop when you reach a staircase. At the top, pick up the Sticky Bombs tactical unit waiting there.
Sticky Bombs launch explosives that latch onto enemies. Each bomb applied shrinks the target’s hacking window, making it easier to hack. The more bombs attached, the smaller the window gets. They work best on tough enemies with large hacking windows like Executors and MK-II types.
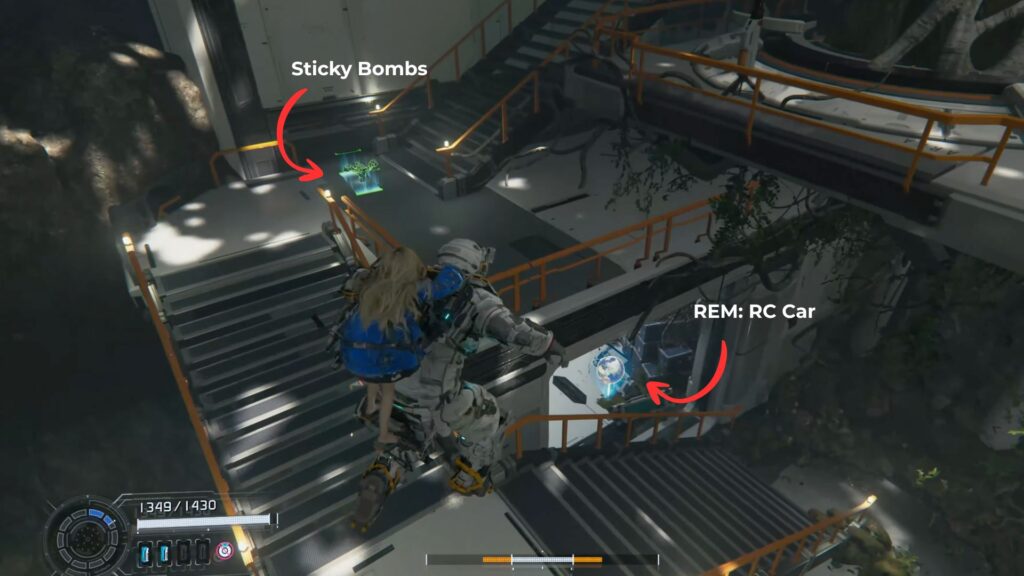
Take out the Crusher MK-II near the top of the stairs and continue to the Gen Chip device to collect Gen Chip 1.
After picking it up, head toward the broken staircase but stop before reaching it. Look left to spot a broken guard rail with a lower area containing shipping crates below. Drop down, defeat the two Walker guards, and find a Safe Box tucked in a container beside the crates for three Upgrade Components.
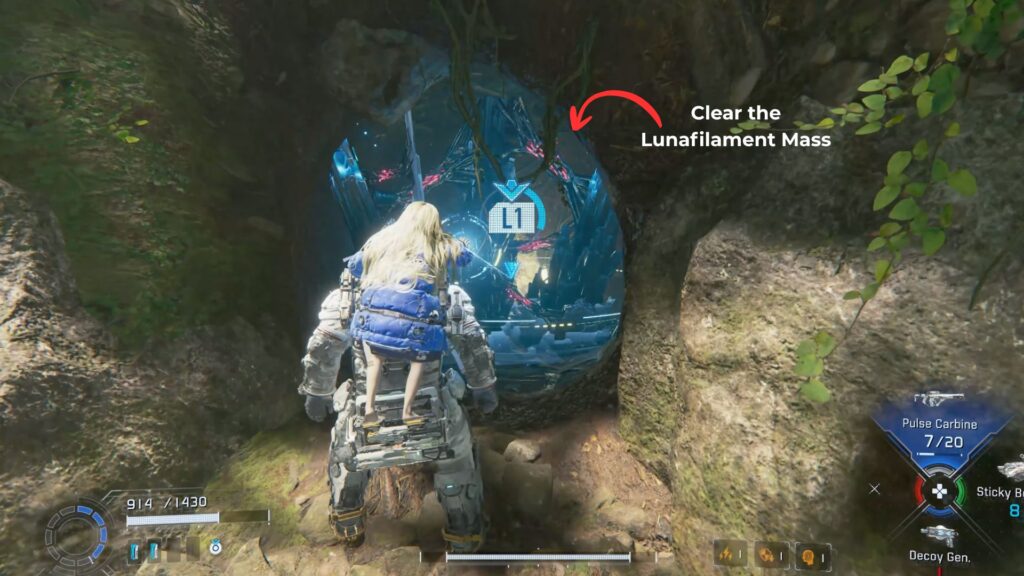
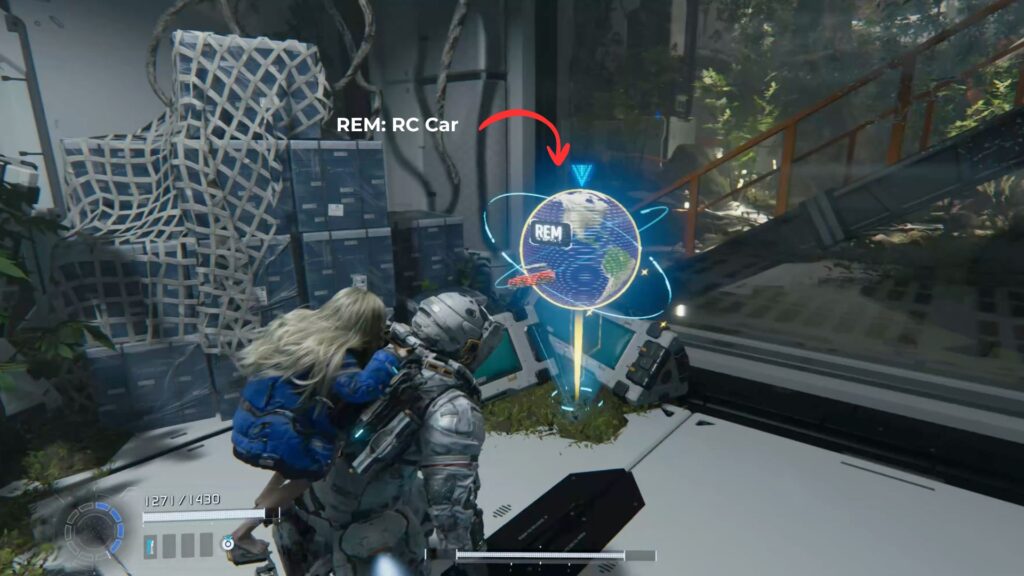
From here, look for a small cave in the wall above with a Walker guarding it. Defeat the Walker, then use the Lim Eraser to clear the Lunafilament Mass blocking the gap.
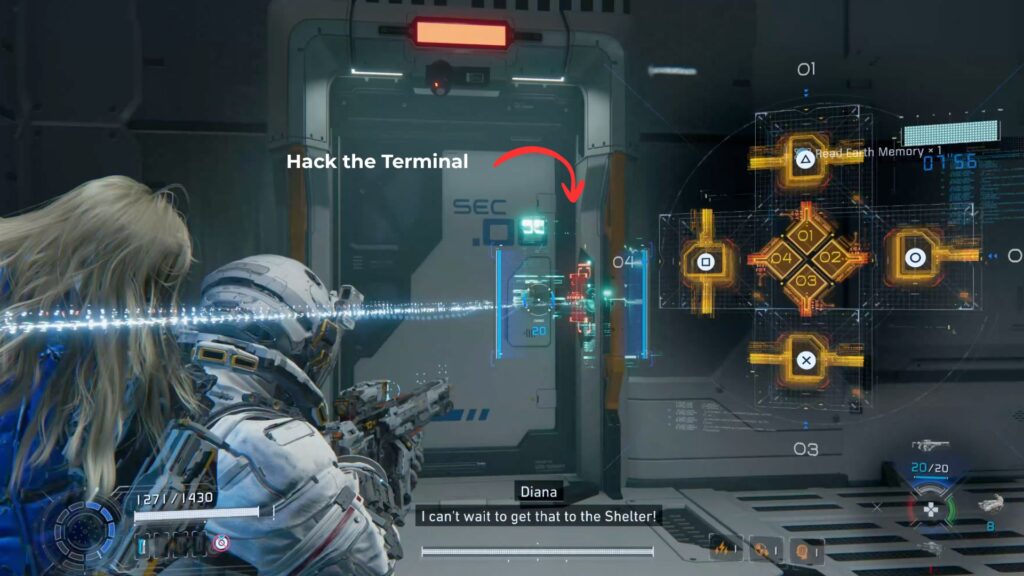
Inside is a room with laser traps. Navigate past them and turn around to find a terminal. Hack it to shut the lasers off. The RC Car REM is inside this room. Hack the nearby door lock for a quick way out.
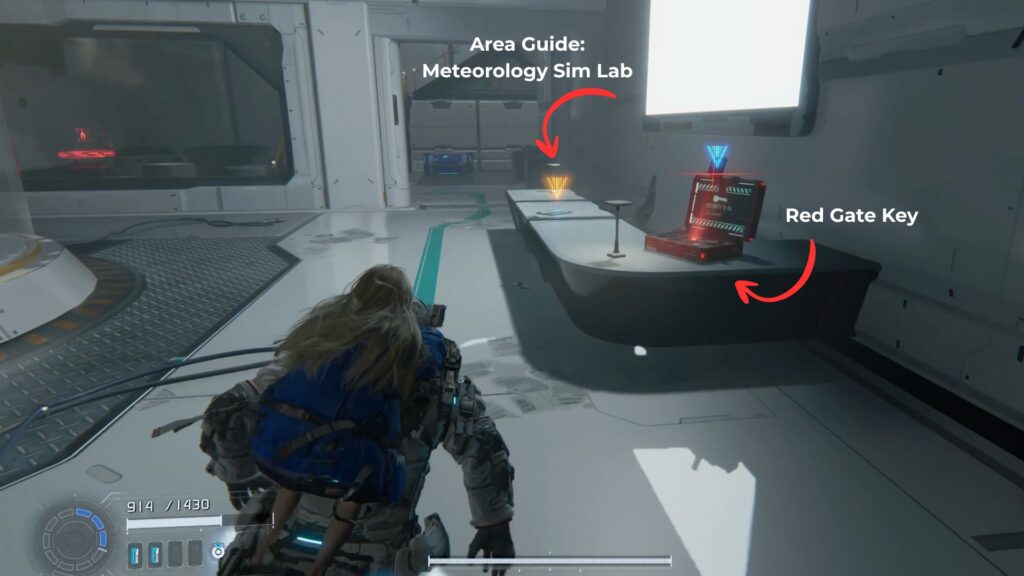
Next, follow the blue paint line on the floor into the lab built into the wall ahead. Inside the lab, a Red Gate Key is sitting on a desk alongside a tablet with the Area Guide: Meteorology Sim Lab information file.
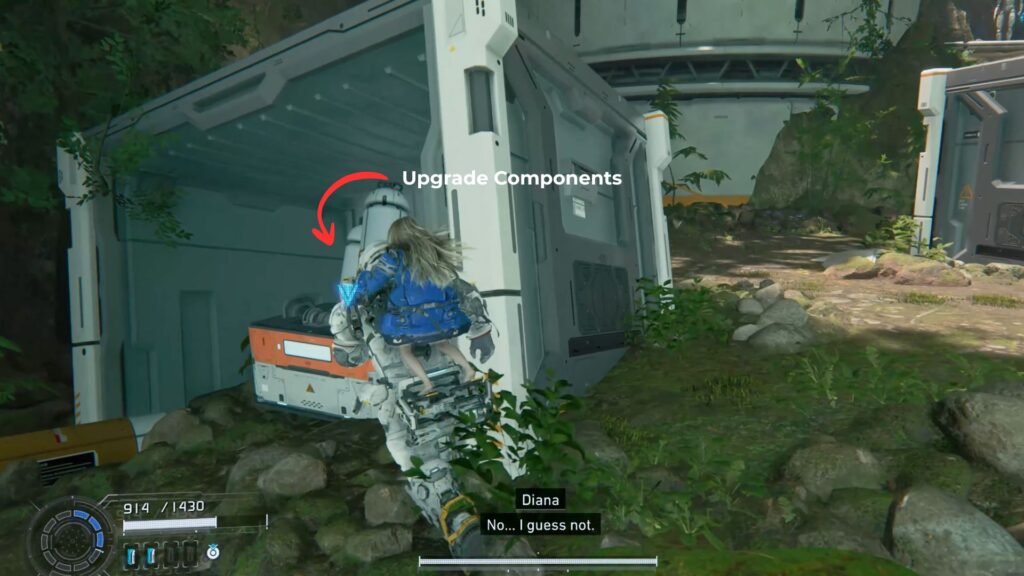
On the opposite side of the room, collect another Upgrade Component. Walk into the adjacent room to find Mod: Aggressive Defense, which reduces damage taken by 20% while aiming. Activate the Escape Hatch there as well.

Gen Chip 2 and 3
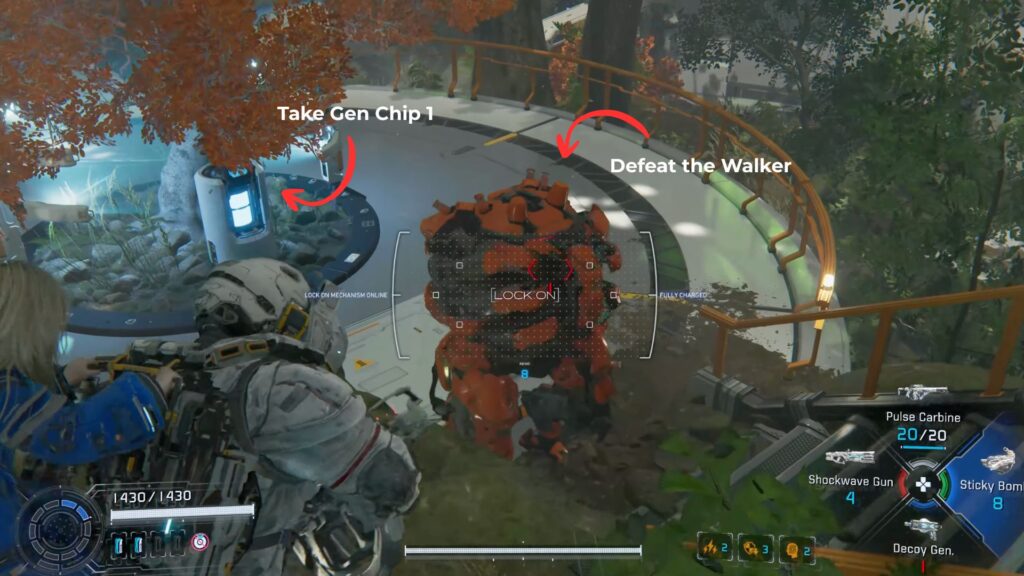
Head up the staircase and push forward past the lab until you reach a large circular room. A Crusher drops into the arena, but this time the floor has yellow dotted circles marked on it. Lightning will strike the center of those circles after a short delay. Lure enemies into the strike zones to stun them, then follow up with your attacks. After the Crusher, two Walkers and a Crusher MK-II arrive. Use the same strategy to stay in control.

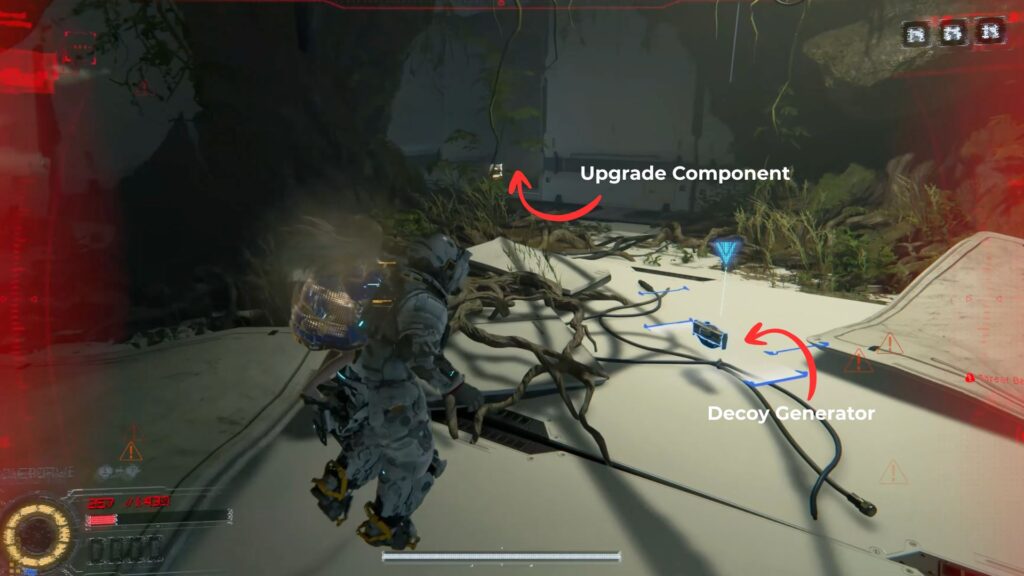
After clearing the first lightning room, step through the doorway and look left immediately to find an Upgrade Component.
Drop to the lower area when ready. Six Walkers will swarm you. Use the Decoy Generator or Stasis Net to manage the crowd and keep luring enemies into the lightning circles. A Bomber follows after the Walkers. Apply the same strategy to limit its explosive attacks.
Once the fighting is done, head forward to the next room and check the desk nearby for a hologram generator, then take Gen Chip from the device.
Head through the door and drop to the room below. On the left, collect the tablet with the Facility Guide: Closed Test Area information file. Hack the door lock on the far side to exit.

Back through the central area, you’ll find an Upgrade Component just after stepping out. Across from it, past a small tree, a Walker guards another REM. Defeat it and collect the Balloons REM.


When you reach the stairs going back up, grab the Gen Chip from under the tree beside them before ascending.
From the staircase area, look for a darkened room above a small platform to the left of the Escape Hatch. Jump and thrust across, then crawl through the window. The Upgrade Component is toward the back of the room. There’s also a Decoy Generator near the tree inside if you want it.
Head back to the Shelter now to restock before continuing. The next section has some of the toughest fights in the sector.
The Lim Regulator
Make your way back to the three-tree room and insert all three Gen Chips. The trees will sprout new branches, creating a path to the door on the far side. Hack the door to enter.
Inside, IDUS wakes up a Sector Guard, the same boss type from Sector 01, accompanied by two Lancers. Take the Lancers down first, as their mid-range attacks make dodging the Sector Guard’s missile barrages much harder. Once they’re gone, focus on hacking the Sector Guard and targeting its back.
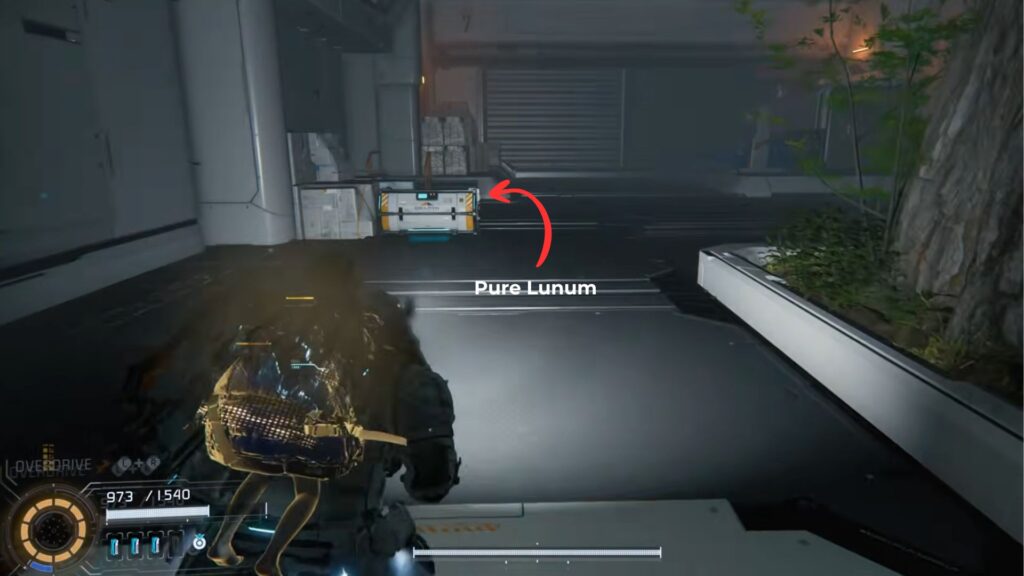
After the Sector Guard is destroyed, move into the next room. Check the chest immediately after the fight to find Pure Lunum.
Go through the unlocked door and take a right past the tangle of vines to find a Holo-Wall. Inside, look in the corner for a tablet with the Strong Soldiers information file. The Safe Box inside rewards 500 Lunafilament.


Continue until you reach a room with a circular platform surrounded by lab equipment. Check the corner near the broken guard rail for an Upgrade Component.
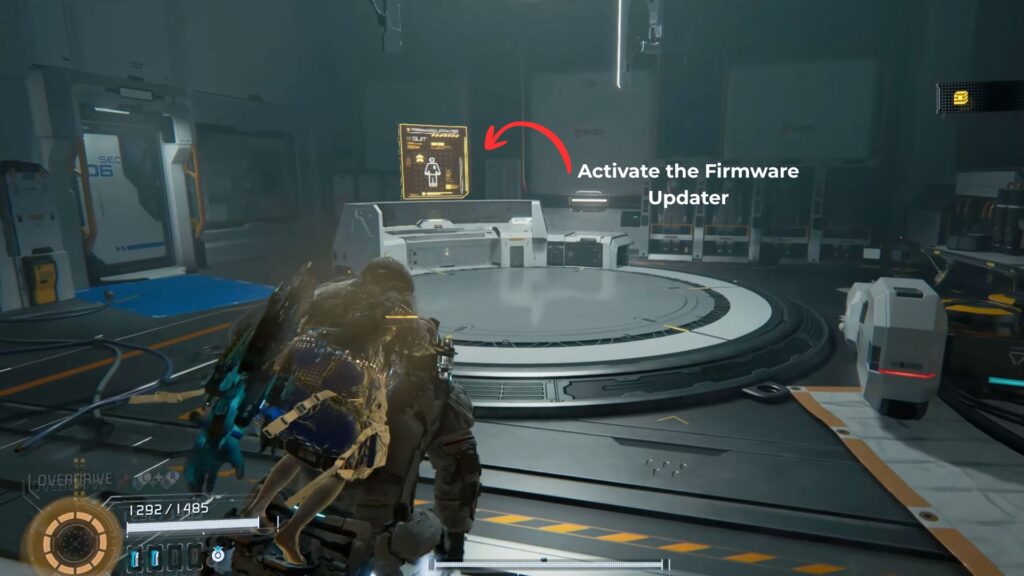
Step onto the platform and activate the Firmware Updater, which adds an extra slot for both Attack Units and Support Units. The room beyond has a Shockwave Gun and a Charge Piercer on the floor to fill those new slots. Right beside that room is the Lim Regulator. Activate it to clear the branches from the central lift.
With both regulators now active, head back and use the central lift to reach the next floor. Block 4: Soil Research is next.
Center Hall – Upper Floor
Once the elevator reaches the top, and you will notice the locked Soil Research door.

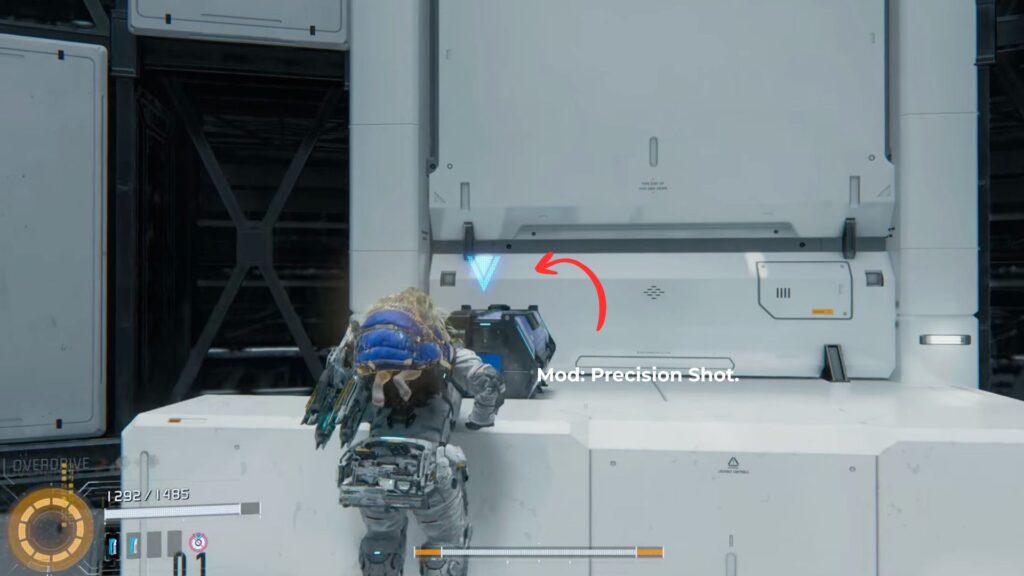
On the side of the lift opposite the stairs, you’ll spot a ledge you can jump across to. There’s a blue chest here containing Mod: Precision Shot.
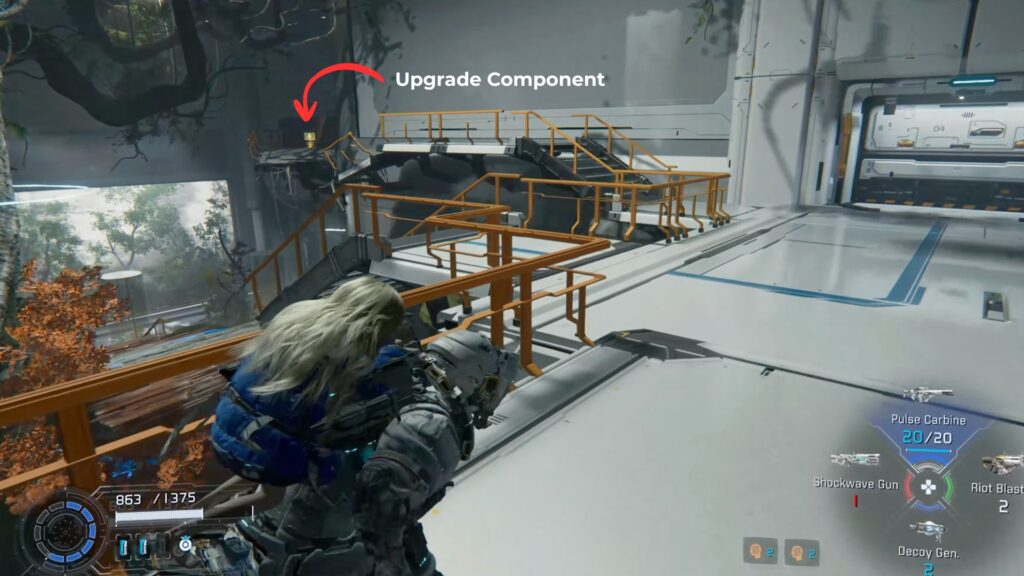
Drop down from this ledge to a lower one just beneath it to pick up an Upgrade Component. You can also go across another ledge for another set of 3x Upgrade Components. After grabbing it, head down into the room below and use the elevator to come back up.
Now, move to the left side of the stairs and jump over the large roots to find another hidden Upgrade Component.
With everything collected, go up the stairs and follow the hallway all the way to the end to trigger a scene. After it finishes, you’ll unlock Another Pragmata: Meet the trapped girl trophy and receive a new objective, to find the Underground Lim Regulator.

Turn back and head down the hallway. As you descend the stairs, the door on your left will now be open. Go through it to enter the next area: Soil Research.
Block 4: Soil Research
Go back along the hallway from the Central Lift upper floor and head down the stairs. The Soil Research door will be open now. Walk through it into a small storage room that leads outside.
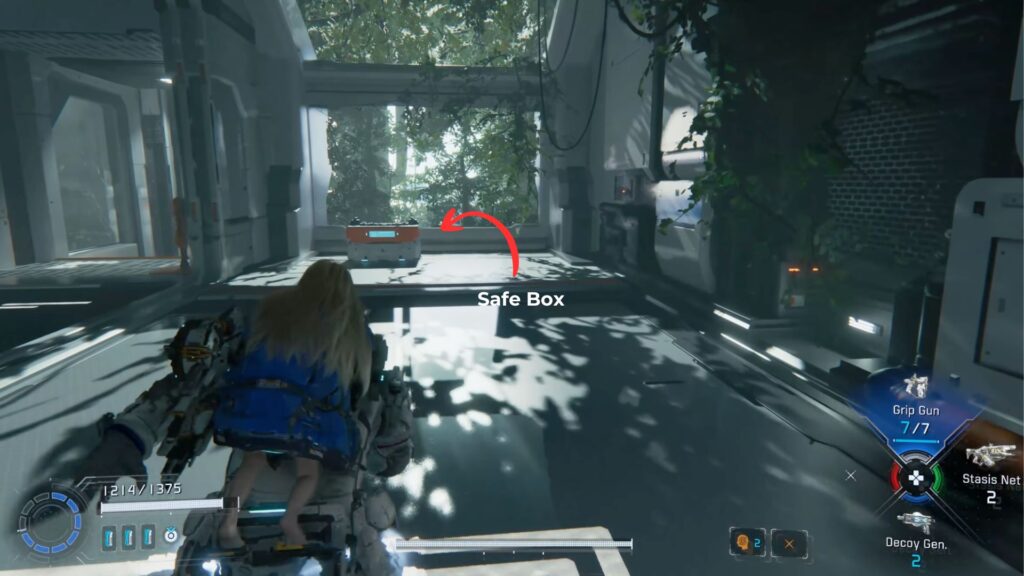
Follow the path ahead until it splits. Go right first to reach a dead end with a Safe Box holding a Cabin Coin. Come back to the split and take the left path all the way down to a beach. A cutscene will play.

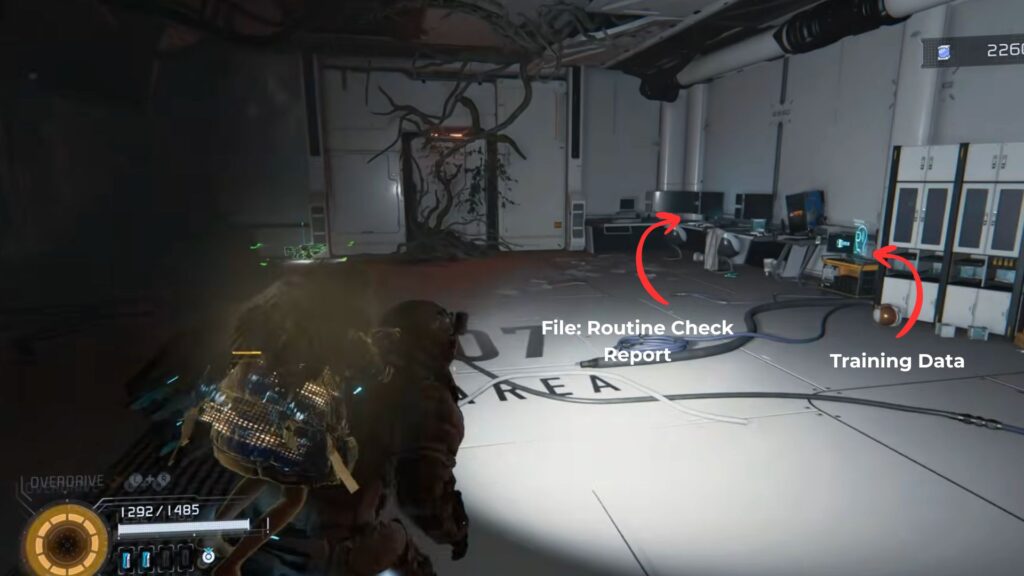
After regaining control, turn around and check the right side of the tunnel entrance. Lunafilament Mass are blocking a small lift. Have Diana use her Lim Eraser to clear them so you can ride it down. The room at the bottom holds Training Data and File: Routine Check Report. Come back up and make your way to the beach.


Follow the beach path forward. When you notice a large rock on your right , check it because it is hiding an Upgrade Component.

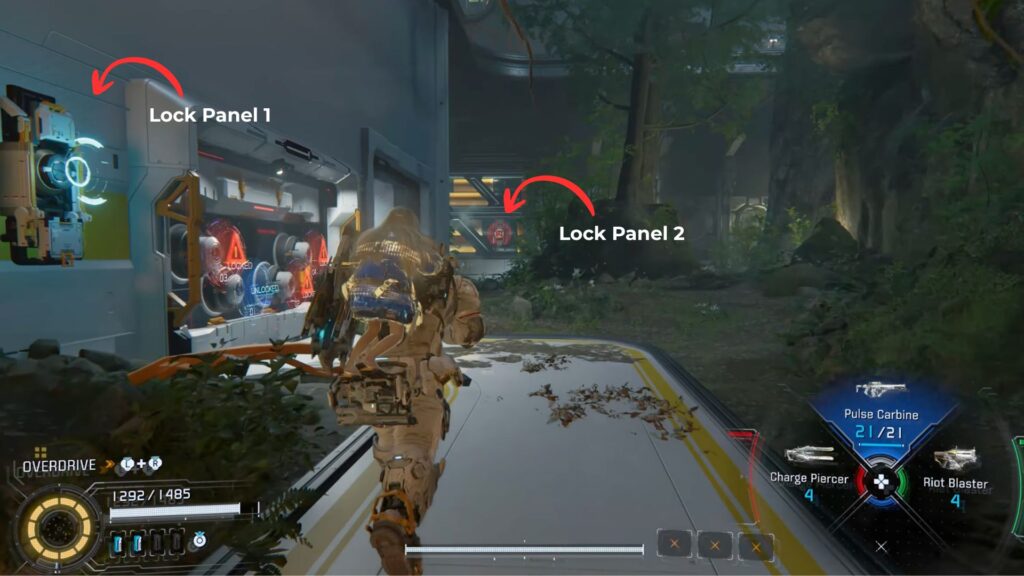
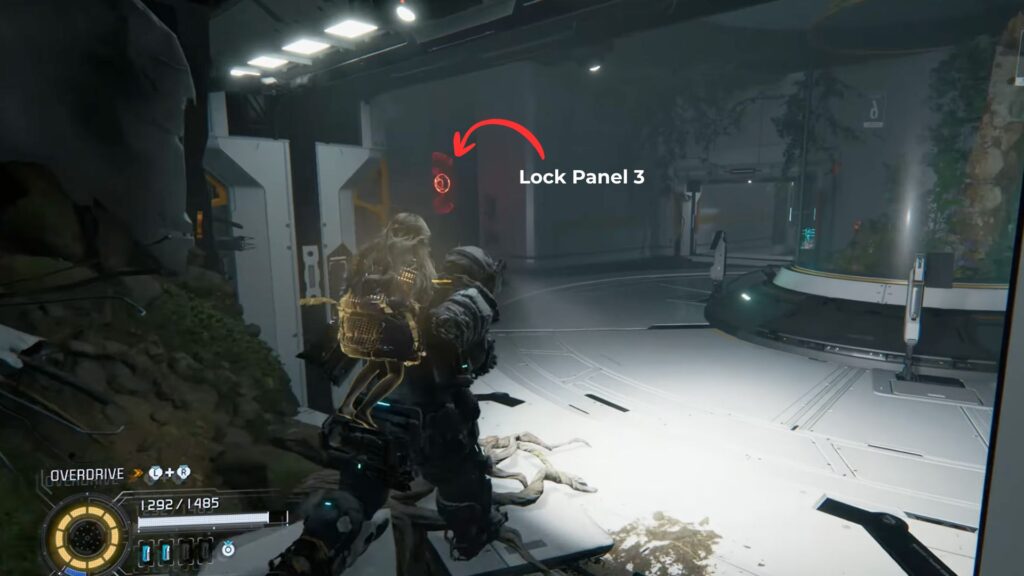
Continue until the cave entrance comes into view. Step inside and you will immediately notice a door sealed with four locks. Four red panels scattered through the cave are what you need to hack to break it open.
The first panel is right next to the locked door on the left side. The second one is further into the cave and is being watched by two Walkers. Take them out and hack the panel.

Facing the locked door, look directly opposite and you will notice a small cave opening that blends into the wall. Head through and follow the passage to a larger chamber.
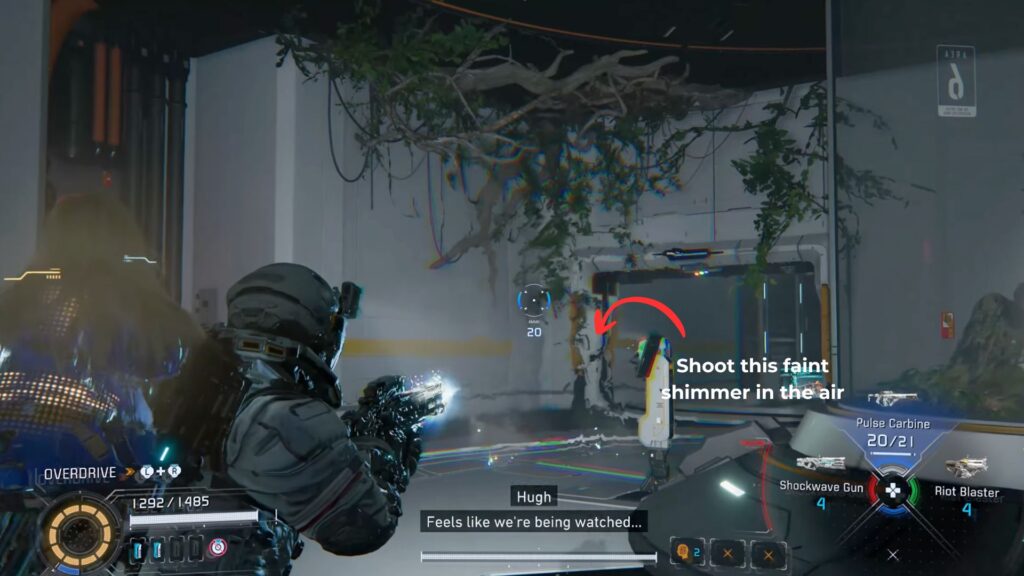
A Creeper is lurking inside. These enemies stay chill until provoked, so keep an eye out for a faint shimmer in the air. Shoot it to force the Creeper into the open, then put it down. The third panel is mounted on the chamber wall.

Continue through the following hallway and you will come across the Photon Laser, a beam weapon that deals more damage the longer you keep it focused on a target. Ride the life at the end upward.
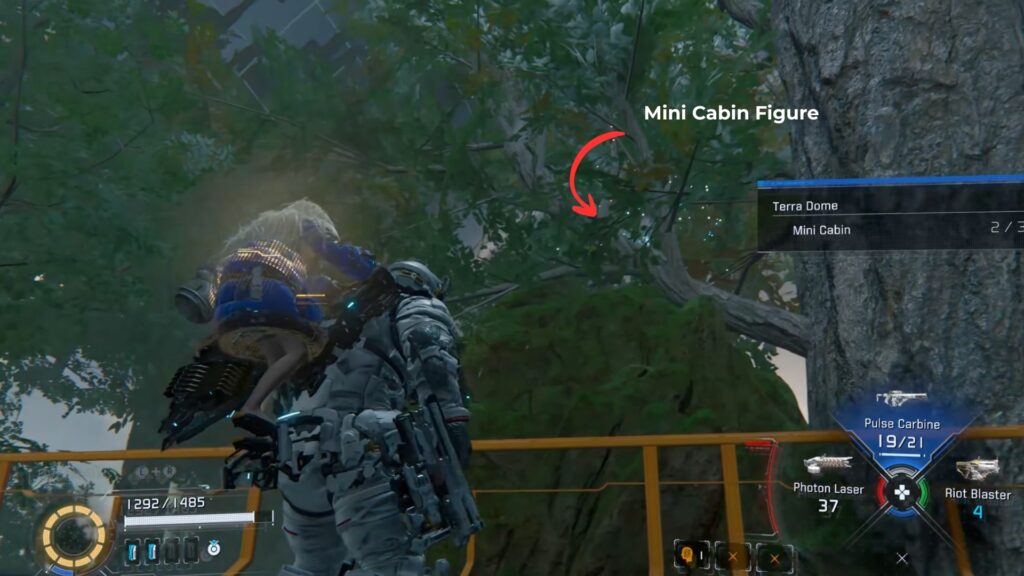
Two Watchers and an Impeder are positioned at the top. Clear them before entering the building. On the tree branch to your left, you will also find a Mini Cabin figure.


With the hallway cleared, head in the direction opposite where the Bomber was standing. A Safe Box there holds three Upgrade Components.
The fourth panel is located at the Bomber’s previous position. Hack it and the sealed door at the cave entrance will unlock.

Return to the main route. At the edge of the small platform, find the gap in the railing and hop down to the ledge underneath for a Safe Box containing 400 Lunafilament.
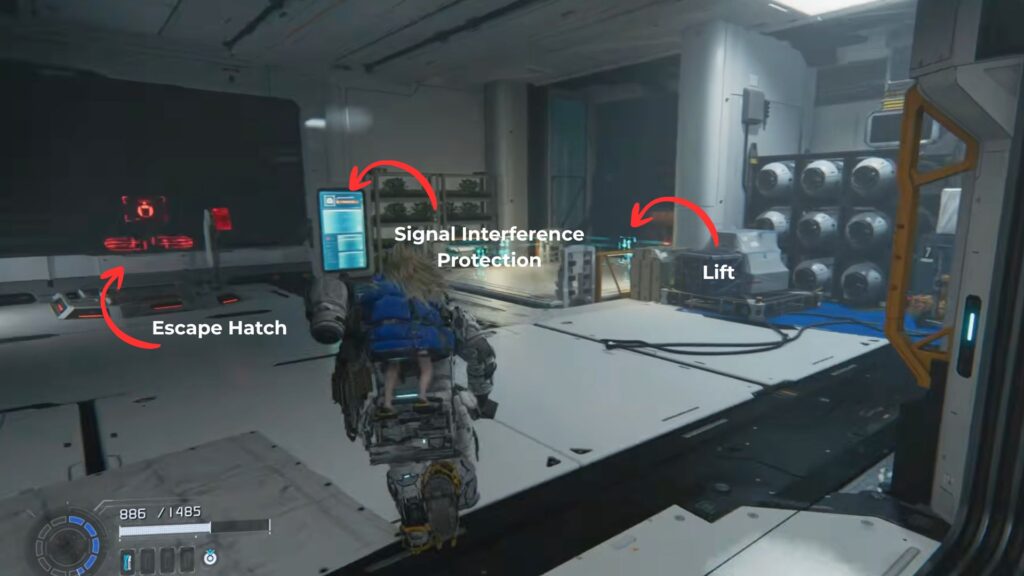
Drop back to the main path and return to the now-unlocked door. Inside you will find an Escape Hatch, a blue panel labeled “Signal Interference Protection,” and a lift. Take it down.
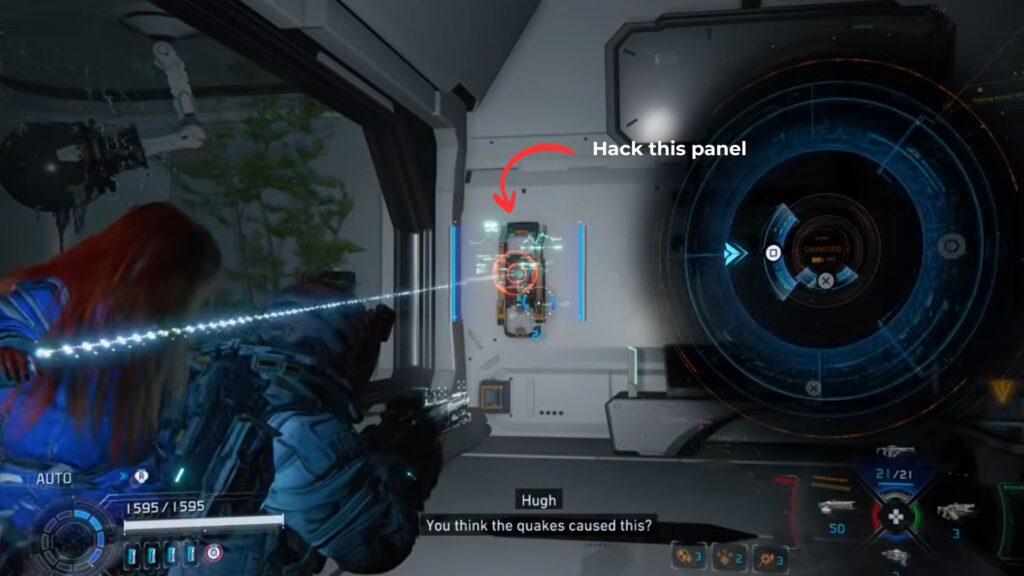
At the bottom, a jammer device sits in your path. It pulses rings of purple electricity that disrupt Diana’s hacking ability on contact. Time your movement to hop over the pulse, then hack it to permanently disable it.

Turn back toward the lift and look at the wall to its left, it is a Holo-Wall. Step through it to find a concealed room containing File: Dad’s Room and a Safe Box with Lunafilament inside.
Near the forward door, Diana can remove another cluster of Lunafilament Mass clinging to the wall. A Safe Box with more Lunafilament is stashed behind them. Hack the door and continue ahead.

Security Room
The path here is dim but straightforward. Follow it until a Safe Box comes into view. However, a Creeper is waiting close by to ambush you. Wait for the shimmer, take it down, then claim the three Upgrade Components inside the box.

A console sits at the dead end beyond it. Activating it causes the tree to shrink, clearing a previously blocked doorway. Drop to the lower floor and go through the next door.
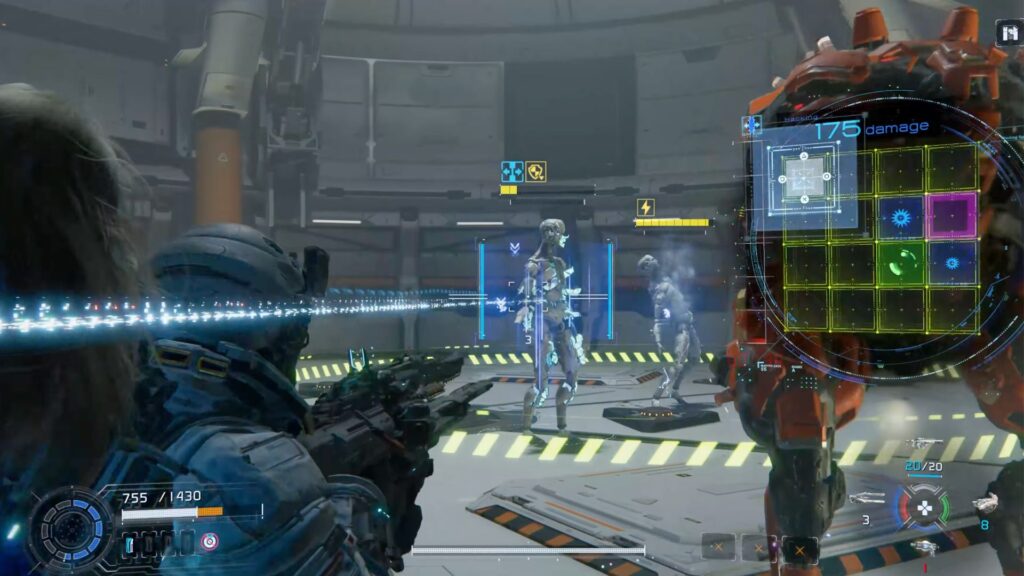
You are now in a security room. A Crusher MK-II enters alongside a jammer hidden behind a metal column. Prioritize the jammer, then deal with the Crusher. A follow-up group of two Walkers and a Walker MK-II will then appear. Take them all out to open the door ahead.
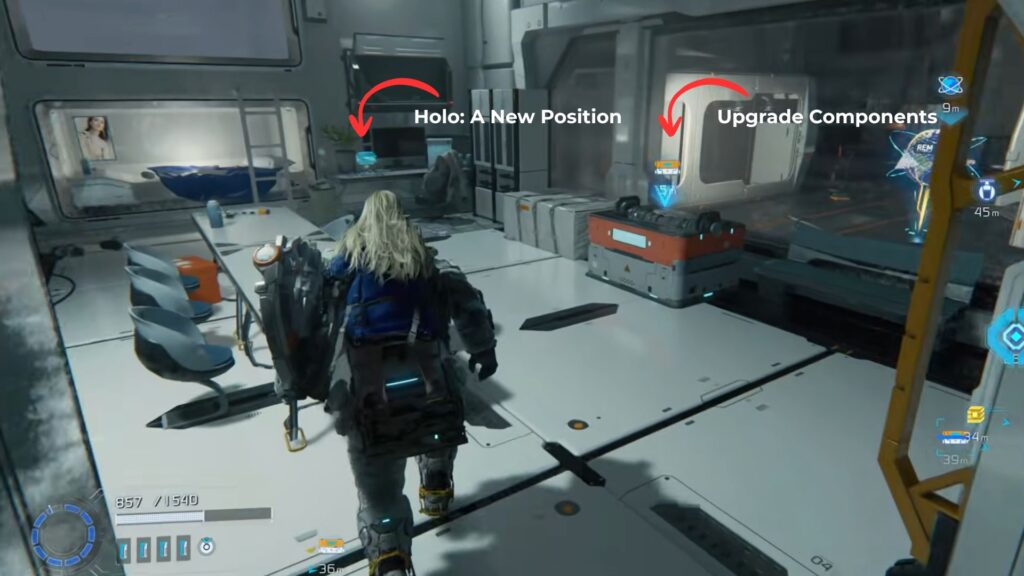
On the other side you will see a holographic map on your right. Go through the door directly across from where you entered to find a Safe Box carrying three Upgrade Components and Holo: A New Position. Return to the map area and hack the door on the right side.
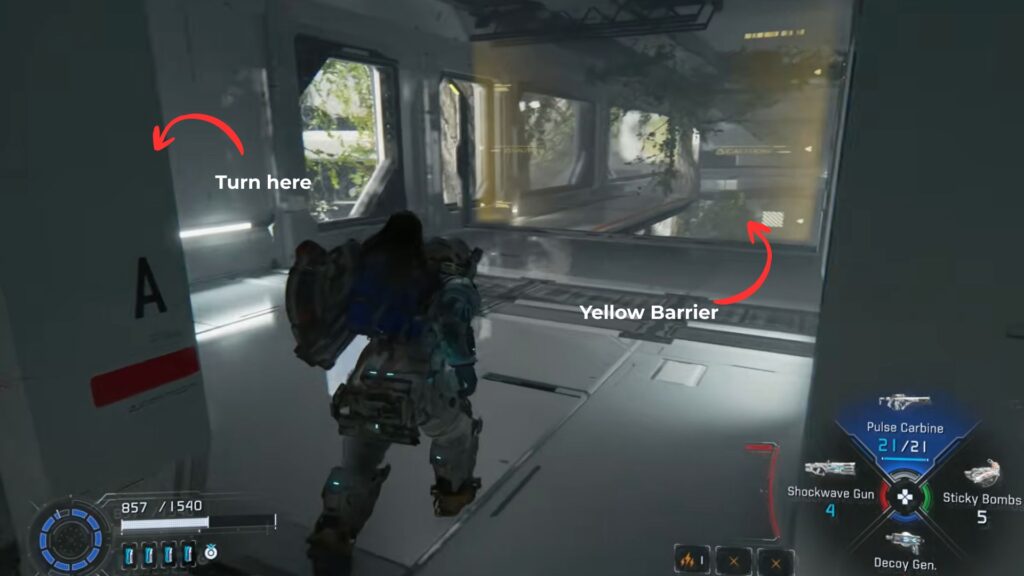
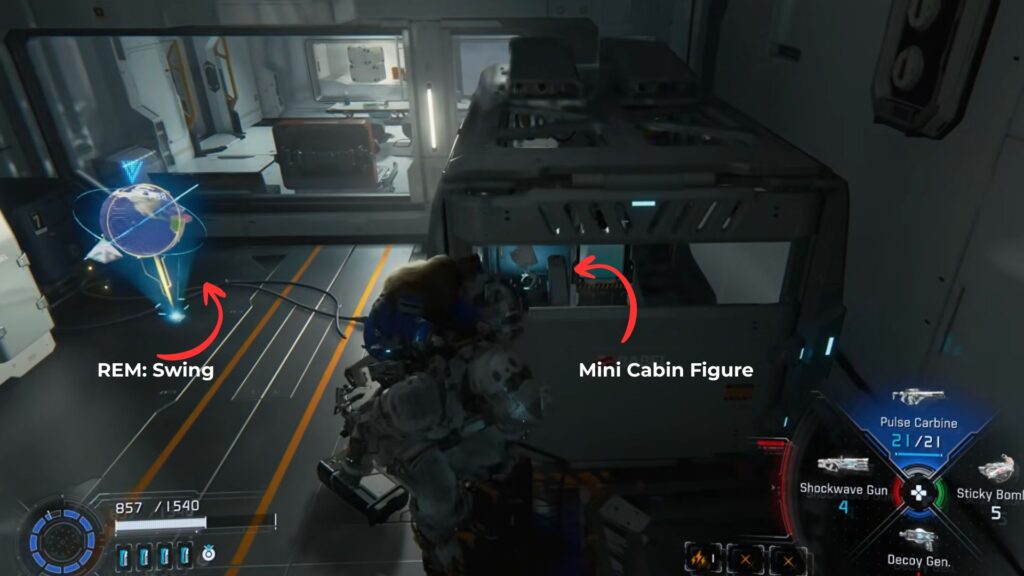
Inside the next room a yellow security barrier blocks the path forward. Before crossing it, check the wall beside the door you entered through. Lunafilament Mass are covering a climbable section. Clear it and then drop into the room at the far end. REM: Swing is waiting for you there.
Check the container beside it for a Mini Cabin Figure, using nearby crates for a better vantage point if needed. Hack the door to return to the map room.

Re-enter the security area through the opposite door and drop to the lower floor. A two-wave enemy encounter is about to begin, and each wave brings its own jammer. Disabling the jammer quickly each time keeps Diana’s hacking online throughout the fight.
- Wave 1: Two Impeders and one Lancer, jammer is near the exit door.
- Wave 2: Two Bombers, jammer is near the big central pillar.
After both waves are finished the exit door opens. Before leaving, cross to the large window on the far side of the room and hack the panel beside it. A ledge will rise up, jump onto it to reach a Safe Box containing three Upgrade Components. From there you can also leap across to a second Safe Box near the entrance holding a Cabin Coin.

Pass through the ground-level door into a dark room and open the chest inside to collect Pure Lunum.
Scan the area for a blast door left partially open. Climb the crate in front of it, pull yourself onto the top of the door, and drop behind it. Diana can clear Lunafilament Mass on the back wall to reveal a Safe Box with 300x Lunafilament. Hack the nearby panel to lower the blast door and open the way forward.

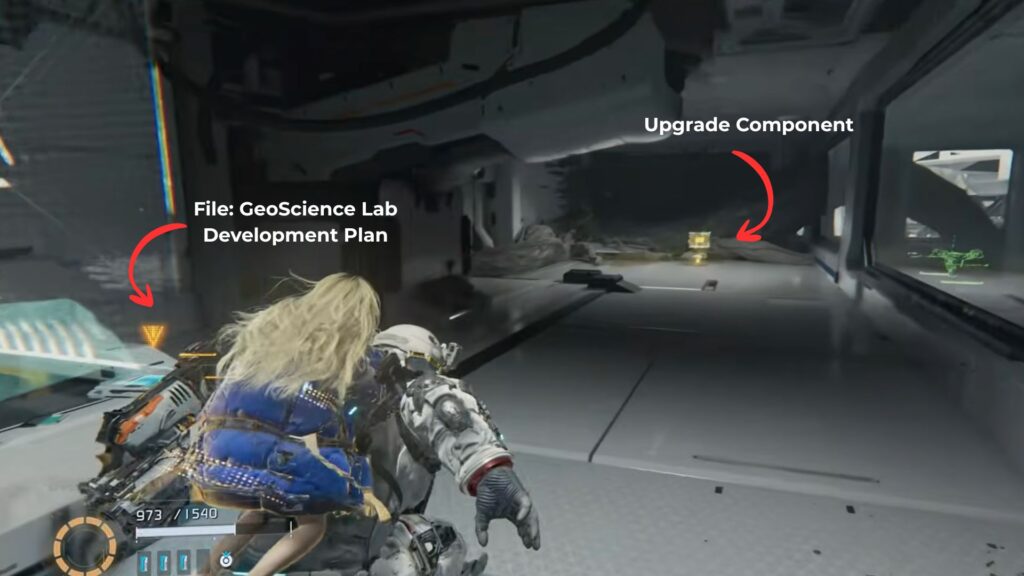
The final room in this section has a lift. Before riding it down, check the door behind it. A small side room holds an Upgrade Component and File: GeoScience Lab Development Plan. When you are ready, take the lift down to begin the next section.
Block 5: Terrarium
Step off the lift and take a moment at the Shelter after activating the Escape Hatch to recover. Before moving on, check the area behind the lift shaft for an Upgrade Component.
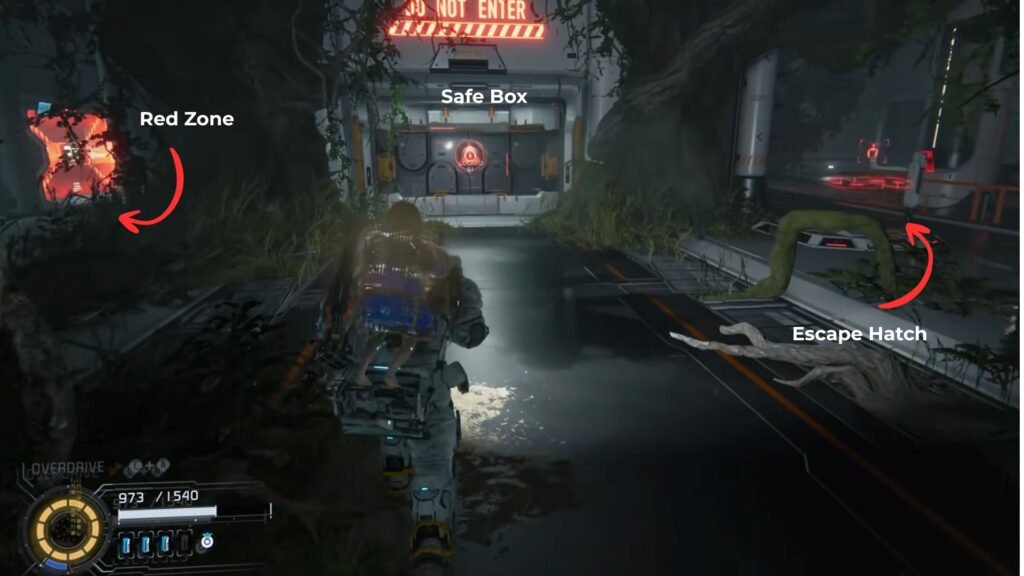
A locked door sits beside the Escape Hatch. To its left is a Red Zone requiring a Red Zone Key to enter. If you do not have one on hand, mark the location and return once you do.
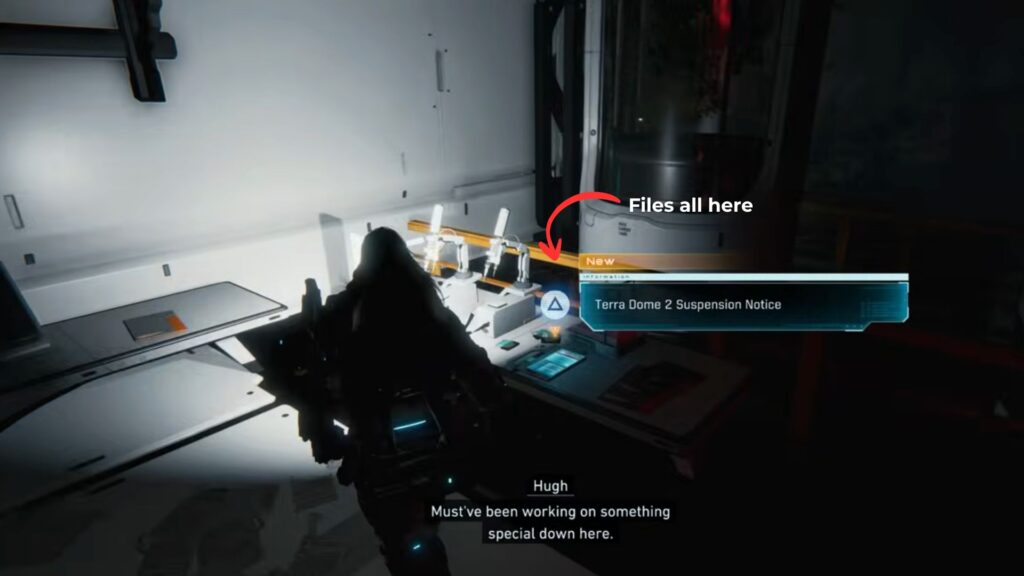
Head right along the path past the locked door. You will come across a desk holding three files:
- File: Terra Dome 2 Suspension Notice
- Email: Message Delivery Failure
- Email: Help Me
A red panel is mounted on the wall nearby. Hack it to get the door open. Walk through and drop into the hole at the end. A cutscene kicks in, followed immediately by a boss encounter.
Boss Fight: Garden Keeper
The Garden Keeper is a large, agile scorpion-like machine that attacks from both close and long range. Hacking it exposes weak points on its face, stomach, and tail tip, so keep targeting those whenever they are open. On the ground, watch out for its arm swings, leg stomps, and tail slams. When it gets stuck in the ground after a miss, that is your chance to deal free damage.

Its most dangerous move is a forward lunge followed by the tail driving under its body, which triggers a delayed electric explosion. Back away fast the moment you see it coming.
At around half health, the Garden Keeper climbs the arena walls and changes its attack style. It fires a splitting laser that breaks into five beams sweeping in different directions, so find the gaps and move into them. It also launches homing missiles from the walls, which you can hack and redirect back at it.
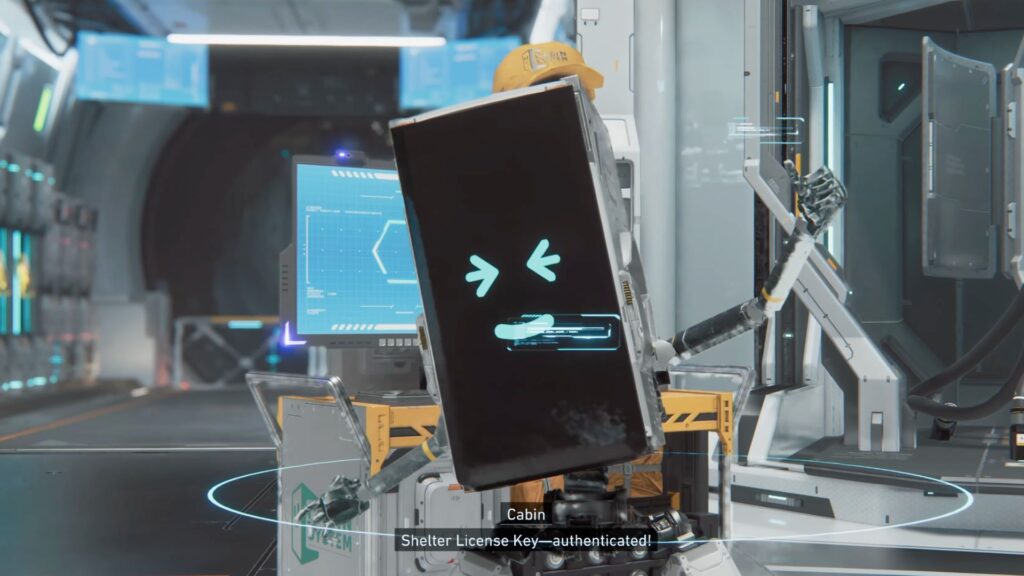
Stay mobile, keep hacking to expose the weak points, and learn its patterns. Taking it down rewards you with Lunafilament and a Shelter License Key, after which a cutscene at the nearby terminal brings you back to the Shelter.
The Shelter Level 3
Back at the Shelter, Cabin will point out the License Key you brought back. The Shelter upgrades to Level 3 and unlocks the following:
- REM Replicator Sigma is now active
- New Specialist Stamp Board added for the Cabin’s Stamp Club
- New Training Simulations available
- New items and upgrades at the Unit Printer
- Expanded upgrade levels for health, weapons, and hacking


Before moving on, run some Training Simulations to build up your Cabin Coins. Check the Specialist Stamp Board too since it has a Red Zone Key, which lets you into the Red Zone back in the Terrarium that you could not access before.
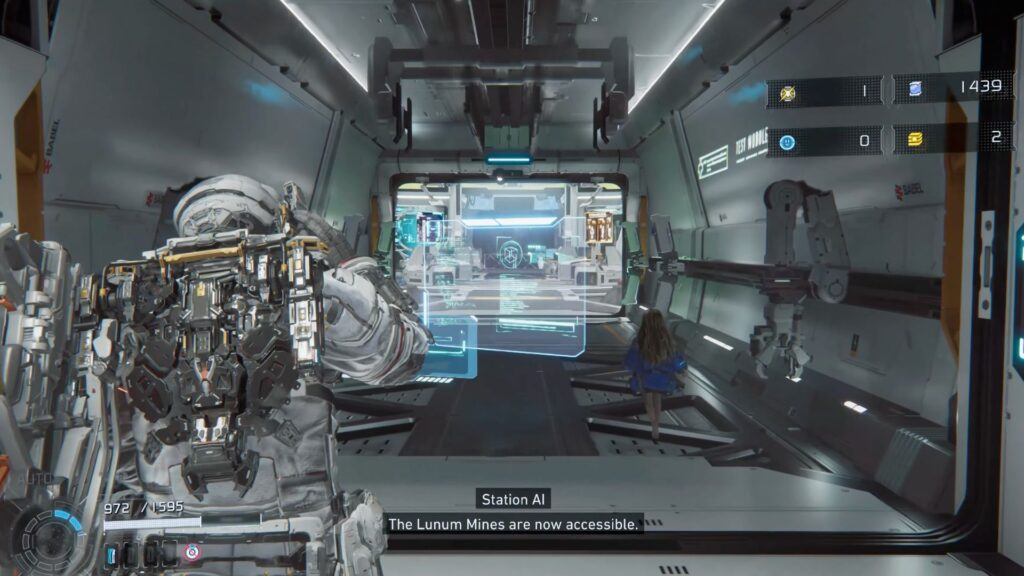
When you are ready, go to the tram and pick Lunum Mines to continue the story.
All Collectibles in Pragmata Sector 03: Terra Dome
| Category | Item | Location/Notes |
|---|---|---|
| Mods | Mod: Cheap Shot | Blue chest next to the desk in the room before the hand lift – Increases attack by 15% from behind |
| Mod: Aggressive Defense | Adjacent room inside the lab in Gen Chip 1 area – Reduces damage taken by 20% while aiming | |
| Mod: Collateral Damage | Room next to the large glass wall after the Red Zone in Eco Modeling Lab – Critical Shot damage spreads to nearby enemies at 30% | |
| Mod: Precision Shot | Blue chest on the ledge opposite the stairs on the upper floor of Center Hall | |
| Weapons | Pulse Carbine | Top of the hand lift in the Plant Factory |
| Photon Laser | Hallway past the third cave panel in Soil Research | |
| Tactical Units | Sticky Bombs | Top of the staircase near the Gen Chip 1 device |
| Charge Piercer Attack Unit | Unit Printer in Plant Factory Area-3 | |
| Riot Blaster Tactical Unit | Unit Printer in Plant Factory Area-3 | |
| REMs | RC Car REM | Hidden cave past the Walker and Lunafilament Mass, Gen Chip 1 area |
| Balloons REM | Past the small tree after exiting the Gen Chip 2 room | |
| REM: Swing | Dropped into the room past the yellow security barrier in Security Room section | |
| Hacking Nodes | Hacking Node: Confuse | Before the Area-2A/2B split in the Plant Factory – Turns hacked enemies into temporary allies |
| Mini Cabin Figures | Mini Cabin Figure | On a branch near the ceiling in the Eco Modeling Lab |
| Mini Cabin Figure | Tree branch near the top of the cave lift in Soil Research | |
| Mini Cabin Figure | Container beside REM: Swing in Security Room section | |
| Abilities | Auto-hacking | Unlocked via Shelter Level 2 Key at the start of the sector |
| Bot Scan | Unlocked via Shelter Level 2 Key at the start of the sector | |
| Object Scan | Unlocked via Shelter Level 2 Key at the start of the sector | |
| EC Thrusters | Unlocked via Shelter Level 2 Key at the start of the sector | |
| Keys | Red Zone Key | On the desk in the lab built into the wall, Gen Chip 1 area |
| Shelter License Key | Reward for defeating the Garden Keeper boss | |
| Upgrade Components | Upgrade Component | Behind stacked boxes at the top of the ramp after the tram |
| Upgrade Component | On the white metal arm — cross via large root and metal connector | |
| Upgrade Component | Next to the tram pod near the orange beam — Walker guarding it | |
| Upgrade Component | Broken catwalk along the wall after crossing the regrown branch in Eco Modeling Lab | |
| Upgrade Component | Behind lasers in the first Holo-Wall — hack the outside terminal to deactivate | |
| Upgrade Component | Opposite side of the room from the Area Guide tablet, Gen Chip 1 lab | |
| Upgrade Component | After clearing the first lightning room in the Eco Modeling Lab | |
| Upgrade Component | Darkened room above the small platform left of the Escape Hatch, Eco Modeling Lab | |
| Upgrade Component | Corner near the broken guard rail in the circular platform room, Eco Modeling Lab | |
| Upgrade Component | Ledge directly below the Mod: Precision Shot chest in Center Hall upper floor | |
| 3x Upgrade Components | Across another ledge in the upper Center Hall | |
| Upgrade Component | Left of the stairs past the large roots in the upper Center Hall | |
| Upgrade Component | Hidden behind the large rock on the beach path in Soil Research | |
| Upgrade Component | Side room behind the lift just before Block 5 | |
| Upgrade Component | Behind the lift shaft after the Escape Hatch at the start of Block 5 | |
| Other Items | Lunafilament | On top of the floating crate near the Terra Dome entrance |
| Training Data | Broken Cabin unit in the room before the hand lift in Plant Factory | |
| Training Data | Room at the bottom of the small lift on the beach — Diana clears Lunafilament Mass | |
| Pure Lunum | Chest immediately after the Sector Guard fight in Eco Modeling Lab | |
| Pure Lunum | Same room as Mod: Collateral Damage after the Red Zone | |
| Pure Lunum | Chest in the dark room past the ground-level door in Security Room section | |
| Gen Chip 1 | Device past the Crusher MK-II near the top of the stairs in Eco Modeling Lab | |
| Gen Chip 2 | Device in the room after the two lightning rooms in Eco Modeling Lab | |
| Gen Chip 3 | Under the tree beside the stairs in Eco Modeling Lab | |
| Bosses | Garden Keeper | Large scorpion-like machine boss — hack to expose weak points on face, stomach, and tail tip; redirects homing missiles back at it when hacked |