The Hammer is one of Monster Hunter Wilds‘ most enjoyable and rewarding weapons to master, delivering the kind of satisfying, bone-crunching impact that few other weapons can match. Landing a KO on a monster never gets old, and with the new mechanics introduced in Wilds, the Hammer is stronger and more versatile than ever, provided you have the right build to back it up. In this guide, you will find the best Hammer builds in Monster Hunter Wilds.
*This guide was updated for Title Update 4
Hammer Gameplay and Combo
Wilds significantly expands Hammer’s mobility and versatility, with Offset Attacks, Mighty Charge, Overhead Smash, Spinning Bludgeon, and Charged Step forming the backbone of its new mechanics.
Basic Combo
The Triangle → Triangle → Triangle combo serves as the best all-purpose combo starter. Each swing now allows for repositioning mid-combo, which is a substantial improvement to Hammer’s overall fluidity.
On the third Triangle input, holding the button and timing it precisely as a monster attacks will activate an Offset Attack, one of Hammer’s most powerful new tools for countering and maintaining offensive momentum.
Spinning Bludgeon
Spinning Bludgeon has become significantly more accessible, as it can now be entered after any attack by pressing Triangle + Circle. This makes it an excellent combo extender and a smooth transition point into Mighty Charge, keeping your offensive flow consistent.
Mighty Charge
Mighty Charge is Hammer’s highest damage move and should be incorporated after every combo where possible. Execute it by holding R2 + Triangle + Circle, and it can be chained naturally from basic combos, Big Bang, upswing combos, and Spinning Bludgeon alike.
Charged Step
Pressing Circle while charging (R2) performs the Charged Step, which grants improved mobility and slight invincibility frames, making it a useful tool for repositioning or avoiding attacks without breaking your charge state.
Low Rank Hammer Build & Progression

The default Hope Armor is an excellent starting point, providing Divine Blessing Level 3 for reliable survivability throughout Low Rank. This set will serve you well until you have defeated Ajarakan and Guardian Doshaguma, at which point you can begin transitioning to stronger options.
The primary focus in Low Rank should be on keeping your weapon upgraded. The Jail Hammer I is the best early choice available, offering Paralysis status alongside good sharpness and solid raw damage, a well-rounded combination that will carry you comfortably into early High Rank content.
Best Hammers for Low Rank
- Jail Hammer II
- Balahara Hammer II
Early High Rank Hammer Build & Progression

After defeating Guardian Rathalos, replace the current armor pieces with G. Rathalos armor to gain access to Weakness Exploit, one of the most impactful skills available for boosting affinity and damage when striking monster weak points.
Crafting the Exploiter Charm as early as possible is strongly recommended, as it is a core component of stronger builds later in progression and is well worth prioritizing from this stage onward.
This setup will comfortably carry you through higher-difficulty content, including Tempered Apex monsters, your primary targets for farming late high rank equipment and decorations.
The Jail Hammer remains the strongest choice at this stage. However, several solid alternatives are now available depending on your preferred playstyle.
Best Hammers for High Rank
- Jail Hammer IV
- Albirath Bludgeon II
- Jin Dhauda I
- Shell Hammer I
- Whuchtblick I
Best High Rank to Endgame Hammer Builds
These builds are the best options to carry you from the end of the story quests and help increase your HR until you reach true endgame monsters, such as arch-tempered dragons and Gogmazios.
Second Wind Gore Hammer Build
One of the best build options to get you to the endgame, built around the Second Wind and Black Eclipse set skills.
Black Eclipse provides a significant Affinity boost for consistent critical hits, while Second Wind grants a secondary stamina bar, a critical addition for Hammer, as charging attacks continuously drain stamina and would otherwise interrupt Maximum Might uptime.
Counterstrike is a natural fit for Hammer, boosting attack damage after successfully landing an Offset Attack. Agitator further increases raw damage and critical hit chance whenever the monster enters an enraged state.
At this stage, you will already have the option to craft an Artian weapon, which will be the best option. Blast or Paralysis are the recommended status options for the Artian Hammer. For maximum damage output, use full Attack infusion with a 4 Attack + 1 Sharpness reinforcement.
TU3 Azure Hammer Build
Title Update 3 introduced new armor options that enable an even stronger skill combination for Hammer.
This build retains the core damage skills from the previous setup, full Critical Boost, Weakness Exploit, Counterstrike, and Maximum Might, while adding full Agitator, Stamina Surge, and Quick Sheathe on top, along with improved overall defense.
The 2-piece Lagiacrus set bonus activates Azure Bolt, which contributes a nice additional damage boost throughout hunts.
The primary distinction between this build and the previous one comes down to total affinity. If maximizing affinity is your priority, the previous build remains the better choice.
That said, both builds are fully capable of carrying you through endgame content, the decision ultimately comes down to personal preference.
Best Endgame Hammer Builds in MH Wilds
The builds below are the best options for Hammer for endgame content in the latest update. Choose the one that best fits your playstyle.
Endgame Latent Second Wind Hammer Build
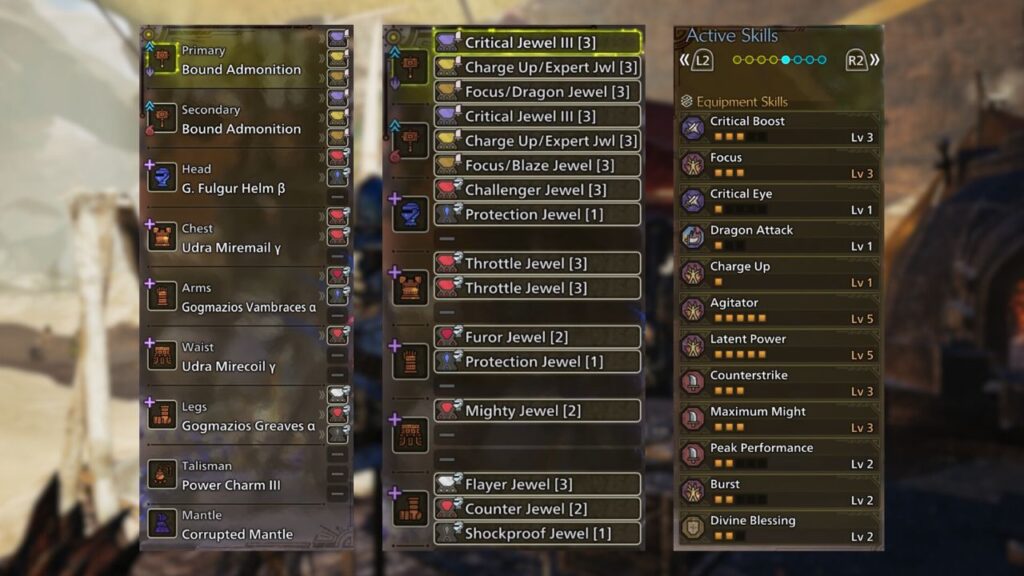
After defeating Gogmazios, you have reached the true endgame, and this build is designed to match the challenges that lie ahead.
The build revolves around three synergistic skills: Second Wind, Latent Power, and Bad Blood, all of which stack additional Affinity for consistently high critical hit output. Make sure to use the Gogmazios Vambraces Alpha to activate Second Wind.
It is strongly recommended to craft Gogmartian Hammers in all available elements. Having a full elemental roster allows you to adapt to any monster’s weakness on the fly, ensuring you are always bringing the most effective weapon into any given fight.
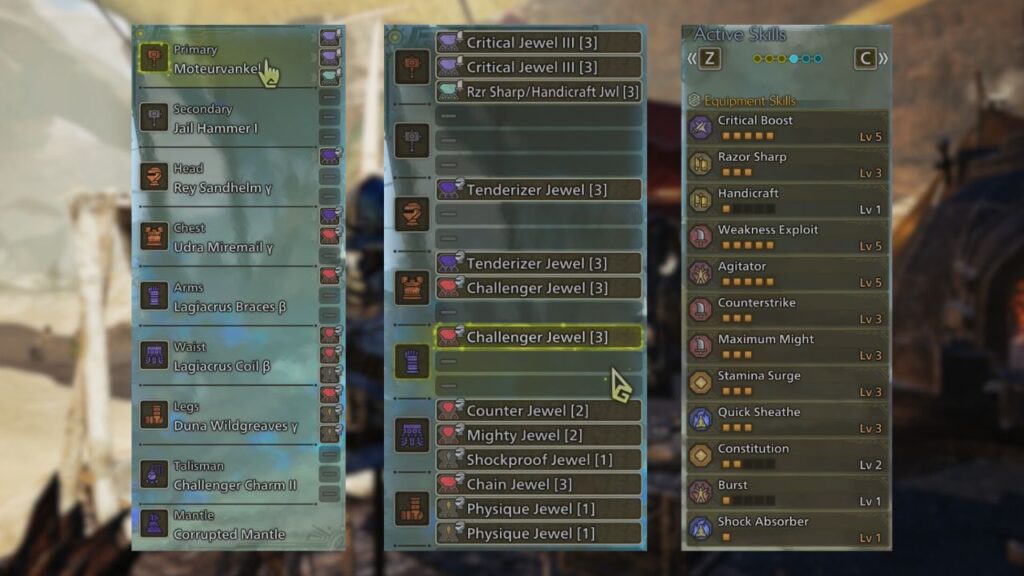
Endgame Raw Latent Hammer Build
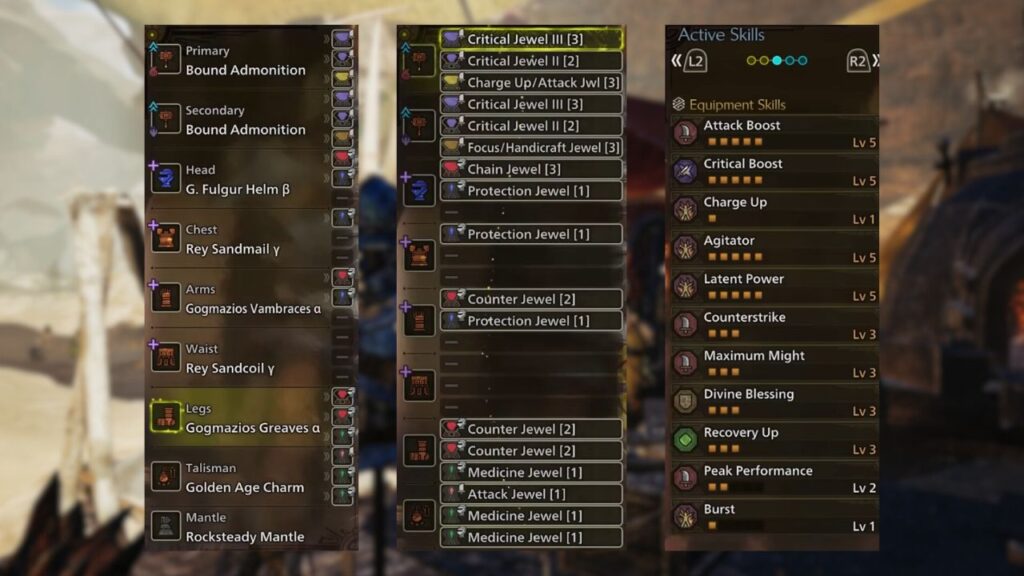
This build follows a similar structure to the previous one but swaps Udra’s set skills for Rey Dau’s, resulting in higher overall damage output at the cost of requiring favorable charm rolls.
Latent Power remains the centerpiece, now further enhanced by Rey Dau’s Thunderous Roar set skill, which extends Latent Power’s active duration for greater uptime.
Combined with Attack Boost Level 5 and Agitator, this build delivers noticeably higher damage than the previous build. As before, the Gogmazios Vambraces Alpha is mandatory to keep Second Wind consistently active.
The main drawback of this build is its reliance on a god-roll charm, specifically Attack Boost Level 3 paired with Agitator Level 1. Obtaining this combination may require a significant investment of time and resources, so factor that in when deciding between this build and the previous alternative.
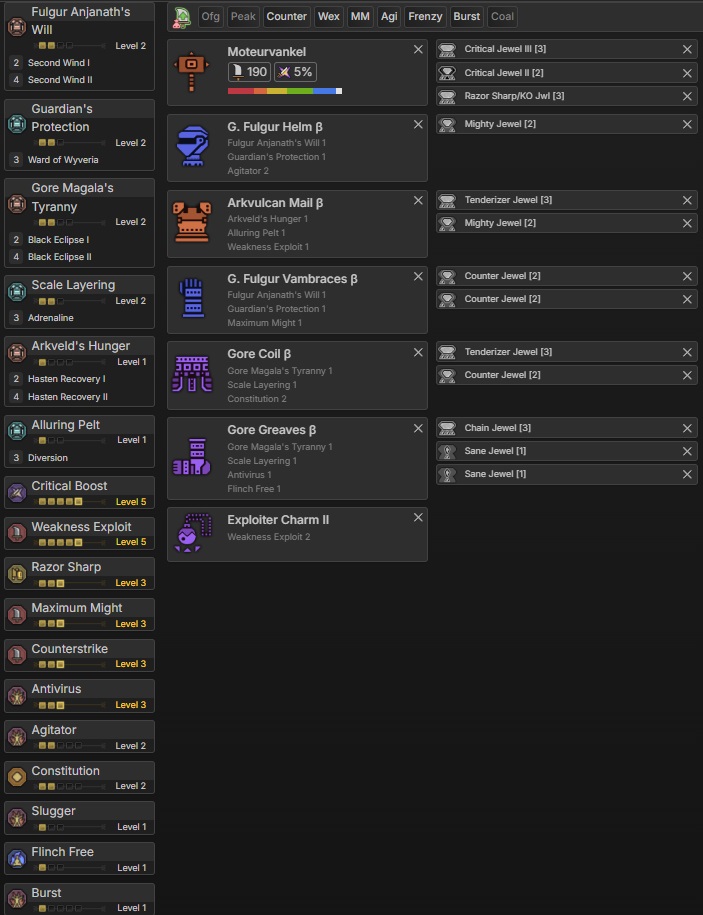
Endgame Gore Second Wind Hammer Build
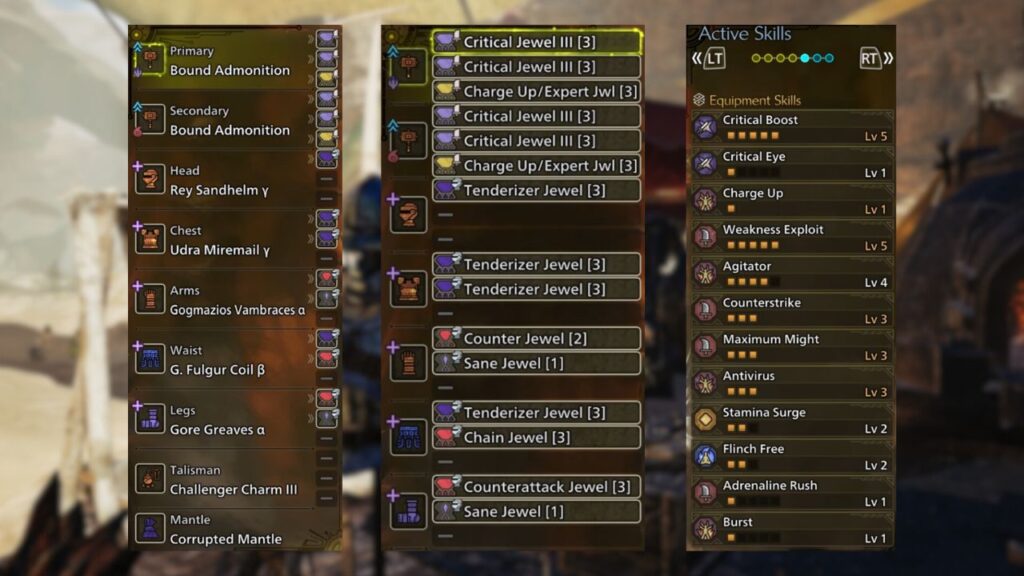
This build brings back Gore Magala’s skill set to maximize affinity so you can deal ultimate critical bonkers with your hammer. This is a reliable alternative if you prefer to avoid the charm RNG dependency of the previous build.
Black Eclipse and Second Wind serve as the primary skill duo, supported by maximum levels of Weakness Exploit, Maximum Might, and Antivirus, all working together to push affinity and damage to their highest possible values.
The Gore Magala’s Tyranny skill must be active on your Gogmartian Hammer for this build to function correctly.
While overall damage output falls slightly short of the god-roll RNG build, this setup still performs very well and offers a more accessible and consistent path to strong endgame performance.
Currently, these are the best Hammer builds in Monster Hunter Wilds as of the latest update (TU 4). This page will be updated as new meta builds emerge in future updates.